Common scenarios
Note
We recommend that you require your human users to use temporary credentials when accessing Amazon. Have you considered using Amazon IAM Identity Center? You can use IAM Identity Center to centrally manage access to multiple Amazon Web Services accounts and provide users with MFA-protected, single sign-on access to all their assigned accounts from one place. With IAM Identity Center, you can create and manage user identities in IAM Identity Center or easily connect to your existing SAML 2.0 compatible identity provider. For more information, see What is IAM Identity Center? in the Amazon IAM Identity Center User Guide.
You can use an external identity provider (IdP) to manage user identities outside of Amazon and the external IdP. An external IdP can provide identity information to Amazon using either OpenID Connect (OIDC) or Security Assertion Markup Language (SAML). OIDC is commonly used when an application that does not run on Amazon needs access to Amazon resources.
When you want to configure federation with an external IdP, you create an IAM identity provider to inform Amazon about the external IdP and its configuration. This establishes trust between your Amazon Web Services account and the external IdP. The following topics provide common scenarios to use IAM identity providers.
Amazon Cognito for mobile apps
The preferred way to use OIDC federation is to use Amazon Cognito
To enable the mobile app to access her Amazon resources, Adele first registers for a developer ID with her chosen IdPs. She also configures the application with each of these providers. In her Amazon Web Services account that contains the Amazon S3 bucket and DynamoDB table for the game, Adele uses Amazon Cognito to create IAM roles that precisely define permissions that the game needs. If she is using an OIDC IdP, she also creates an IAM OIDC identity provider entity to establish trust between an Amazon Cognito identity pool in her Amazon Web Services account and the IdP.
In the app's code, Adele calls the sign-in interface for the IdP that she configured previously. The IdP handles all the details of letting the user sign in, and the app gets an OAuth access token or OIDC ID token from the provider. Adele's app can trade this authentication information for a set of temporary security credentials that consist of an Amazon access key ID, a secret access key, and a session token. The app can then use these credentials to access web services offered by Amazon. The app is limited to the permissions that are defined in the role that it assumes.
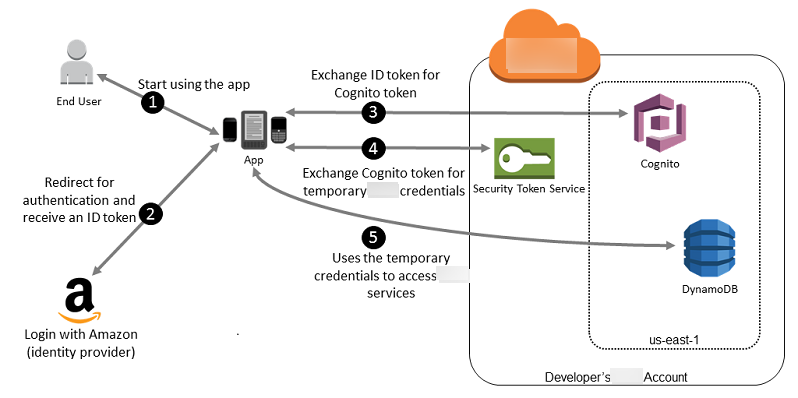
The following figure shows a simplified flow for how this might work, using Login with Amazon as the IdP. For Step 2, the app can also use Facebook, Google, or any OIDC-compatible IdP, but that's not shown here.
-
A customer starts your app on a mobile device. The app asks the user to sign in.
-
The app uses Login with Amazon resources to accept the user's credentials.
-
The app uses the Amazon Cognito API operations
GetIdandGetCredentialsForIdentityto exchange the Login with Amazon ID token for an Amazon Cognito token. Amazon Cognito, which has been configured to trust your Login with Amazon project, generates a token that it exchanges for temporary session credentials with Amazon STS. -
The app receives temporary security credentials from Amazon Cognito. Your app can also use the Basic (Classic) workflow in Amazon Cognito to retrieve tokens from Amazon STS using
AssumeRoleWithWebIdentity. For more information, see Identity pools (federated identities) authentication flow in the Amazon Cognito Developer Guide. -
The temporary security credentials can be used by the app to access any Amazon resources required by the app to operate. The role associated with the temporary security credentials and the assigned policies determines what can be accessed.
Use the following process to configure your app to use Amazon Cognito to authenticate users and give your app access to Amazon resources. For specific steps to accomplish this scenario, consult the documentation for Amazon Cognito.
-
(Optional) Sign up as a developer with Login with Amazon, Facebook, Google, or any other OpenID Connect (OIDC)–compatible IdP and configure one or more apps with the provider. This step is optional because Amazon Cognito also supports unauthenticated (guest) access for your users.
-
Go to Amazon Cognito in the Amazon Web Services Management Console
. Use the Amazon Cognito wizard to create an identity pool, which is a container that Amazon Cognito uses to keep end user identities organized for your apps. You can share identity pools between apps. When you set up an identity pool, Amazon Cognito creates one or two IAM roles (one for authenticated identities, and one for unauthenticated "guest" identities) that define permissions for Amazon Cognito users. -
Integrate Amazon
Amplify with your app, and import the files required to use Amazon Cognito. -
Create an instance of the Amazon Cognito credentials provider, passing the identity pool ID, your Amazon Web Services account number, and the Amazon Resource Name (ARN) of the roles that you associated with the identity pool. The Amazon Cognito wizard in the Amazon Web Services Management Console provides sample code to help you get started.
-
When your app accesses an Amazon resource, pass the credentials provider instance to the client object, which passes temporary security credentials to the client. The permissions for the credentials are based on the role or roles that you defined earlier.
For more information, see the following:
-
Sign in (Android)
in the Amazon Amplify Framework Documentation. -
Sign in (iOS)
in the Amazon Amplify Framework Documentation.
OIDC federation for mobile apps
For best results, use Amazon Cognito as your identity broker for almost all OIDC federation
scenarios. Amazon Cognito is easy to use and provides additional capabilities like anonymous
(unauthenticated) access, and synchronizing user data across devices and providers. However, if
you have already created an app that uses OIDC federation by manually calling the
AssumeRoleWithWebIdentity API, you can continue to use it and your apps will
still work fine.
The process for using OIDC federation without Amazon Cognito follows this general outline:
-
Sign up as a developer with the external identity provider (IdP) and configure your app with the IdP, who gives you a unique ID for your app. (Different IdPs use different terminology for this process. This outline uses the term configure for the process of identifying your app with the IdP.) Each IdP gives you an app ID that's unique to that IdP, so if you configure the same app with multiple IdPs, your app will have multiple app IDs. You can configure multiple apps with each provider.
The following external links provide information about using some of the commonly used identity providers (IdPs):
-
Add Facebook Login to Your App or Website
on the Facebook developers site. -
Using OAuth 2.0 for Login (OpenID Connect)
on the Google developers site.
Important
If you use an OIDC identity provider from Google, Facebook, or Amazon Cognito, do not create a separate IAM identity provider in the Amazon Web Services Management Console. Amazon has these OIDC identity providers built-in and available for your use. Skip the following step and move directly to creating new roles using your identity provider.
-
If you use an IdP other than Google, Facebook or Amazon Cognito compatible with OIDC, then create an IAM identity provider entity for it.
-
In IAM, create one or more roles. For each role, define who can assume the role (the trust policy) and what permissions the app's users have (the permissions policy). Typically, you create one role for each IdP that an app supports. For example, you might create a role assumed by an app if the user signs in through Login with Amazon, a second role for the same app if the user signs in through Facebook, and a third role for the app if the user signs in through Google. For the trust relationship, specify the IdP (like Amazon.com) as the
Principal(the trusted entity), and include aConditionthat matches the IdP assigned app ID. Examples of roles for different providers are described in Create a role for a third-party identity provider . -
In your application, authenticate your users with the IdP. The specifics of how to do this vary both according to which IdP you use (Login with Amazon, Facebook, or Google) and on which platform your app runs. For example, an Android app's method of authentication can differ from that of an iOS app or a JavaScript-based web app.
Typically, if the user is not already signed in, the IdP takes care of displaying a sign-in page. After the IdP authenticates the user, the IdP returns an authentication token with information about the user to your app. The information included depends on what the IdP exposes and what information the user is willing to share. You can use this information in your app.
-
In your app, make an unsigned call to the
AssumeRoleWithWebIdentityaction to request temporary security credentials. In the request, you pass the IdP's authentication token and specify the Amazon Resource Name (ARN) for the IAM role that you created for that IdP. Amazon verifies that the token is trusted and valid and if so, returns temporary security credentials to your app that have the permissions for the role that you name in the request. The response also includes metadata about the user from the IdP, such as the unique user ID that the IdP associates with the user. -
Using the temporary security credentials from the
AssumeRoleWithWebIdentityresponse, your app makes signed requests to Amazon API operations. The user ID information from the IdP can distinguish users in your app. For example, you can put objects into Amazon S3 folders that include the user ID as prefixes or suffixes. This lets you create access control policies that lock the folder so only the user with that ID can access it. For more information, see Amazon STS federated user principals. -
Your app should cache the temporary security credentials so that you do not have to get new ones each time the app needs to make a request to Amazon. By default, the credentials are good for one hour. When the credentials expire (or before then), you make another call to
AssumeRoleWithWebIdentityto obtain a new set of temporary security credentials. Depending on the IdP and how they manage their tokens, you might have to refresh the IdP's token before you make a new call toAssumeRoleWithWebIdentity, since the IdP's tokens also usually expire after a fixed time. If you use the Amazon SDK for iOS or the Amazon SDK for Android, you can use the AmazonSTSCredentialsProvideraction, which manages the IAM temporary credentials, including refreshing them as required.