Ingesting data into Amazon OpenSearch Serverless collections
These sections provide details about the supported ingest pipelines for data ingestion into Amazon OpenSearch Serverless collections. They also cover some of the clients that you can use to interact with the OpenSearch API operations. Your clients should be compatible with OpenSearch 2.x in order to integrate with OpenSearch Serverless.
Topics
Minimum required permissions
In order to ingest data into an OpenSearch Serverless collection, the principal that is writing the data must have the following minimum permissions assigned in a data access policy:
[
   {
      "Rules":[
         {
            "ResourceType":"index",
            "Resource":[
               "index/target-collection/logs"
            ],
            "Permission":[
               "aoss:CreateIndex",
               "aoss:WriteDocument",
               "aoss:UpdateIndex"
            ]
         }
      ],
      "Principal":[
         "arn:aws:iam::123456789012:user/my-user"
      ]
   }
]
The permissions can be more broad if you plan to write to additional indexes. For
example, rather than specifying a single target index, you can allow permission to all
indexes (index/target-collection/*), or a subset of indexes
(index/target-collection/logs*).
For a reference of all available OpenSearch API operations and their associated permissions, see Supported operations and plugins in Amazon OpenSearch Serverless.
OpenSearch Ingestion
Rather than using a third-party client to send data directly to an OpenSearch Serverless collection, you can use Amazon OpenSearch Ingestion. You configure your data producers to send data to OpenSearch Ingestion, and it automatically delivers the data to the collection that you specify. You can also configure OpenSearch Ingestion to transform your data before delivering it. For more information, see Overview of Amazon OpenSearch Ingestion.
An OpenSearch Ingestion pipeline needs permission to write to an OpenSearch Serverless collection that is configured as its sink. These permissions include the ability to describe the collection and send HTTP requests to it. For instructions to use OpenSearch Ingestion to add data to a collection, see Granting Amazon OpenSearch Ingestion pipelines access to collections.
To get started with OpenSearch Ingestion, see Tutorial: Ingesting data into a collection using Amazon OpenSearch Ingestion.
Fluent Bit
You can use Amazon
for Fluent Bit image
Note
You must have version 2.30.0 or later of the Amazon for Fluent Bit image in order to integrate with OpenSearch Serverless.
Example configuration:
This sample output section of the configuration file shows how to use an OpenSearch Serverless
collection as a destination. The important addition is the AWS_Service_Name
parameter, which is aoss. Host is the collection
endpoint.
[OUTPUT] Name opensearch Match * Hostcollection-endpoint.us-west-2.aoss.amazonaws.com Port 443 Indexmy_indexTrace_Error On Trace_Output On AWS_Auth On AWS_Region<region>AWS_Service_Name aoss tls On Suppress_Type_Name On
Amazon Data Firehose
Firehose supports OpenSearch Serverless as a delivery destination. For instructions to send data into OpenSearch Serverless, see Creating a Kinesis Data Firehose Delivery Stream and Choose OpenSearch Serverless for Your Destination in the Amazon Data Firehose Developer Guide.
The IAM role that you provide to Firehose for delivery must be specified within a data
access policy with the aoss:WriteDocument minimum permission for the target
collection, and you must have a preexisting index to send data to. For more information,
see Minimum required permissions.
Before you send data to OpenSearch Serverless, you might need to perform transforms on the data. To learn more about using Lambda functions to perform this task, see Amazon Kinesis Data Firehose Data Transformation in the same guide.
Go
The following sample code uses the opensearch-goregion and
host.
package main

import (
  "context"
  "log"
  "strings"
  "github.com/aws/aws-sdk-go-v2/aws"
  "github.com/aws/aws-sdk-go-v2/config"
  opensearch "github.com/opensearch-project/opensearch-go/v2"
  opensearchapi "github.com/opensearch-project/opensearch-go/v2/opensearchapi"
  requestsigner "github.com/opensearch-project/opensearch-go/v2/signer/awsv2"
)

const endpoint = "" // serverless collection endpoint

func main() {
	ctx := context.Background()

	awsCfg, err := config.LoadDefaultConfig(ctx,
		config.WithRegion("<AWS_REGION>"),
		config.WithCredentialsProvider(
			getCredentialProvider("<AWS_ACCESS_KEY>", "<AWS_SECRET_ACCESS_KEY>", "<AWS_SESSION_TOKEN>"),
		),
	)
	if err != nil {
		log.Fatal(err) // don't log.fatal in a production-ready app
	}

	// create an AWS request Signer and load AWS configuration using default config folder or env vars.
	signer, err := requestsigner.NewSignerWithService(awsCfg, "aoss") // "aoss" for Amazon OpenSearch Serverless
	if err != nil {
		log.Fatal(err) // don't log.fatal in a production-ready app
	}

	// create an opensearch client and use the request-signer
	client, err := opensearch.NewClient(opensearch.Config{
		Addresses: []string{endpoint},
		Signer:    signer,
	})
	if err != nil {
		log.Fatal("client creation err", err)
	}

	indexName := "go-test-index"

  // define index mapping
	mapping := strings.NewReader(`{
	 "settings": {
	   "index": {
	        "number_of_shards": 4
	        }
	      }
	 }`)

	// create an index
	createIndex := opensearchapi.IndicesCreateRequest{
		Index: indexName,
    Body: mapping,
	}
	createIndexResponse, err := createIndex.Do(context.Background(), client)
	if err != nil {
		log.Println("Error ", err.Error())
		log.Println("failed to create index ", err)
		log.Fatal("create response body read err", err)
	}
	log.Println(createIndexResponse)

	// delete the index
	deleteIndex := opensearchapi.IndicesDeleteRequest{
		Index: []string{indexName},
	}

	deleteIndexResponse, err := deleteIndex.Do(context.Background(), client)
	if err != nil {
		log.Println("failed to delete index ", err)
		log.Fatal("delete index response body read err", err)
	}
	log.Println("deleting index", deleteIndexResponse)
}

func getCredentialProvider(accessKey, secretAccessKey, token string) aws.CredentialsProviderFunc {
	return func(ctx context.Context) (aws.Credentials, error) {
		c := &aws.Credentials{
			AccessKeyID:     accessKey,
			SecretAccessKey: secretAccessKey,
			SessionToken:    token,
		}
		return *c, nil
	}
}
Java
The following sample code uses the opensearch-javaregion and host.
The important difference compared to OpenSearch Service domains is the service
name (aoss instead of es).
// import OpenSearchClient to establish connection to OpenSearch Serverless collection
import org.opensearch.client.opensearch.OpenSearchClient;

SdkHttpClient httpClient = ApacheHttpClient.builder().build();
// create an opensearch client and use the request-signer
OpenSearchClient client = new OpenSearchClient(
    new AwsSdk2Transport(
        httpClient,
        "...us-west-2.aoss.amazonaws.com", // serverless collection endpoint
        "aoss" // signing service name
        Region.US_WEST_2, // signing service region
        AwsSdk2TransportOptions.builder().build()
    )
);

String index = "sample-index";

// create an index
CreateIndexRequest createIndexRequest = new CreateIndexRequest.Builder().index(index).build();
CreateIndexResponse createIndexResponse = client.indices().create(createIndexRequest);
System.out.println("Create index reponse: " + createIndexResponse);

// delete the index
DeleteIndexRequest deleteIndexRequest = new DeleteIndexRequest.Builder().index(index).build();
DeleteIndexResponse deleteIndexResponse = client.indices().delete(deleteIndexRequest);
System.out.println("Delete index reponse: " + deleteIndexResponse);

httpClient.close();
The following sample code again establishes a secure connection, and then searches an index.
import org.opensearch.client.opensearch.OpenSearchClient;

SdkHttpClient httpClient = ApacheHttpClient.builder().build();

OpenSearchClient client = new OpenSearchClient(
    new AwsSdk2Transport(
        httpClient,
        "...us-west-2.aoss.amazonaws.com", // serverless collection endpoint
        "aoss" // signing service name
        Region.US_WEST_2, // signing service region
        AwsSdk2TransportOptions.builder().build()
    )
);

Response response = client.generic()
    .execute(
        Requests.builder()
            .endpoint("/" + "users" + "/_search?typed_keys=true")
            .method("GET")
            .json("{"
                + "    \"query\": {"
                + "        \"match_all\": {}"
                + "    }"
                + "}")
            .build());

httpClient.close();
JavaScript
The following sample code uses the opensearch-jsnode and region.
The important difference compared to OpenSearch Service domains is the service
name (aoss instead of es).
Logstash
You can use the Logstash
OpenSearch plugin
To use Logstash to send data to OpenSearch Serverless
-
Install version 2.0.0 or later of the logstash-output-opensearch
plugin using Docker or Linux. -
In order for the OpenSearch output plugin to work with OpenSearch Serverless, you must make the following modifications to the
opensearchoutput section of logstash.conf:-
Specify
aossas theservice_nameunderauth_type. -
Specify your collection endpoint for
hosts. -
Add the parameters
default_server_major_versionandlegacy_template. These parameters are required for the plugin to work with OpenSearch Serverless.
output {
  opensearch {
    hosts => "collection-endpoint:443"
    auth_type => {
      ...
      service_name => 'aoss'
    }
    default_server_major_version => 2
    legacy_template => false
  }
}
This example configuration file takes its input from files in an S3 bucket and sends them to an OpenSearch Serverless collection:
input { s3 { bucket => "my-s3-bucket" region => "us-east-1" } } output { opensearch { ecs_compatibility => disabled hosts => "https://my-collection-endpoint.us-east-1.aoss.amazonaws.com:443" index =>my-indexauth_type => { type => 'aws_iam' aws_access_key_id => 'your-access-key' aws_secret_access_key => 'your-secret-key' region => 'us-east-1' service_name => 'aoss' } default_server_major_version => 2 legacy_template => false } } -
-
Then, run Logstash with the new configuration to test the plugin:
bin/logstash -f config/test-plugin.conf
Python
The following sample code uses the opensearch-pyregion and
host.
The important difference compared to OpenSearch Service domains is the service
name (aoss instead of es).
from opensearchpy import OpenSearch, RequestsHttpConnection, AWSV4SignerAuth
import boto3

host = ''  # serverless collection endpoint, without https://
region = ''  # e.g. us-east-1

service = 'aoss'
credentials = boto3.Session().get_credentials()
auth = AWSV4SignerAuth(credentials, region, service)

# create an opensearch client and use the request-signer
client = OpenSearch(
    hosts=[{'host': host, 'port': 443}],
    http_auth=auth,
    use_ssl=True,
    verify_certs=True,
    connection_class=RequestsHttpConnection,
    pool_maxsize=20,
)

# create an index
index_name = 'books-index'
create_response = client.indices.create(
    index_name
)

print('\nCreating index:')
print(create_response)

# index a document
document = {
  'title': 'The Green Mile',
  'director': 'Stephen King',
  'year': '1996'
}

response = client.index(
    index = 'books-index',
    body = document,
    id = '1'
)


# delete the index
delete_response = client.indices.delete(
    index_name
)

print('\nDeleting index:')
print(delete_response)
Ruby
The opensearch-aws-sigv4 gem provides access to OpenSearch Serverless, along with OpenSearch Service,
out of the box. It has all features of the opensearch-ruby
When instantiating the Sigv4 signer, specify aoss as the service
name:
require 'opensearch-aws-sigv4'
require 'aws-sigv4'

signer = Aws::Sigv4::Signer.new(service: 'aoss',
                                region: 'us-west-2',
                                access_key_id: 'key_id',
                                secret_access_key: 'secret')

# create an opensearch client and use the request-signer
client = OpenSearch::Aws::Sigv4Client.new(
  { host: 'https://your.amz-opensearch-serverless.endpoint',
    log: true },
  signer)

# create an index
index = 'prime'
client.indices.create(index: index)

# insert data
client.index(index: index, id: '1', body: { name: 'Amazon Echo',
                                            msrp: '5999',
                                            year: 2011 })

# query the index
client.search(body: { query: { match: { name: 'Echo' } } })

# delete index entry
client.delete(index: index, id: '1')

# delete the index
client.indices.delete(index: index)
Signing HTTP requests with other clients
The following requirements apply when signing requests to OpenSearch Serverless collections when you construct HTTP requests with another clients.
-
You must specify the service name as
aoss. -
The
x-amz-content-sha256header is required for all Amazon Signature Version 4 requests. It provides a hash of the request payload. If there's a request payload, set the value to its Secure Hash Algorithm (SHA) cryptographic hash (SHA256). If there's no request payload, set the value toe3b0c44298fc1c149afbf4c8996fb92427ae41e4649b934ca495991b7852b855, which is the hash of an empty string.
Indexing with cURL
The following example request uses the Client URL Request Library (cURL) to send a
single document to an index named movies-index within a
collection:
curl -XPOST \
    --user "$AWS_ACCESS_KEY_ID":"$AWS_SECRET_ACCESS_KEY" \
    --aws-sigv4 "aws:amz:us-east-1:aoss" \
    --header "x-amz-content-sha256: $REQUEST_PAYLOAD_SHA_HASH" \
    --header "x-amz-security-token: $AWS_SESSION_TOKEN" \
    "https://my-collection-endpoint.us-east-1.aoss.amazonaws.com/movies-index/_doc" \
    -H "Content-Type: application/json" -d '{"title": "Shawshank Redemption"}'
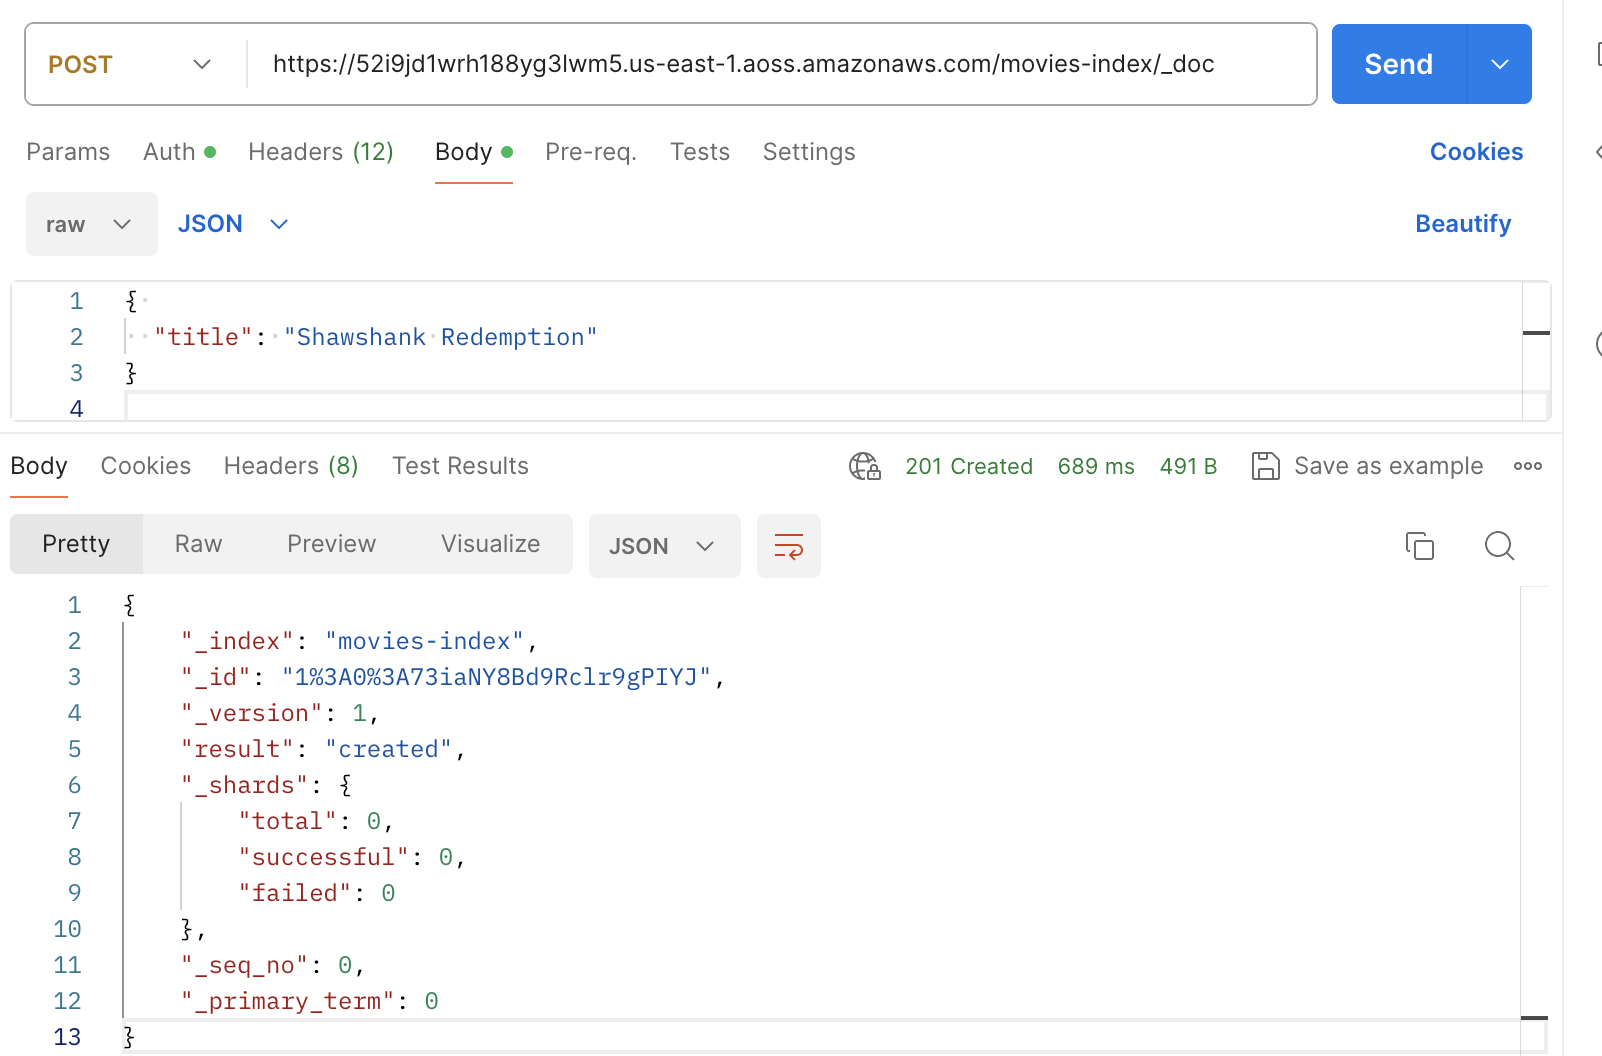
Indexing with Postman
The following image shows how to send a requests to a collection using Postman.
For instructions to authenticate, see Authenticate with Amazon Signature authentication workflow in
Postman