本文属于机器翻译版本。若本译文内容与英语原文存在差异,则一律以英文原文为准。
教程:创建一个四阶段管道
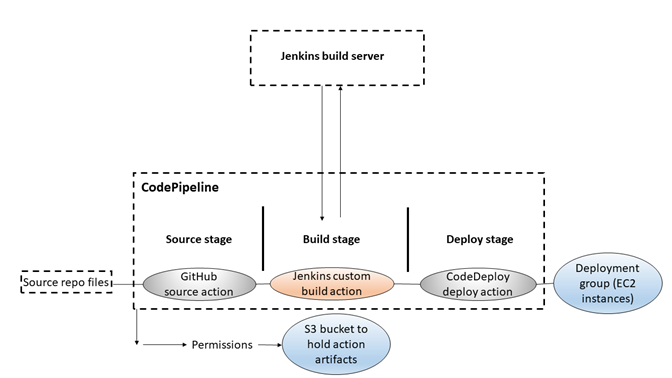
在教程:创建一个简单的管道(S3 存储桶)或教程:创建简单的管道(CodeCommit 存储库)中创建了第一个管道后,接下来就可以开始创建更复杂的管道。本教程将引导你创建四阶段管道,该管道使用 GitHub存储库作为源代码,使用 Jenkins 生成服务器来生成项目,使用 CodeDeploy 应用程序将生成的代码部署到暂存服务器。下图显示最初的三阶段管道。
创建管道后,您将编辑它以添加包含测试操作的阶段来测试代码,同样使用 Jenkins。
创建此管道之前,必须先配置所需的资源。例如,如果要为源代码使用 GitHub 存储库,则必须先创建存储库,然后才能将其添加到管道中。作为设置的一部分,本教程将指导您在 EC2 实例上设置 Jenkins 以进行演示。
重要
在此过程中,您在管道中添加的许多操作都涉及在创建管道之前需要创建的 Amazon 资源。 Amazon 源操作的资源必须始终在您创建管道的同一 Amazon 区域创建。例如,如果您在美国东部(俄亥俄州)地区创建管道,则您的 CodeCommit 存储库必须位于美国东部(俄亥俄州)区域。
您可以在创建管道时添加跨区域操作。 Amazon 跨区域操作的资源必须位于您计划执行操作的同一 Amazon 区域。有关更多信息,请参阅 在中添加跨区域操作 CodePipeline。
重要
作为创建管道的一部分,客户提供的 S3 工件存储桶将 CodePipeline 用于项目。(这与用于 S3 源操作的存储桶不同。) 如果 S3 工件存储桶与您的管道账户位于不同的账户中,请确保 S3 工件存储桶归其所有 Amazon Web Services 账户 ,该存储桶是安全且可靠的。
在开始学习本教程之前,您应该已经完成入门 CodePipeline中的一般先决条件。
步骤 1:满足先决条件
要与 Jenkins 集成, Amazon CodePipeline 需要您在要使用的任何 Jenkins 实例上安装适用于 Jenkins 的 CodePipeline 插件。 CodePipeline您还应配置一个专用 IAM 用户或角色,用于在 Jenkins 项目和 CodePipeline之间获得权限。集成 Jenkins 的最简单方法 CodePipeline 是在使用你为 Jenkins 集成创建的 IAM 实例角色的 EC2 实例上安装 Jenkins。为了使管道中 Jenkins 操作的链接能够成功连接,您必须在服务器或 EC2 实例上配置代理和防火墙设置,以允许与 Jenkins 项目使用的端口进行入站连接。在允许连接这些端口(例如,如果您已保护 Jenkins 以仅使用 HTTPS 连接,端口为 443 和 8443;如果您允许 HTTP 连接,端口为 80 和 8080)之前,请确保已将 Jenkins 配置为对用户进行身份验证并强制执行访问控制。有关更多信息,请参阅保护 Jenkins
注意
本教程使用一个代码示例并配置将该示例从 Haml 转换为 HTML 的生成步骤。您可以按照中的步骤从 GitHub 存储库下载开源示例代码将示例复制或克隆到 GitHub 存储库中。您将需要 GitHub 存储库中的整个示例,而不仅仅是.zip 文件。
本指南还假定:
-
您熟悉安装和管理 Jenkins 以及创建 Jenkins 项目的过程。
-
您已将适用于 Ruby 的 Rake 和 Haml Gem 安装在托管 Jenkins 项目的同一计算机或实例上。
-
您已设置所需的系统环境变量,以便可以从终端或命令行运行 Rake 命令(例如,在 Windows 系统上,修改 PATH 变量以包括安装 Rake 的目录)。
将示例复制或克隆到 GitHub 存储库中
克隆示例并推送到 GitHub 存储库
-
从 GitHub 存储库下载示例代码,或将存储库克隆到本地计算机。有两个示例包:
-
如果您要将示例部署到亚马逊 Linux、RHEL 或 Ubuntu 服务器实例,请选择 _linux.zip。codepipeline-jenkins-aws-codedeploy
-
如果您要将示例部署到 Windows 服务器实例,请选择 CodePipeline-Jenkins-.zi
p。AWSCodeDeploy_Windows
-
-
在存储库中,选择 Fork,将示例存储库克隆到您的 Github 账户的存储库中。有关详情,请参阅 GitHub 文档
。
创建 IAM 角色以用于 Jenkins 集成
作为最佳实践,可以考虑启动 EC2 实例来托管您的 Jenkins 服务器,并使用 IAM 角色向该实例授予与 CodePipeline之交互所需的权限。
登录 Amazon Web Services 管理控制台 并打开 IAM 控制台,网址为https://console.aws.amazon.com/iam/
。 -
在 IAM 控制台的导航窗格中,选择角色,然后选择创建角色。
-
在选择受信任实体的类型下,选择 Amazon Web Services 服务。在选择将使用此角色的服务下,选择 EC2。在选择您的使用案例下,选择 EC2。
-
选择下一步:权限。在附加权限策略页面上,选择
AWSCodePipelineCustomActionAccess托管策略,然后选择下一步: 标签。选择下一步:审核。 -
在 Review (审核) 页面上的 Role name (角色名称) 中,输入专为 Jenkins 集成创建的角色的名称(例如
JenkinsAccess),然后选择 Create role (创建角色)。
当您创建要在其中安装 Jenkins 的 EC2 实例时,请确保在 Step 3: Configure Instance Details (步骤 3:配置实例详细信息) 中选择该实例角色(例如 JenkinsAccess)。
有关实例角色和 Amazon EC2 的更多信息,请参阅适用于 Amazon EC2 的 IAM 角色、使用 IAM 角色为 Amazon EC2 实例上运行的应用程序授权和创建向 Amazon Web Services 服务委托权限的角色。
安装和配置 Jenkins 和适用于 Jenkins 的 CodePipeline 插件
安装 Jenkins 和适用于 Jenkins 的 CodePipeline 插件
-
创建要在其中安装 Jenkins 的 EC2 实例,在 Step 3: Configure Instance Details (步骤 3:配置实例详细信息) 中,确保选择您所创建的实例角色(例如
JenkinsAccess)。有关创建 EC2 实例的更多信息,请参阅 Amazon EC2 用户指南 中的启动 Amazon EC2 实例。注意
如果您已经拥有您想要使用的 Jenkins 资源,您可以执行此操作,但是您必须创建一个专用的 IAM 用户,为该用户应用
AWSCodePipelineCustomActionAccess托管策略,然后在您的 Jenkins 资源上配置和使用该用户的访问凭证。如果您想使用 Jenkins UI 来提供凭证,请将 Jenkins 配置为仅允许 HTTPS。有关更多信息,请参阅 故障排除 CodePipeline。 -
在 EC2 实例上安装 Jenkins。有关更多信息,请参阅针对安装 Jenkins
和启动并访问 Jenkins 的 Jenkins 文档以及 产品和服务与 CodePipeline中的details of integration with Jenkins。 -
启动 Jenkins,然后在主页上,选择管理 Jenkins。
-
在管理 Jenkins 页中,选择管理插件。
-
选择可用选项卡,然后在筛选条件搜索框中,输入
Amazon CodePipeline。从列表中选择 Jenkins 的CodePipeline 插件,然后选择立即下载并在重启后安装。 -
在正在安装插件/更新页中,选择当安装结束且无作业正在运行时重启 Jenkins。
-
选择返回控制面板。
-
在主页中,选择新项目。
-
在项目名称中,输入 Jenkins 项目的名称(例如,
MyDemoProject)。选择自由式项目,然后选择确定。注意
确保项目的名称符合 CodePipeline 要求。有关更多信息,请参阅 Amazon CodePipeline 中的限额。
-
在项目的配置页中,选择如有必要,执行并发构建复选框。在源代码管理中,选择 Amazon CodePipeline。如果您已在 EC2 实例上安装了 Jenkins,并使用您为 Amazon CLI 与 Jenkins 之间的 CodePipeline 集成而创建的 IAM 用户的配置文件配置了,请将所有其他字段留空。
-
选择 “高级”,然后在 “提供者” 中输入操作提供者的名称 CodePipeline (例如,
MyJenkinsProviderName)。确保此名称是唯一的且容易记住。在此教程的后面部分,当您向管道添加生成操作时,会用到这个名称,并且在添加测试操作时,会再次用到它。注意
此操作名称必须符合 CodePipeline 中的操作的命名要求。有关更多信息,请参阅 Amazon CodePipeline 中的限额。
-
在构建触发器中,清除所有复选框,然后选择轮询 SCM。在计划中,输入五个星号并用空格隔开,如下所示:
* * * * *CodePipeline 每分钟进行一次民意调查。
-
在构建中,选择添加构建步骤。选择执行 Shell(Amazon Linux、RHEL 或 Ubuntu Server)执行批处理命令 (Windows Server),然后输入以下内容:
rake注意
确保您的环境配置有运行 rake 所需的变量和设置,否则,生成会失败。
-
选择 “添加生成后期操作”,然后选择 “Amazon CodePipeline 发布者”。选择添加,然后在构建输出位置中,将位置留空。此配置是默认的,会在生成过程结束时创建一个压缩文件。
-
选择保存以保存您的 Jenkins 项目。
步骤 2:在中创建管道 CodePipeline
在这部分教程中,您将使用创建管道向导来创建管道。
创建 CodePipeline 自动发布流程
登录 Amazon Web Services 管理控制台 并打开 CodePipeline 控制台,网址为 http://console.aws.amazon。 com/codesuite/codepipeline/home
。 -
如有必要,请使用区域选择器将区域更改为您的管道资源所在的区域。例如,如果您在
us-east-2中为上一教程创建了资源,请确保将区域选择器设置为“美国东部(俄亥俄州)”。有关可用区域和终端节点的更多信息 CodePipeline,请参阅终Amazon CodePipeline 端节点和配额。
-
在欢迎页面、入门页面或管道页面上,选择创建管道。
-
在步骤 1:选择创建选项页面上的创建选项下,选择构建自定义管道选项。选择下一步。
-
在步骤 2:选择管道设置页面上,在管道名称中,输入管道的名称。
-
CodePipeline 提供 V1 和 V2 类型的管道,它们的特性和价格各不相同。在控制台中,您只能选择 V2 类型。有关更多信息,请参阅管道类型。有关定价的信息 CodePipeline,请参阅定价
。 -
在服务角色中,选择新建服务角色 CodePipeline 以允许在 IAM 中创建服务角色。
-
将高级设置中的各项设置保留为默认值,然后选择下一步。
-
在 “步骤 3:添加源舞台” 页面上,在源提供程序中,选择GitHub。
-
在连接下,选择一个现有连接或创建一个新连接。要创建或管理 GitHub 源操作的连接,请参阅GitHub 连接。
-
在步骤 4:添加构建阶段中,选择添加 Jenkins。在提供者名称中,输入您在 Jenkins CodePipeline 插件中提供的操作的名称(例如
MyJenkinsProviderName)。此名称必须与 Jenkins CodePipeline 插件中的名称完全匹配。在服务器 URL 中,输入在其中安装 Jenkins 的 EC2 实例的 URL。在项目名称中,输入您在 Jenkins 中创建的项目的名称,例如MyDemoProject,然后选择下一步。 -
在步骤 5:添加测试阶段中,选择跳过测试阶段,并通过再次选择跳过接受警告消息。
选择下一步。
-
在步骤 6:添加部署阶段中,重复使用您在中创建的 CodeDeploy 应用程序和部署组教程:创建一个简单的管道(S3 存储桶)。在部署提供商中,选择CodeDeploy。在应用程序名称中,输入
CodePipelineDemoApplication,或选择刷新按钮,然后从列表中选择应用程序名称。在部署组中,输入CodePipelineDemoFleet或者从列表中选择它,然后选择下一步。注意
您可以使用自己的 CodeDeploy 资源或创建新的资源,但可能会产生额外费用。
-
在步骤 7:查看中,查看信息,然后选择创建管道。
-
管道会自动启动示例并通过管道运行示例。当管道将 Haml 示例构建为 HTML 并将其部署到部署中的每个 Amazon EC2 实例时,您可以查看进度以及成功和失败消息。 CodeDeploy
步骤 3:向管道中添加另一个阶段
现在,您将添加一个测试阶段,然后向该阶段添加测试操作,该操作使用示例中包含的 Jenkins 测试来确定网页是否具有任何内容。该测试仅用于演示目的。
注意
如果您不想向管道中添加另一个阶段,则可以向管道的 Staging 阶段添加一个测试操作,该操作可以在部署操作之前或之后。
向管道中添加测试阶段
查找实例的 IP 地址
验证您将代码部署到的实例的 IP 地址
-
当管道状态显示为成功后,在 Staging 阶段的状态区域中,选择详细信息。
-
在部署详细信息部分,在实例 ID 中,选择成功部署的一个实例的实例 ID。
-
复制实例的 IP 地址(例如
192.168.0.4)。您将在 Jenkins 测试中用到此 IP 地址。
创建一个 Jenkins 项目用于测试部署
创建 Jenkins 项目
-
在您将 Jenkins 安装到的实例中,打开 Jenkins,然后从主页中选择新项目。
-
在项目名称中,输入 Jenkins 项目的名称(例如,
MyTestProject)。选择自由式项目,然后选择确定。注意
确保您的项目名称符合 CodePipeline 要求。有关更多信息,请参阅 Amazon CodePipeline 中的限额。
-
在项目的配置页中,选择如有必要,执行并发构建复选框。在源代码管理中,选择 Amazon CodePipeline。如果您已在 EC2 实例上安装了 Jenkins,并使用您为 Amazon CLI 与 Jenkins 之间的 CodePipeline 集成而创建的 IAM 用户的配置文件配置了,请将所有其他字段留空。
重要
如果您正在配置 Jenkins 项目,但该项目未安装在 Amazon EC2 实例上,或者该项目安装在运行 Windows 操作系统的 EC2 实例上,请根据您的代理主机和端口设置填写所需的字段,并提供您为在 Jenkins 和之间集成而配置的 IAM 用户或角色的证书。 CodePipeline
-
选择高级,然后在目录中,选择测试。
-
在 Prov id er 中,输入与生成项目相同的名称(例如,
MyJenkinsProviderName)。在本教程的稍后部分,您在向您的管道添加测试操作时将用到此名称。注意
此名称必须符合操作的 CodePipeline 命名要求。有关更多信息,请参阅 Amazon CodePipeline 中的限额。
-
在构建触发器中,清除所有复选框,然后选择轮询 SCM。在计划中,输入五个星号并用空格隔开,如下所示:
* * * * *CodePipeline 每分钟进行一次民意调查。
-
在构建中,选择添加构建步骤。如果要部署到 Amazon Linux、RHEL 或 Ubuntu Server 实例,请选择执行 Shell。然后输入以下内容,其中 IP 地址是您之前复制的 EC2 实例的地址:
TEST_IP_ADDRESS=192.168.0.4rake test如果您要部署到 Windows Server 实例,请选择执行批处理命令,然后输入以下内容,其中 IP 地址是指您前面复制的 EC2 实例的地址:
set TEST_IP_ADDRESS=192.168.0.4rake test注意
测试假定为默认端口 80。如果您要指定一个不同的端口,请添加一个测试端口语句,如下所示:
TEST_IP_ADDRESS=192.168.0.4TEST_PORT=8000rake test -
选择 “添加生成后期操作”,然后选择 “Amazon CodePipeline 发布者”。不要选择添加。
-
选择保存以保存您的 Jenkins 项目。
创建第四个阶段
向您的管道添加一个包括 Jenkins 测试操作的阶段
登录 Amazon Web Services 管理控制台 并打开 CodePipeline 控制台,网址为 http://console.aws.amazon。 com/codesuite/codepipeline/home
。 -
在 Name (名称) 中,选择您创建的管道名称 MySecondPipeline。
-
在管道详细信息页中,选择编辑。
-
在编辑页面上,选择 + 阶段,紧随构建阶段之后添加一个阶段。
-
在新阶段的名称字段中,输入名称(例如
Testing),然后选择 + 添加操作组。 -
在操作名称中,输入
MyJenkinsTest-Action。在测试提供者中,选择您在 Jenkins 中指定的提供者名称(例如,MyJenkinsProviderName)。在项目名称中,输入您在 Jenkins 中创建的项目的名称(例如,MyTestProject)。在 “输入工件” 中,从 Jenkins 版本中选择默认名称为的工件BuildArtifact,然后选择 “完成”。注意
由于 Jenkins 测试操作对 Jenkins 构建步骤中构建的应用程序起作用,请为输入构件使用构建构件来执行测试操作。
有关输入和输出构件以及管道结构的更多信息,请参阅 CodePipeline 管道结构参考。
-
在编辑页中,选择保存管道更改。在保存管道更改对话框中,选择保存并继续。
-
虽然新阶段已添加到您的管道中,但该阶段会显示为 No executions yet 状态,因为更改并不会触发管道的另一次运行。要通过修订后的管道运行示例,在管道详细信息页中,选择发布更改。
管道视图会显示管道中的阶段和操作以及经历这四个阶段的修订的状态。管道完成所有阶段需要的时间将取决于项目的大小、生成和测试操作的复杂程度以及其他因素。
步骤 4:清理资源
完成本教程之后,您应该删除管道及其使用的资源,以避免为继续使用这些资源付费。如果您不打算继续使用 CodePipeline,请删除管道,然后删除 CodeDeploy 应用程序及其关联的 Amazon EC2 实例,最后删除用于存储项目的 Amazon S3 存储桶。如果您不打算继续使用其他资源,例如 GitHub 存储库,则还应考虑是否删除它们。
清理本教程中使用的资源
-
在您本地的 Linux、macOS 或 Unix 计算机上打开终端会话或在您本地的 Windows 计算机上打开命令提示符,并运行 delete-pipeline 命令,删除您创建的管道。对于
MySecondPipeline,您可以输入以下命令:aws codepipeline delete-pipeline --name "MySecondPipeline"该命令不返回任何内容。
-
要清理 CodeDeploy 资源,请按照清理中的说明进行操作。
-
要清理实例资源,请删除您在其中安装 Jenkins 的 EC2 实例。有关更多信息,请参阅清除您的实例。
-
如果您不打算创建更多管道或 CodePipeline 再次使用,请删除用于存储管道项目的 Amazon S3 存储桶。要删除存储桶,请按照删除存储桶中的说明进行操作。
-
如果您不打算将其他资源再次用于该管道,请考虑根据该特定资源的指导删除这些资源。例如,如果要删除 GitHub 存储库,请按照在 GitHub 网站上删除存储库
中的说明进行操作。