本文属于机器翻译版本。若本译文内容与英语原文存在差异,则一律以英文原文为准。
教程:创建以 Amazon S3 作为部署提供程序的管道
在本教程中,您将使用 Amazon S3 作为部署阶段中的部署操作提供程序来配置连续交付文件的管道。完成的管道会在您对源存储库中的源文件进行更改时检测更改。然后,管道使用 Amazon S3 将文件部署到您的桶。每次在源位置修改或添加网站文件时,部署都会使用最新文件创建网站。
重要
作为创建管道的一部分,客户提供的 S3 工件存储桶将 CodePipeline 用于项目。(这与用于 S3 源操作的存储桶不同。) 如果 S3 工件存储桶与您的管道账户位于不同的账户中,请确保 S3 工件存储桶归其所有 Amazon Web Services 账户 ,该存储桶是安全且可靠的。
注意
即使您从源存储库中删除文件,S3 部署操作也不会删除与已删除文件对应的 S3 对象。
本教程提供了两个选项:
-
创建一个管道,用于将静态网站部署到您的 S3 公有存储桶。此示例创建了一个包含 Amazon CodeCommit 源操作和 Amazon S3 部署操作的管道。请参阅选项 1:将静态网站文件部署到 Amazon S3。
-
创建一个管道,该管道将示例 TypeScript 代码编译到您的 S3 存储桶中, JavaScript 并将 CodeBuild 输出项目部署到您的 S3 存储桶中进行存档。此示例创建了一个包含 Amazon S3 源操作、 CodeBuild 构建操作和 Amazon S3 部署操作的管道。请参阅选项 2:将构建的存档文件从 S3 源桶部署到 Amazon S3。。
重要
在此过程中,您在管道中添加的许多操作都涉及在创建管道之前需要创建的 Amazon 资源。 Amazon 源操作的资源必须始终在您创建管道的同一 Amazon 区域创建。例如,如果您在美国东部(俄亥俄州)地区创建管道,则您的 CodeCommit 存储库必须位于美国东部(俄亥俄州)区域。
您可以在创建管道时添加跨区域操作。 Amazon 跨区域操作的资源必须位于您计划执行操作的同一 Amazon 区域。有关更多信息,请参阅 在中添加跨区域操作 CodePipeline。
选项 1:将静态网站文件部署到 Amazon S3
在此示例中,您将下载示例静态网站模板文件,将文件上传到 Amazon CodeCommit 存储库,创建存储桶,然后将其配置为托管。接下来,您可以使用 Amazon CodePipeline 控制台创建管道并指定 Amazon S3 部署配置。
先决条件
您必须已经具备以下各项:
-
存储 CodeCommit 库。您可以使用您在中创建的 Amazon CodeCommit 存储库教程:创建简单的管道(CodeCommit 存储库)。
-
您的静态网站的源文件。使用此链接下载示例静态网站。该 sample-website.zip 下载生成以下文件:
-
一个
index.html文件 -
一个
main.css文件 -
一个
graphic.jpg文件
-
-
一个为网站托管配置的 S3 存储桶。请参阅在 Amazon S3 上托管静态网站。确保您在与管道相同的区域中创建存储桶。
注意
若要托管网站,您的桶必须具有公共读取访问权限,以为每个人提供读取访问权限。您应该保留阻止对 S3 存储桶的公共访问的默认访问设置,但网站托管除外。
第 1 步:将源文件推送到您的 CodeCommit 存储库
在本节中,将源文件推送到管道用于源阶段的存储库。
将文件推送到您的 CodeCommit 存储库
-
提取下载的示例文件。不要将 ZIP 文件上传到您的存储库。
-
将文件推送或上传到您的 CodeCommit 存储库。这些文件是由创建管道向导针对您在 CodePipeline 中的部署操作创建的源项目。您的文件在本地目录中应如下所示:
index.html main.css graphic.jpg -
你可以使用 Git 或 CodeCommit 控制台上传文件:
-
在本地计算机上从克隆的存储库使用 Git 命令行:
-
运行以下命令以立即暂存您的所有文件:
git add -A -
运行以下命令以提交带有提交消息的文件:
git commit -m "Added static website files" -
运行以下命令将本地存储库中的文件推送到存储 CodeCommit 库:
git push
-
-
要使用 CodeCommit 控制台上传您的文件,请执行以下操作:
-
打开 CodeCommit 控制台,然后从 “存储库” 列表中选择您的存储库。
-
选择添加文件,然后选择上传文件。
-
选择选择文件,然后浏览找到您的文件。通过输入您的用户名和电子邮件地址来提交更改。选择提交更改。
-
对要上传的每个文件重复此步骤。
-
-
步骤 2:创建管道
在此部分中,您将使用以下操作创建管道:
-
一个源代码阶段,其 CodeCommit 操作中的源构件是您网站的文件。
-
一个具有 Amazon S3 部署操作的部署阶段。
使用向导创建管道
登录 Amazon Web Services 管理控制台 并打开 CodePipeline 控制台,网址为 http://console.aws.amazon。 com/codesuite/codepipeline/home
。 -
在欢迎页面、入门页面或管道页面上,选择创建管道。
-
在步骤 1:选择创建选项页面上的创建选项下,选择构建自定义管道选项。选择下一步。
-
在步骤 2:选择管道设置的管道名称中,输入
MyS3DeployPipeline。 -
在管道类型中,选择 V2。有关更多信息,请参阅 管道类型。选择下一步。
-
在服务角色中,选择新建服务角色 CodePipeline 以允许在 IAM 中创建服务角色。
-
将高级设置中的各项设置保留为默认值,然后选择下一步。
-
在步骤 3:添加源阶段的源提供程序中,选择 Amazon CodeCommit。在 Repository name (存储库名称) 中,选择您在步骤 1:创建 CodeCommit 存储库中创建的 CodeCommit 存储库的名称。在分支名称中,选择包含最新的代码更新的分支的名称。除非您自行创建了其他分支,否则仅
main可用。选择存储库名称和分支后,将显示要为此管道创建的 Amazon CloudWatch Events 规则。
选择下一步。
-
在步骤 4:添加构建阶段中,选择跳过构建阶段,并通过再次选择跳过接受警告消息。
选择下一步。
-
在步骤 5:添加测试阶段中,选择跳过测试阶段,并通过再次选择跳过接受警告消息。
选择下一步。
-
在步骤 6:添加部署阶段中:
-
在部署提供程序中,选择 Amazon S3。
-
在存储桶中,输入您的公有存储桶的名称。
-
选择在部署前提取文件。
注意
如果不选择部署前提取文件,部署将会失败。这是因为管道中的 Amazon CodeCommit 操作会压缩源工件,而您的文件是一个 ZIP 文件。
当在部署前提取文件已选择时,将会显示部署路径。输入您要使用的路径的名称。这将在 Amazon S3 中创建一个文件夹结构,文件将提取到该文件夹结构中。对于此教程,将此字段保留为空。

-
(可选)在标准 ACL 中,您可以将一组预定义的授权(称作标准 ACL)应用于上传的构件。
-
(可选)在缓存控制中,输入缓存参数。您可以设置它以控制请求/响应的缓存行为。有关有效值,请参阅 HTTP 操作的
Cache-Control标头字段 。 -
选择下一步。
-
-
在步骤 7:查看中,查看信息,然后选择创建管道。
-
在管道成功运行后,打开 Amazon S3 控制台并验证您的文件是否显示在公有桶中,如下所示:
index.html main.css graphic.jpg -
访问您的终端节点以测试网站。您的终端节点遵循以下格式:
http://。bucket-name.s3-website-region.amazonaws.com/示例终端节点:
http://my-bucket.s3-website-us-west-2.amazonaws.com/。此时会显示示例网页。
步骤 3:对任何源文件进行更改并验证部署
对您的源文件进行更改,然后将更改推送到存储库。这将触发您的管道运行。验证您的网站是否已更新。
选项 2:将构建的存档文件从 S3 源桶部署到 Amazon S3。
在此选项中,构建阶段的构建命令将 TypeScript 代码编译成 JavaScript 代码,并将输出部署到带有时间戳的单独文件夹下的 S3 目标存储桶。首先,创建 TypeScript 代码和一个 buildspec.yml 文件。将源文件合并到 ZIP 文件中后,将源 ZIP 文件上传到 S3 源存储桶,然后使用 CodeBuild 阶段将构建的应用程序 ZIP 文件部署到您的 S3 目标存储桶。编译后的代码将作为存档保留在目标存储桶中。
先决条件
您必须已经具备以下各项:
-
S3 源存储桶。您可以使用在教程:创建一个简单的管道(S3 存储桶)中创建的桶。
-
S3 目标存储桶。请参阅在 Amazon S3 上托管静态网站。请务必使用与要创建的管道 Amazon Web Services 区域 相同的方式创建存储桶。
注意
此示例演示如何将文件部署到私有存储桶。请勿为网站托管启用目标桶,也不要附加任何将桶设为公共桶的策略。
步骤 1:创建源文件并将其上传到您的 S3 源存储桶
在本部分中,您将创建源文件,并将其上传到管道用于源阶段的桶。本节提供有关创建以下源文件的说明:
-
一个
buildspec.yml文件,用于 CodeBuild 生成项目。 -
一个
index.ts文件。
创建 buildspec.yml 文件
-
使用以下内容创建名为
buildspec.yml的文件。这些编译命令安装 TypeScript 并使用 TypeScript编译器将代码重写index.ts为 JavaScript代码。version: 0.2 phases: install: commands: - npm install -g typescript build: commands: - tsc index.ts artifacts: files: - index.js
创建 index.ts 文件
-
使用以下内容创建名为
index.ts的文件。interface Greeting { message: string; } class HelloGreeting implements Greeting { message = "Hello!"; } function greet(greeting: Greeting) { console.log(greeting.message); } let greeting = new HelloGreeting(); greet(greeting);
将文件上传到 S3 源存储桶
-
您的文件在本地目录中应如下所示:
buildspec.yml
index.ts
压缩这些文件,并将文件命名为
source.zip。 -
在 Amazon S3 控制台中,对于您的源桶,选择上传。选择添加文件,然后浏览找到您之前创建的 ZIP 文件。
-
选择上传。这些文件是由创建管道向导针对您在 CodePipeline 中的部署操作创建的源项目。您的文件应该在您的文件夹中如下所示:
source.zip
步骤 2:创建管道
在此部分中,您将使用以下操作创建管道:
-
一个具有 Amazon S3 操作的源阶段,其中源构件是用于可下载应用程序的文件。
-
一个具有 Amazon S3 部署操作的部署阶段。
使用向导创建管道
登录 Amazon Web Services 管理控制台 并打开 CodePipeline 控制台,网址为 http://console.aws.amazon。 com/codesuite/codepipeline/home
。 -
在欢迎页面、入门页面或管道页面上,选择创建管道。
-
在步骤 1:选择创建选项页面上的创建选项下,选择构建自定义管道选项。选择下一步。
-
在步骤 2:选择管道设置的管道名称中,输入
MyS3DeployPipeline。 -
在服务角色中,选择新建服务角色 CodePipeline 以允许在 IAM 中创建服务角色。
-
将高级设置中的各项设置保留为默认值,然后选择下一步。
-
在步骤 3:添加源阶段的源提供程序中,选择 Amazon S3。在存储桶中,选择您的源存储桶的名称。在 S3 对象键中,输入您的源 ZIP 文件。请确保包含 .zip 文件扩展名。
选择下一步。
-
在步骤 4:添加构建阶段中:
-
在构建提供程序中,选择 CodeBuild。
-
选择 Create build project(创建构建项目)。在创建项目页面上:
-
在项目名称中,输入此构建项目的名称。
-
在环境中,选择托管映像。对于操作系统,选择 Ubuntu。
-
对于运行时,选择标准。对于运行时版本,请选择aws/codebuild/standard:1.0。
-
在映像版本中,选择始终对此运行时版本使用最新映像。
-
对于服务角色,请选择您的 CodeBuild 服务角色或创建一个服务角色。
-
对于构建规范,选择使用 buildspec 文件。
-
选择 “继续” CodePipeline。如果项目已成功创建,则会显示一条消息。
-
选择下一步。
-
-
在步骤 5:添加部署阶段中:
-
在部署提供程序中,选择 Amazon S3。
-
在存储桶中,输入您的 S3 目标存储桶的名称。
-
确保已清除部署前提取文件。
当在部署前提取文件已清除时,将会显示 S3 对象键。输入您要使用的路径的名称:
js-application/{datetime}.zip。这将在 Amazon S3 中创建一个
js-application文件夹,文件将提取到该文件夹中。在此文件夹中,{datetime}变量在您的管道运行时会在每个输出文件上创建一个时间戳。
-
(可选)在标准 ACL 中,您可以将一组预定义的授权(称作标准 ACL)应用于上传的构件。
-
(可选)在缓存控制中,输入缓存参数。您可以设置它以控制请求/响应的缓存行为。有关有效值,请参阅 HTTP 操作的
Cache-Control标头字段 。 -
选择下一步。
-
-
在 Step 6: Review 中,查看信息,然后选择 Create pipeline。
-
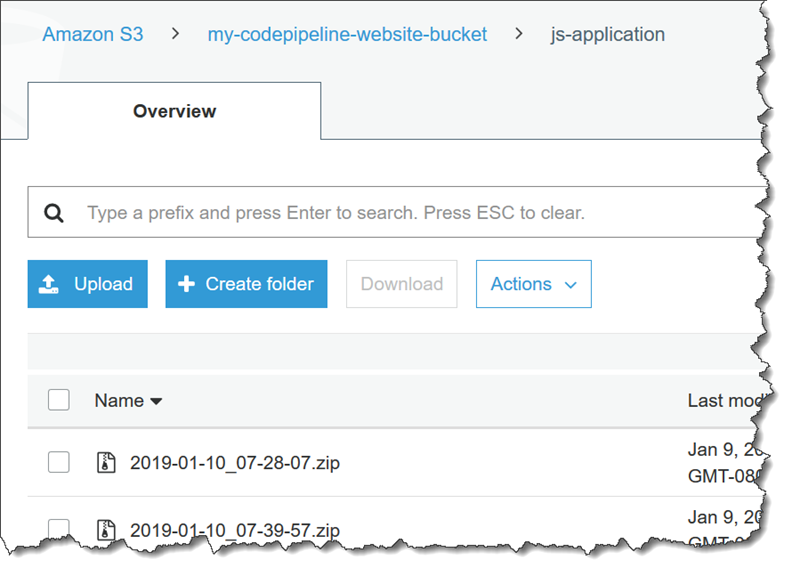
管道成功运行后,在 Amazon S3 控制台中查看您的桶。验证已部署的 ZIP 文件是否显示在
js-application文件夹下的目标存储桶中。ZIP JavaScript 文件中包含的文件应为index.js。index.js文件包含以下输出:var HelloGreeting = /** @class */ (function () { function HelloGreeting() { this.message = "Hello!"; } return HelloGreeting; }()); function greet(greeting) { console.log(greeting.message); } var greeting = new HelloGreeting(); greet(greeting);
步骤 3:对任何源文件进行更改并验证部署
对源文件进行更改,然后将其上传到源存储桶。这将触发您的管道运行。查看目标存储桶并验证部署的输出文件是否在 js-application 文件夹中可用,如下所示: