本文属于机器翻译版本。若本译文内容与英语原文存在差异,则一律以英文原文为准。
将 OIDC 身份提供者与用户池配合使用
用户可以使用 OpenID Connect (OIDC) 身份提供商 () 提供的现有账户登录您的应用程序。IdPs借助 OIDC 提供者,独立单点登录系统的用户可以提供现有凭证,同时您的应用程序以用户池共享格式接收 OIDC 令牌。要配置 OIDC IdP,请将您的 IdP 设置为将用户池作为 RP 处理,并将应用程序配置为将用户池作为 IdP 处理。Amazon Cognito 是多个 OIDC IdPs 和您的应用程序之间的中间步骤。用户池将属性映射规则应用于提供者直接传递给用户池的 ID 和访问令牌中的声明。然后,Amazon Cognito 会根据映射的用户属性以及您使用 Lambda 触发器对身份验证流程所做的任何其他调整来发出新令牌。
使用 OIDC IdP 登录的用户无需提供新的凭证或信息即可访问您的用户池应用程序。您的应用程序可以静默地将他们重定向到其 IdP 进行登录,在后台使用用户池作为工具,用于标准化应用程序的令牌格式。要了解有关 IdP 重定向的更多信息,请参阅对端点授权。
与其他第三方身份提供者一样,您必须向 OIDC 提供者注册您的应用程序,并获取有关要连接到用户池的 IdP 应用程序的信息。用户池 OIDC IdP 需要客户端 ID、客户端密钥、您要请求的范围以及有关提供者服务端点的信息。您的用户池可以从发现端点发现提供者 OIDC 端点,也可以手动输入它们。您还必须检查提供者 ID 令牌,并在 IdP 和用户池中的属性之间创建属性映射。
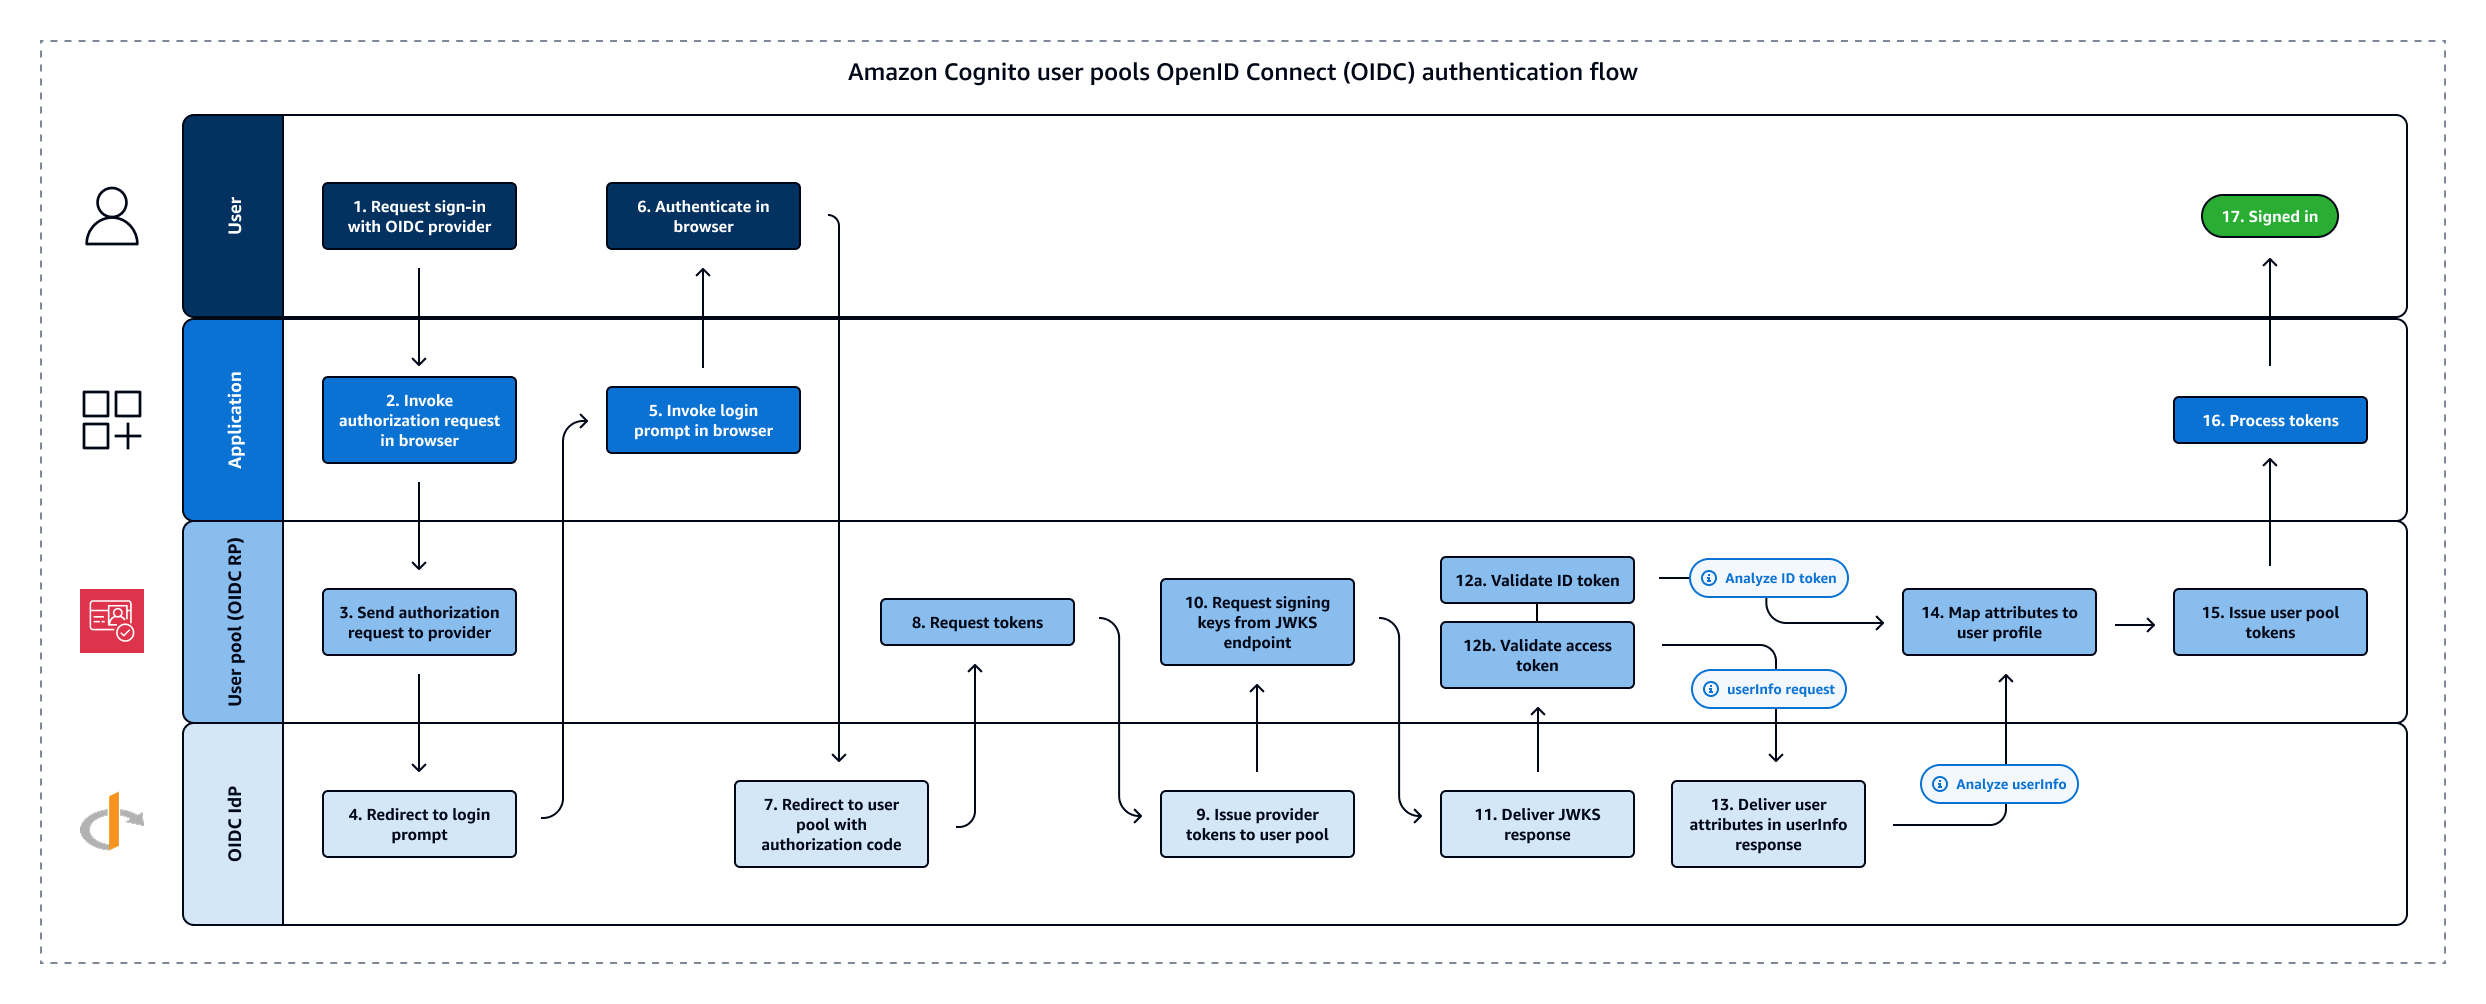
有关此身份验证流程的更多详细信息,请参阅 OIDC 用户池 IdP 身份验证流程。
注意
通过第三方(联合身份验证)进行登录可在 Amazon Cognito 用户池中实现。此特征不依赖于通过 Amazon Cognito 身份池实现的 OIDC 联合身份验证。
您可以通过 Amazon Web Services 管理控制台、或使用用户池 API 方法将 OIDC IdP 添加到您的用户池中。 Amazon CLICreateIdentityProvider
先决条件
在开始之前,您需要:
-
具有应用程序客户端和用户池域的用户池。有关更多信息,请参阅创建用户池。
-
具有以下配置的 OIDC IdP:
-
支持
client_secret_post客户端身份验证。Amazon Cognito 不在 IdP 的 OIDC 发现端点上检查token_endpoint_auth_methods_supported声明。Amazon Cognito 不支持client_secret_basic客户端身份验证。有关客户端验证的更多信息,请参阅 OpenID Connect 文档中的客户端身份验证。 -
仅对 OIDC 端点使用 HTTPS,例如
openid_configuration、userInfo和jwks_uri。 -
仅为 OIDC 端点使用 TCP 端口 80 和 443。
-
只能使用 HMAC-SHA、ECDSA 或 RSA 算法对 ID 令牌进行签名。
-
在密钥的
jwks_uri处发布密钥 IDkid声明,并在其令牌中包含kid声明。 -
提供具有有效根 CA 信任链的未过期公钥。
-
向 OIDC IdP 注册应用程序
在将 OIDC IdP 添加到用户池配置并将其分配给应用程序客户端之前,您需要在 IdP 中设置一个 OIDC 客户端应用程序。您的用户池是用于管理您的 IdP 身份验证的依赖方应用程序。
向 OIDC IdP 注册
-
使用 OIDC IdP 创建开发人员账户。
指向 OIDC 的链接 IdPs OIDC IdP 如何安装 OIDC 发现 URL Salesforce https://MyDomainName.my.salesforce.com/.well-known/openid-configurationOneLogin 连接启用 OIDC 的应用程序 https://your-domain.onelogin.com/oidc/2/.well-known/openid-configurationJumpCloud 通过 OIDC 进行 SSO https://oauth.id.jumpcloud.com/.well-known/openid-configurationOkta https://Your Okta subdomain.okta.com/.well-known/openid-configurationMicrosoft Entra ID https://login.microsoftonline.com/{tenant}/v2.0tenant的值可以包括租户 ID、common、organizations或consumers。 -
向 OIDC IdP 注册具有
/oauth2/idpresponse端点的用户池域 URL。这将确保 OIDC IdP 之后在对用户进行身份验证时通过 Amazon Cognito 接受此 URL。https://mydomain.auth.us-east-1.amazoncognito.com/oauth2/idpresponse -
选择您希望用户目录与用户池共享的范围。OIDC 需要使用作用域 openid IdPs 才能提供任何用户信息。需要使用
email范围才能授予对email和email_verified声明的访问权限。OIDC 规范中的其他范围是适用于所有用户属性的 profile以及适用于phone_number和phone_number_verified的phone。 -
OIDC IdP 为您提供客户端 ID 和客户端密钥。请记下这些值并将其添加到稍后添加到用户池的 OIDC IdP 的配置中。
示例:使用 Salesforce 作为用户池的 OIDC IdP
当您要在与 OIDC 兼容的 IdP(如 Salesforce)和您的用户池之间建立信任时,请使用 OIDC IdP。
-
在 Salesforce 开发人员网站上创建账户
。 -
请在 Salesforce 页面上,执行以下操作之一:
-
如果您使用的是 Lightning Experience,请选择设置齿轮图标,然后选择 Setup Home(设置主页)。
-
如果您使用的是 Salesforce Classic 并且在用户界面标题中看到 Setup(设置),请选择它。
-
如果您使用的是 Salesforce Classic 但没有在用户界面标题中看到 Setup(设置),请从顶部导航栏中选择您的姓名,然后从下拉列表中选择 Setup(设置)。
-
-
在左侧导航栏上,选择 Company Settings(公司设置)。
-
在导航栏上,选择域,输入一个域,然后选择创建。
-
在左侧导航栏上,选择在 Platform Tools(平台工具)下的 Apps(应用程序)。
-
选择 App Manager(应用程序管理器)。
-
-
选择 New connected app(新连接的应用程序)。
-
完成必填句段。
在 Start URL(启动 URL)下,在
/authorize终端节点处输入使用您的 Salesforce IdP 登录的用户池域的 URL。当您的用户访问您连接的应用程序时,Salesforce 会将他们定向到此 URL 以完成登录。然后 Salesforce 将用户重定向到与应用程序客户端关联的回调 URL。https://mydomain.auth.us-east-1.amazoncognito.com/authorize?response_type=code&client_id=<your_client_id>&redirect_uri=https://www.example.com&identity_provider=CorpSalesforce -
启用OAuth 设置并在回调 URL 中输入您的用户池域的
/oauth2/idpresponse终端节点 URL。这是 Salesforce 发布授权码的网址,Amazon Cognito 用该代码兑换令牌。 OAuthhttps://mydomain.auth.us-east-1.amazoncognito.com/oauth2/idpresponse
-
-
选择 scopes
(范围)。您必须包含范围 openid。要授予对 email 和 email_verified 声明 的访问权限,请添加电子邮件范围。通过空格分隔范围。 -
选择 Create(创建)。
在 Salesforce 中,客户端 ID 称为 Consumer Key(使用者密钥),客户端密钥为 Consumer Secret(使用者私有密钥)。记下您的客户端 ID 和客户端密钥。您将在下一节中使用它们。
将 OIDC IdP 添加到用户池
设置 IdP 后,您可以将用户池配置为使用 OIDC IdP 处理身份验证请求。
测试 OIDC IdP 配置
在您的应用程序中,您必须在用户的客户端中调用浏览器,这样他们才能使用其 OIDC 提供商登录。完成前几节中的设置过程后,使用提供商测试登录。以下示例 URL 通过前缀域加载用户池的登录页面。
https://mydomain.auth.us-east-1.amazoncognito.com/oauth2/authorize?response_type=code&client_id=1example23456789&redirect_uri=https://www.example.com
此链接是当您转到应用程序客户端菜单,选择应用程序客户端,导航到登录页面选项卡,然后选择查看登录页面时,Amazon Cognito 将您引导至的页面。有关用户池域的更多信息,请参阅 配置用户池域。有关应用程序客户端(包括客户端 IDs 和回调)的更多信息 URLs,请参阅特定于应用程序的应用程序客户端设置。
以下示例链接通过 identity_provider 查询参数设置从对端点授权到 MyOIDCIdP 提供者的静默重定向。此 URL 会绕过使用托管登录的交互式用户池登录,直接转到 IdP 登录页面。
https://mydomain.auth.us-east-1.amazoncognito.com/oauth2/authorize?identity_provider=MyOIDCIdP&response_type=code&client_id=1example23456789&redirect_uri=https://www.example.com