Configuring IAM permissions for RDS for Oracle integration with Amazon S3
For RDS for Oracle to integrate with Amazon S3, your DB instance must have access to an Amazon S3 bucket. The Amazon VPC used by your DB instance doesn't need to provide access to the Amazon S3 endpoints.
RDS for Oracle supports transferring files between a DB instance in one account and an Amazon S3 bucket in a different account. Where additional steps are required, they are noted in the following sections.
Topics
Step 1: Create an IAM policy for your Amazon RDS role
In this step, you create an Amazon Identity and Access Management (IAM) policy with the permissions required to transfer files between your Amazon S3 bucket and your RDS DB instance. This step assumes that you have already created an S3 bucket.
Before you create the policy, note the following pieces of information:
-
The Amazon Resource Name (ARN) for your bucket
-
The ARN for your Amazon KMS key, if your bucket uses SSE-KMS or SSE-S3 encryption
Note
An RDS for Oracle DB instance can't access Amazon S3 buckets encrypted with SSE-C.
For more information, see Protecting data using server-side encryption in the Amazon Simple Storage Service User Guide.
To create an IAM policy to allow Amazon RDS to access your Amazon S3 bucket
-
Open the IAM Management Console
. -
Under Access management, choose Policies.
-
Choose Create Policy.
-
On the Visual editor tab, choose Choose a service, and then choose S3.
-
For Actions, choose Expand all, and then choose the bucket permissions and object permissions required to transfer files from an Amazon S3 bucket to Amazon RDS. For example, do the following:
-
Expand List, and then select ListBucket.
-
Expand Read, and then select GetObject.
-
Expand Write, and then select PutObject, DeleteObject, AbortMultipartUpload, and ListMultipartUploadParts. The multipart upload permissions are required when uploading large files (100 MB or larger) to Amazon S3.
-
Expand Permissions management, and then select PutObjectAcl. This permission is necessary if you plan to upload files to a bucket owned by a different account, and this account needs full control of the bucket contents.
Object permissions are permissions for object operations in Amazon S3. You must grant them for objects in a bucket, not the bucket itself. For more information, see Permissions for object operations.
-
-
Choose Resources, and then do the following:
-
Choose Specific.
-
For bucket, choose Add ARN. Enter your bucket ARN. The bucket name is filled in automatically. Then choose Add.
-
If the object resource is shown, either choose Add ARN to add resources manually or choose Any.
Note
You can set Amazon Resource Name (ARN) to a more specific ARN value to allow Amazon RDS to access only specific files or folders in an Amazon S3 bucket. For more information about how to define an access policy for Amazon S3, see Managing access permissions to your Amazon S3 resources.
-
-
(Optional) Choose Add additional permissions to add resources to the policy. For example, do the following:
-
If your bucket is encrypted with a custom KMS key, select KMS for the service.
-
For Manual actions, select the following:
-
Encrypt
-
ReEncrypt from and ReEncrypt to
-
Decrypt
-
DescribeKey
-
GenerateDataKey
-
-
For Resources, choose Specific.
-
For key, choose Add ARN. Enter the ARN of your custom key as the resource, and then choose Add.
For more information, see Protecting Data Using Server-Side Encryption with KMS keys Stored in Amazon Key Management Service (SSE-KMS) in the Amazon Simple Storage Service User Guide.
-
If you want Amazon RDS to access other buckets, add the ARNs for these buckets. Optionally, you can also grant access to all buckets and objects in Amazon S3.
-
-
Choose Next: Tags and then Next: Review.
-
For Name, enter a name for your IAM policy, for example
rds-s3-integration-policy. You use this name when you create an IAM role to associate with your DB instance. You can also add an optional Description value. -
Choose Create policy.
Create an Amazon Identity and Access Management (IAM) policy that grants Amazon RDS access to an Amazon S3 bucket. After you create the policy, note the ARN of the policy. You need the ARN for a subsequent step.
Include the appropriate actions in the policy based on the type of access required:
-
GetObject– Required to transfer files from an Amazon S3 bucket to Amazon RDS. -
ListBucket– Required to transfer files from an Amazon S3 bucket to Amazon RDS. -
PutObject– Required to transfer files from Amazon RDS to an Amazon S3 bucket. -
AbortMultipartUpload– Required for multipart uploads when transferring large files (100 MB or larger) from Amazon RDS to an Amazon S3 bucket. -
ListMultipartUploadParts– Required for multipart uploads when transferring large files (100 MB or larger) from Amazon RDS to an Amazon S3 bucket.
The following Amazon CLI command creates an IAM policy named rds-s3-integration-policyamzn-s3-demo-bucket
Example
For Linux, macOS, or Unix:
aws iam create-policy \ --policy-namerds-s3-integration-policy\ --policy-document '{ "Version": "2012-10-17", "Statement": [ { "Sid": "s3integration", "Action": [ "s3:GetObject", "s3:ListBucket", "s3:PutObject", "s3:AbortMultipartUpload", "s3:ListMultipartUploadParts" ], "Effect": "Allow", "Resource": [ "arn:aws-cn:s3:::amzn-s3-demo-bucket", "arn:aws-cn:s3:::amzn-s3-demo-bucket/*" ] } ] }'
The following example includes permissions for custom KMS keys.
aws iam create-policy \ --policy-namerds-s3-integration-policy\ --policy-document '{ "Version": "2012-10-17", "Statement": [ { "Sid": "s3integration", "Action": [ "s3:GetObject", "s3:ListBucket", "s3:PutObject", "kms:Decrypt", "kms:Encrypt", "kms:ReEncrypt*", "kms:GenerateDataKey", "kms:DescribeKey", ], "Effect": "Allow", "Resource": [ "arn:aws-cn:s3:::amzn-s3-demo-bucket", "arn:aws-cn:s3:::amzn-s3-demo-bucket/*", "arn:aws-cn:kms:::your-kms-arn" ] } ] }'
For Windows:
aws iam create-policy ^ --policy-namerds-s3-integration-policy^ --policy-document '{ "Version": "2012-10-17", "Statement": [ { "Sid": "s3integration", "Action": [ "s3:GetObject", "s3:ListBucket", "s3:PutObject", "s3:AbortMultipartUpload", "s3:ListMultipartUploadParts" ], "Effect": "Allow", "Resource": [ "arn:aws-cn:s3:::amzn-s3-demo-bucket", "arn:aws-cn:s3:::amzn-s3-demo-bucket/*" ] } ] }'
The following example includes permissions for custom KMS keys.
aws iam create-policy ^ --policy-namerds-s3-integration-policy^ --policy-document '{ "Version": "2012-10-17", "Statement": [ { "Sid": "s3integration", "Action": [ "s3:GetObject", "s3:ListBucket", "s3:PutObject", "kms:Decrypt", "kms:Encrypt", "kms:ReEncrypt", "kms:GenerateDataKey", "kms:DescribeKey", ], "Effect": "Allow", "Resource": [ "arn:aws-cn:s3:::amzn-s3-demo-bucket", "arn:aws-cn:s3:::amzn-s3-demo-bucket/*", "arn:aws-cn:kms:::your-kms-arn" ] } ] }'
Step 2: (Optional) Create an IAM policy for your Amazon S3 bucket
This step is necessary only in the following conditions:
-
You plan to upload files to an Amazon S3 bucket from one account (account A) and access them from a different account (account B).
-
Account B owns the bucket.
-
Account B needs full control of objects loaded into the bucket.
If the preceding conditions don't apply to you, skip to Step 3: Create an IAM role for your DB instance and attach your policy.
To create your bucket policy, make sure you have the following:
-
The account ID for account A
-
The user name for account A
-
The ARN value for the Amazon S3 bucket in account B
To create or edit a bucket policy
Sign in to the Amazon Web Services Management Console and open the Amazon S3 console at https://console.amazonaws.cn/s3/
. -
In the Buckets list, choose the name of the bucket that you want to create a bucket policy for or whose bucket policy you want to edit.
-
Choose Permissions.
-
Under Bucket policy, choose Edit. This opens the Edit bucket policy page.
-
On the Edit bucket policy page, explore Policy examples in the Amazon S3 User Guide, choose Policy generator to generate a policy automatically, or edit the JSON in the Policy section.
If you choose Policy generator, the Amazon Policy Generator opens in a new window:
-
On the Amazon Policy Generator page, in Select Type of Policy, choose S3 Bucket Policy.
-
Add a statement by entering the information in the provided fields, and then choose Add Statement. Repeat for as many statements as you would like to add. For more information about these fields, see the IAM JSON policy elements reference in the IAM User Guide.
Note
For convenience, the Edit bucket policy page displays the Bucket ARN (Amazon Resource Name) of the current bucket above the Policy text field. You can copy this ARN for use in the statements on the Amazon Policy Generator page.
-
After you finish adding statements, choose Generate Policy.
-
Copy the generated policy text, choose Close, and return to the Edit bucket policy page in the Amazon S3 console.
-
-
In the Policy box, edit the existing policy or paste the bucket policy from the Policy generator. Make sure to resolve security warnings, errors, general warnings, and suggestions before you save your policy.
-
Choose Save changes, which returns you to the Bucket Permissions page.
Step 3: Create an IAM role for your DB instance and attach your policy
This step assumes that you have created the IAM policy in Step 1: Create an IAM policy for your Amazon RDS role. In this step, you create a role for your RDS for Oracle DB instance and then attach your policy to the role.
To create an IAM role to allow Amazon RDS to access an Amazon S3 bucket
-
Open the IAM Management Console
. -
In the navigation pane, choose Roles.
-
Choose Create role.
-
Choose Amazon service.
-
For Use cases for other Amazon services:, choose RDS and then RDS – Add Role to Database. Then choose Next.
-
For Search under Permissions policies, enter the name of the IAM policy you created in Step 1: Create an IAM policy for your Amazon RDS role, and select the policy when it appears in the list. Then choose Next.
-
For Role name, enter a name for your IAM role, for example,
rds-s3-integration-role. You can also add an optional Description value. -
Choose Create role.
To create a role and attach your policy to it
-
Create an IAM role that Amazon RDS can assume on your behalf to access your Amazon S3 buckets.
We recommend using the
aws:SourceArnandaws:SourceAccountglobal condition context keys in resource-based trust relationships to limit the service's permissions to a specific resource. This is the most effective way to protect against the confused deputy problem.You might use both global condition context keys and have the
aws:SourceArnvalue contain the account ID. In this case, theaws:SourceAccountvalue and the account in theaws:SourceArnvalue must use the same account ID when used in the same statement.-
Use
aws:SourceArnif you want cross-service access for a single resource. -
Use
aws:SourceAccountif you want to allow any resource in that account to be associated with the cross-service use.
In the trust relationship, make sure to use the
aws:SourceArnglobal condition context key with the full Amazon Resource Name (ARN) of the resources accessing the role.The following Amazon CLI command creates the role named
rds-s3-integration-roleExample
For Linux, macOS, or Unix:
aws iam create-role \ --role-namerds-s3-integration-role\ --assume-role-policy-document '{ "Version": "2012-10-17", "Statement": [ { "Effect": "Allow", "Principal": { "Service": "rds.amazonaws.com" }, "Action": "sts:AssumeRole", "Condition": { "StringEquals": { "aws:SourceAccount": "my_account_ID", "aws:SourceArn": "arn:aws:rds:Region:my_account_ID:db:dbname" } } } ] }'For Windows:
aws iam create-role ^ --role-namerds-s3-integration-role^ --assume-role-policy-document '{ "Version": "2012-10-17", "Statement": [ { "Effect": "Allow", "Principal": { "Service": "rds.amazonaws.com" }, "Action": "sts:AssumeRole", "Condition": { "StringEquals": { "aws:SourceAccount": "my_account_ID", "aws:SourceArn": "arn:aws:rds:Region:my_account_ID:db:dbname" } } } ] }'For more information, see Creating a role to delegate permissions to an IAM user in the IAM User Guide.
-
-
After the role is created, note the ARN of the role. You need the ARN for a subsequent step.
-
Attach the policy you created to the role you created.
The following Amazon CLI command attaches the policy to the role named
rds-s3-integration-roleExample
For Linux, macOS, or Unix:
aws iam attach-role-policy \ --policy-arnyour-policy-arn\ --role-namerds-s3-integration-roleFor Windows:
aws iam attach-role-policy ^ --policy-arnyour-policy-arn^ --role-namerds-s3-integration-roleReplace
your-policy-arn
Step 4: Associate your IAM role with your RDS for Oracle DB instance
The last step in configuring permissions for Amazon S3 integration is associating your IAM role with your DB instance. Note the following requirements:
-
You must have access to an IAM role with the required Amazon S3 permissions policy attached to it.
-
You can only associate one IAM role with your RDS for Oracle DB instance at a time.
-
Your DB instance must be in the Available state.
To associate your IAM role with your RDS for Oracle DB instance
Sign in to the Amazon Web Services Management Console and open the Amazon RDS console at https://console.amazonaws.cn/rds/
. -
Choose Databases from the navigation pane.
-
Choose the RDS for Oracle DB instance name to display its details.
-
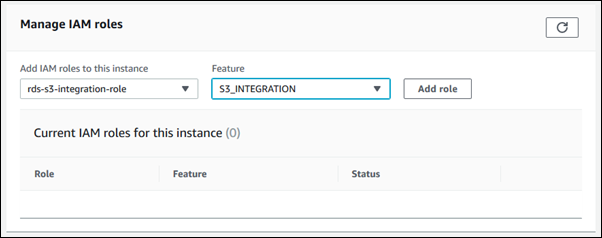
On the Connectivity & security tab, scroll down to the Manage IAM roles section at the bottom of the page.
-
For Add IAM roles to this instance, choose the role that you created in Step 3: Create an IAM role for your DB instance and attach your policy.
-
For Feature, choose S3_INTEGRATION.
-
Choose Add role.
The following Amazon CLI command adds the role to an Oracle DB instance named
mydbinstance
Example
For Linux, macOS, or Unix:
aws rds add-role-to-db-instance \ --db-instance-identifiermydbinstance\ --feature-name S3_INTEGRATION \ --role-arnyour-role-arn
For Windows:
aws rds add-role-to-db-instance ^ --db-instance-identifiermydbinstance^ --feature-name S3_INTEGRATION ^ --role-arnyour-role-arn
Replace your-role-arnS3_INTEGRATION must be specified for the --feature-name option.
Verifying your S3 integration configuration
To verify your S3 integration configuration, confirm the IAM role is associated:
SELECT * FROM TABLE(rdsadmin.rdsadmin_util.list_iam_roles());
The output should show your role with the feature name S3_INTEGRATION and a status of
ACTIVE.
To test connectivity, upload a small test file:
BEGIN
    rdsadmin.rdsadmin_util.upload_to_s3(
        p_bucket_name    => 'my-s3-bucket',
        p_s3_prefix      => 'test/',
        p_directory_name => 'DATA_PUMP_DIR',
        p_file_name      => 'test_upload.txt');
END;
/
If the upload succeeds without errors, your S3 integration is configured correctly.