Integrating ActiveMQ brokers with LDAP
Important
Amazon MQ does not support server certificate issued by a private CA.
You can access your ActiveMQ brokers using the following protocols with TLS enabled:
Amazon MQ offers a choice between native ActiveMQ authentication and LDAP authentication and authorization to manage user permissions. For information about restrictions related to ActiveMQ usernames and passwords, see Users.
To authorize ActiveMQ users and groups to works with queues and topics, you must edit your broker's
configuration. Amazon MQ uses ActiveMQ's Simple Authentication PluginauthorizationEntry.
Note
Currently, Amazon MQ doesn't support Client Certificate Authentication.
Integrate LDAP with ActiveMQ
You can authenticate Amazon MQ users through the credentials stored in your lightweight directory access protocol (LDAP) server. You can also add, delete, and modify Amazon MQ users and assign permissions to topics and queues through it. Management operations like creating, updating and deleting brokers still require IAM credentials and are not integrated with LDAP.
Customers who want to simplify and centralize their Amazon MQ broker authentication and authorization using an LDAP server can use this feature. Keeping all user credentials in the LDAP server saves time and effort by providing a central location for storing and managing these credentials.
Amazon MQ provides LDAP support using the Apache ActiveMQ JAAS plugin. Any LDAP server,
such as Microsoft Active Directory or OpenLDAP that is supported by the plugin is also
supported by Amazon MQ. For more information about the plugin, see the Security
In addition to users, you can specify access to topics and queues for a specific group or a user through your LDAP server. You do this by creating entries that represent topics and queues in your LDAP server and then assigning permissions to a specific LDAP user or a group. You can then configure broker to retrieve authorization data from the LDAP server.
Important
When using LDAP, authentication is not case-sensitive, but authorization is case-sensitive for your username.
Prerequisites
Before you add LDAP support to a new or existing Amazon MQ broker, you must set up a service account. This service account is required to initiate a connection to an LDAP server and must have the correct permissions to make this connection. This service account will set up LDAP authentication for your broker. Any successive client connections will be authenticated through the same connection.
The service account is an account in your LDAP server, which has access to initiate a connection. It is a standard LDAP requirement and you have to provide the service account credentials only once. After the connection is setup, all the future client connections are authenticated through your LDAP server. Your service account credentials are stored securely in an encrypted form, which is accessible only to Amazon MQ.
To integrate with ActiveMQ, a specific Directory Information Tree (DIT) is required on
the LDAP server. For an example ldif file that clearly shows this
structure, see Import the following LDIF file into the LDAP server
in the Security
Getting Started with LDAP
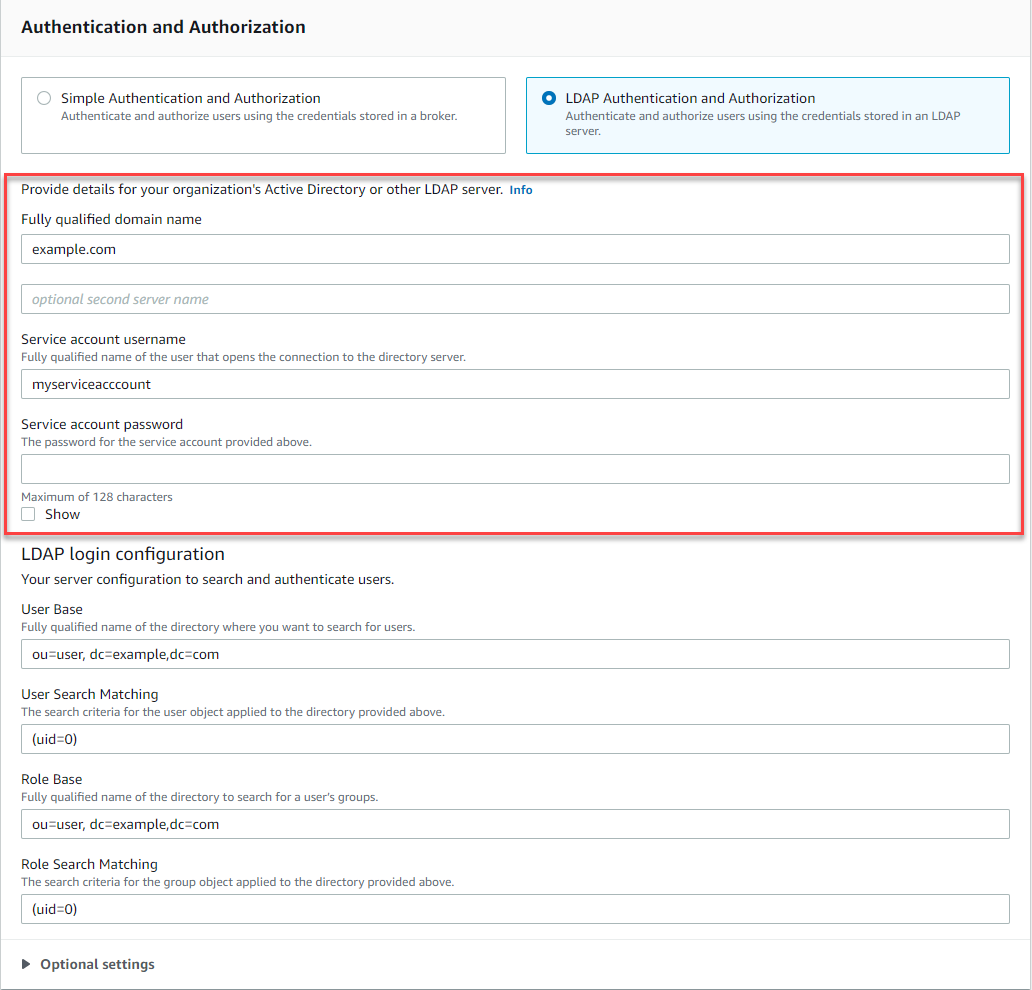
To get started, navigate to the Amazon MQ console and choose LDAP authentication and authorization when you create a new Amazon MQ or edit an existing broker instance.
Provide the following information about the service account:
-
Fully qualified domain name The location of the LDAP server to which authentication and authorization requests are to be issued.
Note
The fully qualified domain name of the LDAP server you supply must not include the protocol or port number. Amazon MQ will prepend the fully qualified domain name with the protocol
ldaps, and will append the port number636.For example, if you provide the following fully qualified domain:
example.com, Amazon MQ will access your LDAP server using the following URL:ldaps://example.com:636.For the broker host to be able to successfully communicate with the LDAP server, the fully qualified domain name must be publicly resolvable. To keep the LDAP server private and secure, restrict inbound traffic in the server's inbound rules to only allow traffic originated from within the broker's VPC.
-
Service account username The distinguished name of the user that will be used to perform the initial bind to the LDAP server.
-
Service account password The password of the user performing the initial bind.
The following image highlights where to supply these details.
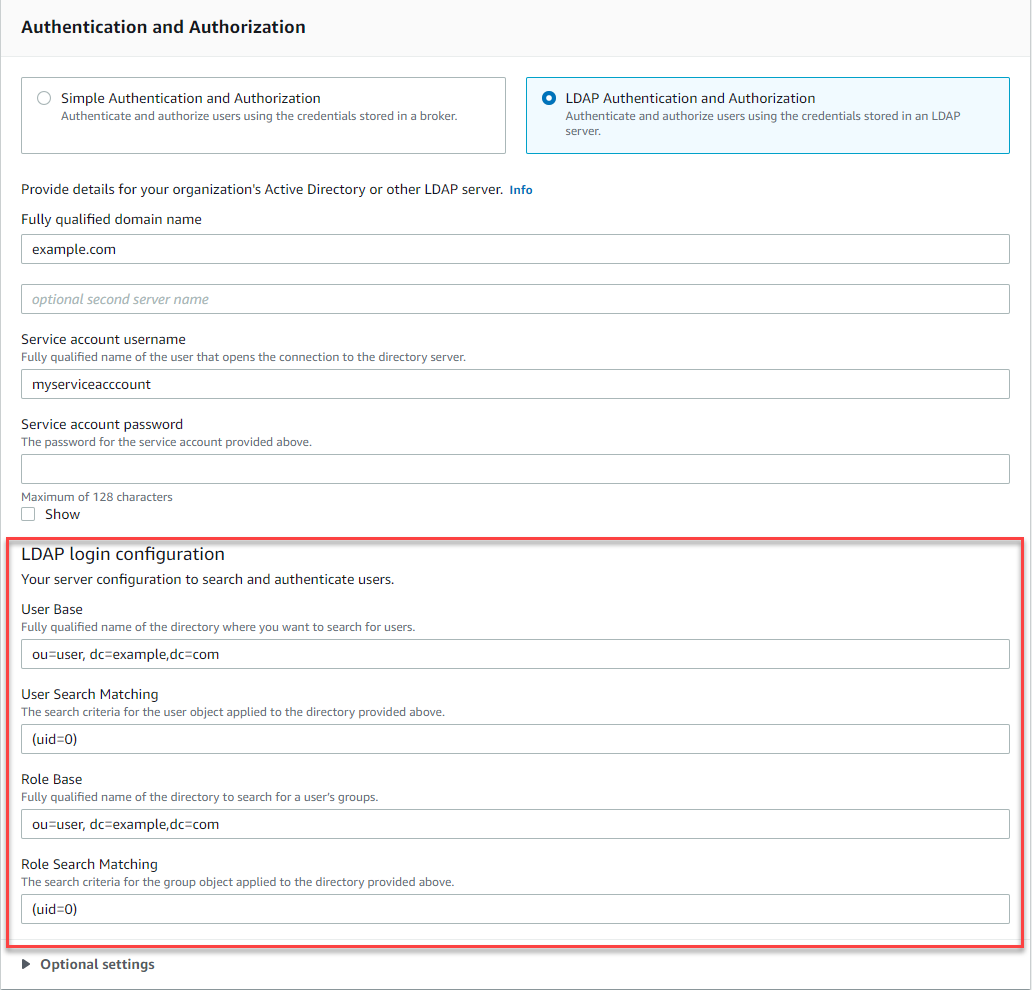
In the LDAP login configuration section, provide the following required information:
-
User Base The distinguished name of the node in the directory information tree (DIT) that will be searched for users.
-
User Search Matching The LDAP search filter that will be used to find users within the
userBase. The client's username will be substituted into the{0}placeholder in the search filter. For more information, see Authentication and Authorization. -
Role Base The distinguished name of the node in the DIT that will be searched for roles. Roles can be configured as explicit LDAP group entries in your directory. A typical role entry may consist of one attribute for the name of the role, such as common name (CN), and another attribute, such as
member, with values representing the distinguished names or usernames of the users belonging to the role group. For example, given the organizational unit,group, you can provide the following distinguished name:ou=group,dc=example,dc=com. -
Role Search Matching The LDAP search filter that will be used to find roles within the
roleBase. The distinguished name of the user matched byuserSearchMatchingwill be substituted into the{0}placeholder in the search filter. The client's username will be substituted in place of the{1}placeholder. For example, if role entries in your directory include an attribute namedmember, containing the usernames for all users in that role, you can provide the following search filter:(member:=uid={1}).
The following image highlights where to specify these details.
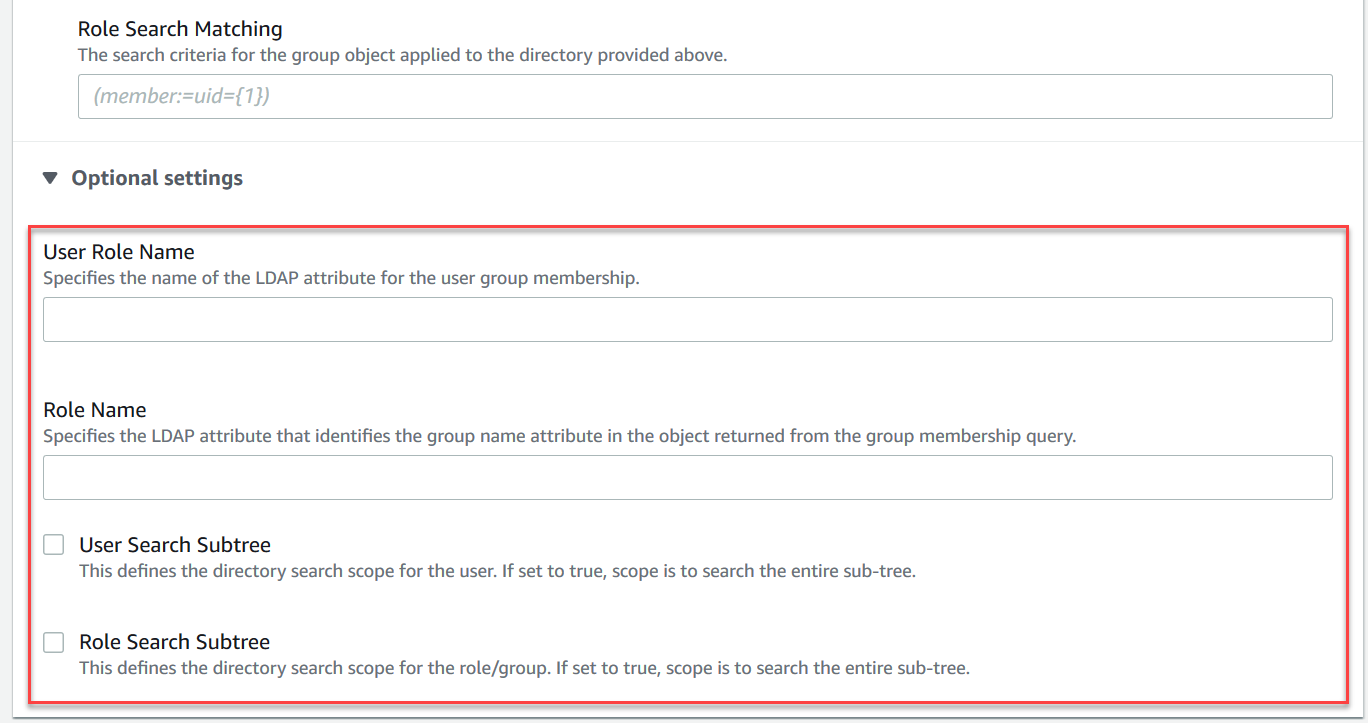
In the Optional settings section, you can provide the following optional information:
-
User Role Name The name of the LDAP attribute in the user's directory entry for the user's group membership. In some cases, user roles may be identified by the value of an attribute in the user's directory entry. The
userRoleNameoption allows you to provide the name of this attribute. For example, let's consider the following user entry:dn: uid=jdoe,ou=user,dc=example,dc=com objectClass: user uid: jdoe sn: jane cn: Jane Doe mail: j.doe@somecompany.com memberOf: role1 userPassword: passwordTo provide the correct
userRoleNamefor the example above, you would specify thememberOfattribute. If authentication is successful, the user is assigned the rolerole1. -
Role Name The group name attribute in a role entry whose value is the name of that role. For example, you can specify
cnfor a group entry's common name. If authentication succeeds, the user is assigned the the value of thecnattribute for each role entry that they are a member of. -
User Search Subtree Defines the scope for the LDAP user search query. If true, the scope is set to search the entire subtree under the node defined by
userBase. -
Role Search Subtree Defines the scope for the LDAP role search query. If true, the scope is set to search the entire subtree under the node defined by
roleBase.
The following image highlights where to specify these optional settings.
How LDAP integration works
You can think of integration in two main categories: the structure for authentication, and the structure for authorization.
Authentication
For authentication, client credentials must be valid. These credentials are validated against users in the user base in the LDAP server.
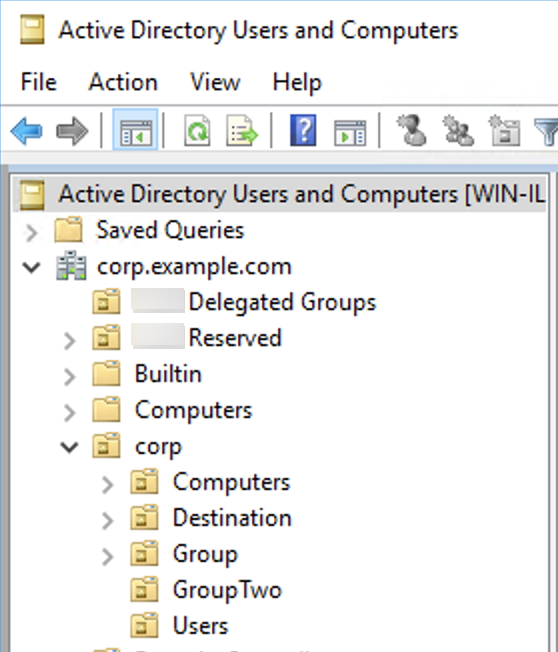
The user base supplied to the ActiveMQ broker must point to the node in the DIT
where users are stored in the LDAP server. For example, if you are using Amazon Managed Microsoft AD, and you have the domain components corp,
example, and com, and within those you have
organizational units corp and Users, you would use the
following as your user base:
OU=Users,OU=corp,DC=corp,DC=example,DC=com
The ActiveMQ broker would search at this location in the DIT for users in order to authenticate client connection requests to the broker.
Because the ActiveMQ source code hardcodes the attribute name for users to
uid, you must make sure that each user has this attribute set. For
simplicity, you can use the user’s connection username. For more information, see
the activemq
To enable ActiveMQ console access for specific users, make sure they belong to
the amazonmq-console-admins group.
Authorization
For authorization, permissions search bases are specified in the broker
configuration. Authorization is done on a per-destination basis (or wildcard,
destination set) via the cachedLdapAuthorizationMap element, found in the
broker’s activemq.xml configuration file. For more information, see
Cached
LDAP Authorization Module
Note
To be able to use the cachedLDAPAuthorizationMap element in your broker's activemq.xml configuration file,
you must choose the LDAP Authentication and Authorization option when
creating a configuration via the Amazon Web Services Management Console, or set the
creating a configuration via the Amazon Web Services Management Console, or set the
authenticationStrategy
property to LDAP when creating a new configuration using the Amazon MQ API.
You must provide the following three attributes as part of the cachedLDAPAuthorizationMap element:
-
queueSearchBase -
topicSearchBase -
tempSearchBase
Important
To prevent sensitive information from being directly placed in the broker's configuration file,
Amazon MQ blocks the following attributes from being used in cachedLdapAuthorizationMap:
-
connectionURL -
connectionUsername -
connectionPassword
When you create a broker, Amazon MQ substitutes the values you provide via the Amazon Web Services Management Console, or in the
ldapServerMetadata
property of your API request, for the above attributes.
The following demonstrates a working example of the cachedLdapAuthorizationMap.
<authorizationPlugin>
    <map>
        <cachedLDAPAuthorizationMap
            queueSearchBase="ou=Queue,ou=Destination,ou=corp,dc=corp,dc=example,dc=com"
            topicSearchBase="ou=Topic,ou=Destination,ou=corp,dc=corp,dc=example,dc=com"
            tempSearchBase="ou=Temp,ou=Destination,ou=corp,dc=corp,dc=example,dc=com"
            refreshInterval="300000"
            legacyGroupMapping="false"
        />
    </map>
</authorizationPlugin>
These values identify the locations within the DIT where permissions for each type
of destination are specified. So for the above example with Amazon Managed Microsoft AD,
using the same domain components of corp, example, and
com, you would specify an organizational unit named
destination to contain all your destination types. Within that OU,
you would create one for queues, one for topics, and one
for temp destinations.
This would mean that your queue search base, which provides authorization information for destinations of type queue, would have the following location in your DIT:
OU=Queue,OU=Destination,OU=corp,DC=corp,DC=example,DC=com
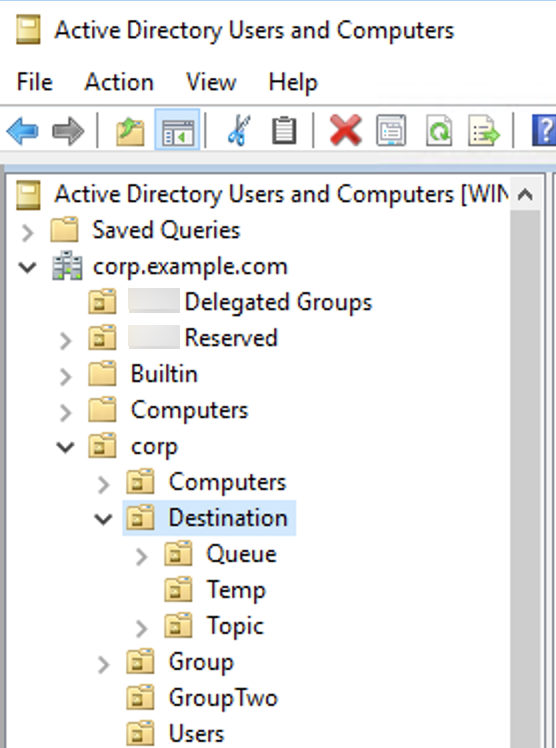
Similarly, permissions rules for topics and temp destinations would be located at the same level in the DIT:
OU=Topic,OU=Destination,OU=corp,DC=corp,DC=example,DC=com
OU=Temp,OU=Destination,OU=corp,DC=corp,DC=example,DC=com
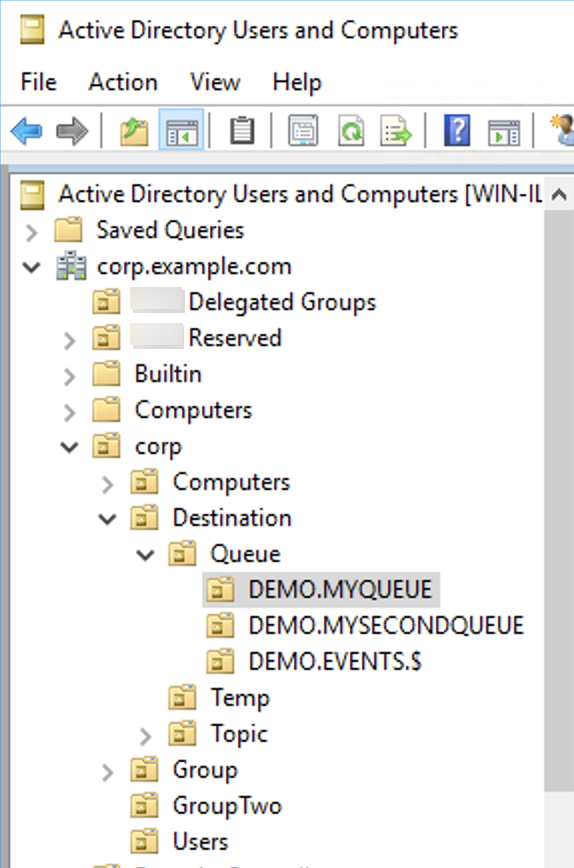
Within the OU for each type of destination (queue, topic, temp), either a wildcard or specific destination name can be provided. For example, to provide an authorization rule for all queues that start with the prefix DEMO.EVENTS.$., you could create the following OU:
OU=DEMO.EVENTS.$,OU=Queue,OU=Destination,OU=corp,DC=corp,DC=example,DC=com
Note
The DEMO.EVENTS.$ OU is within the Queue OU.
For more info on wildcards in ActiveMQ, see Wildcards
To provide authorization rules for specific queues, such as DEMO.MYQUEUE, specify something like the following:
OU=DEMO.MYQUEUE,OU=Queue,OU=Destination,OU=corp,DC=corp,DC=example,DC=com
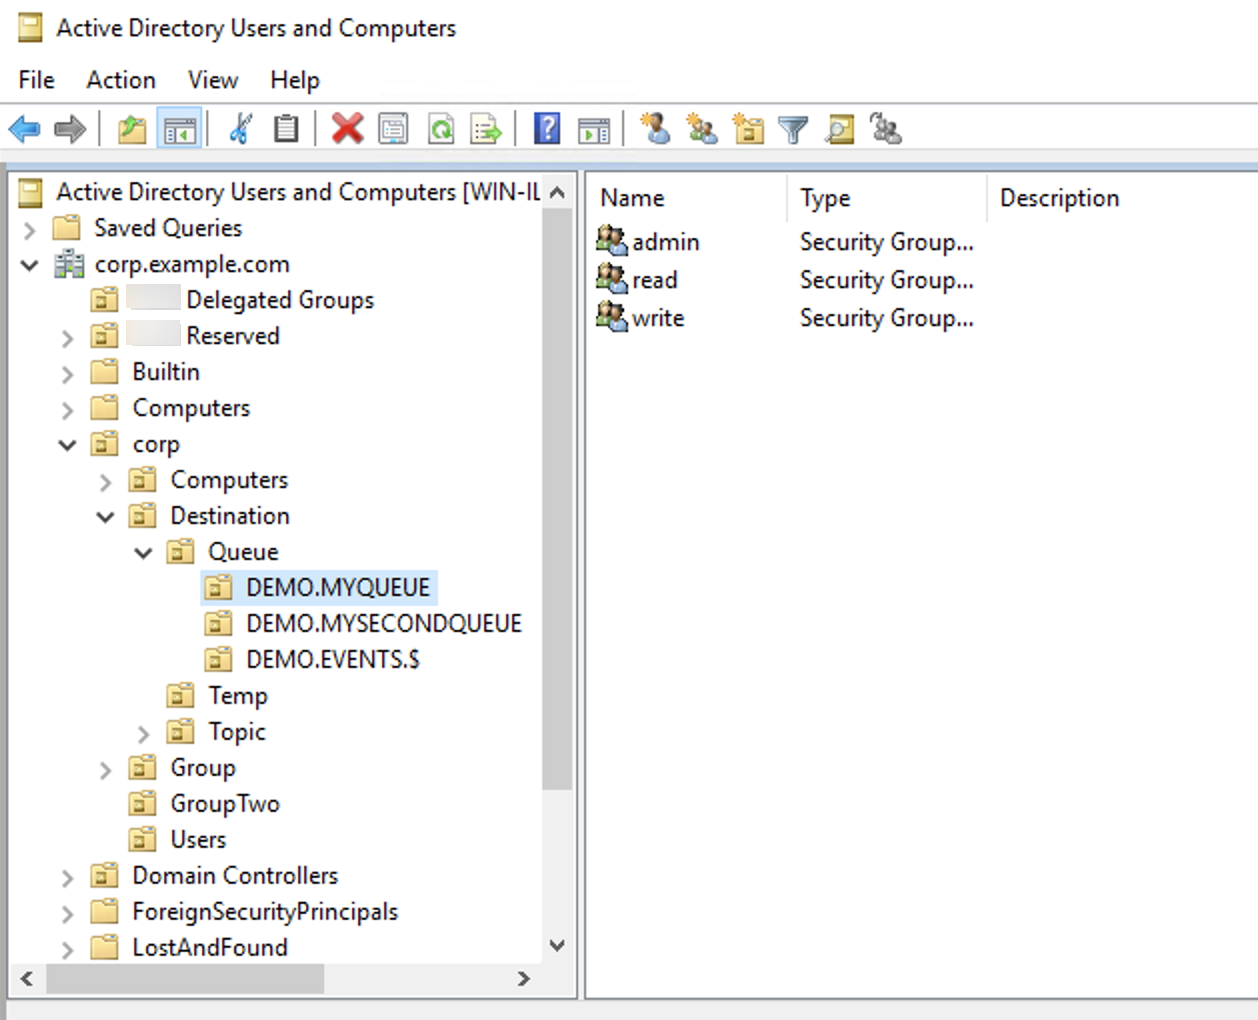
Security Groups
Within each OU that represents a destination or a wildcard, you must create three
security groups. As with all permissions in ActiveMQ, these are read/write/admin
permissions. For more information on what each of these permissions allows a user to
do, see Security
You must name these security groups read, write, and
admin. Within each of these security groups, you can add users or
groups, who will then have permission to perform the associated actions. You’ll need
these security groups for each wildcard destination set or individual destination.
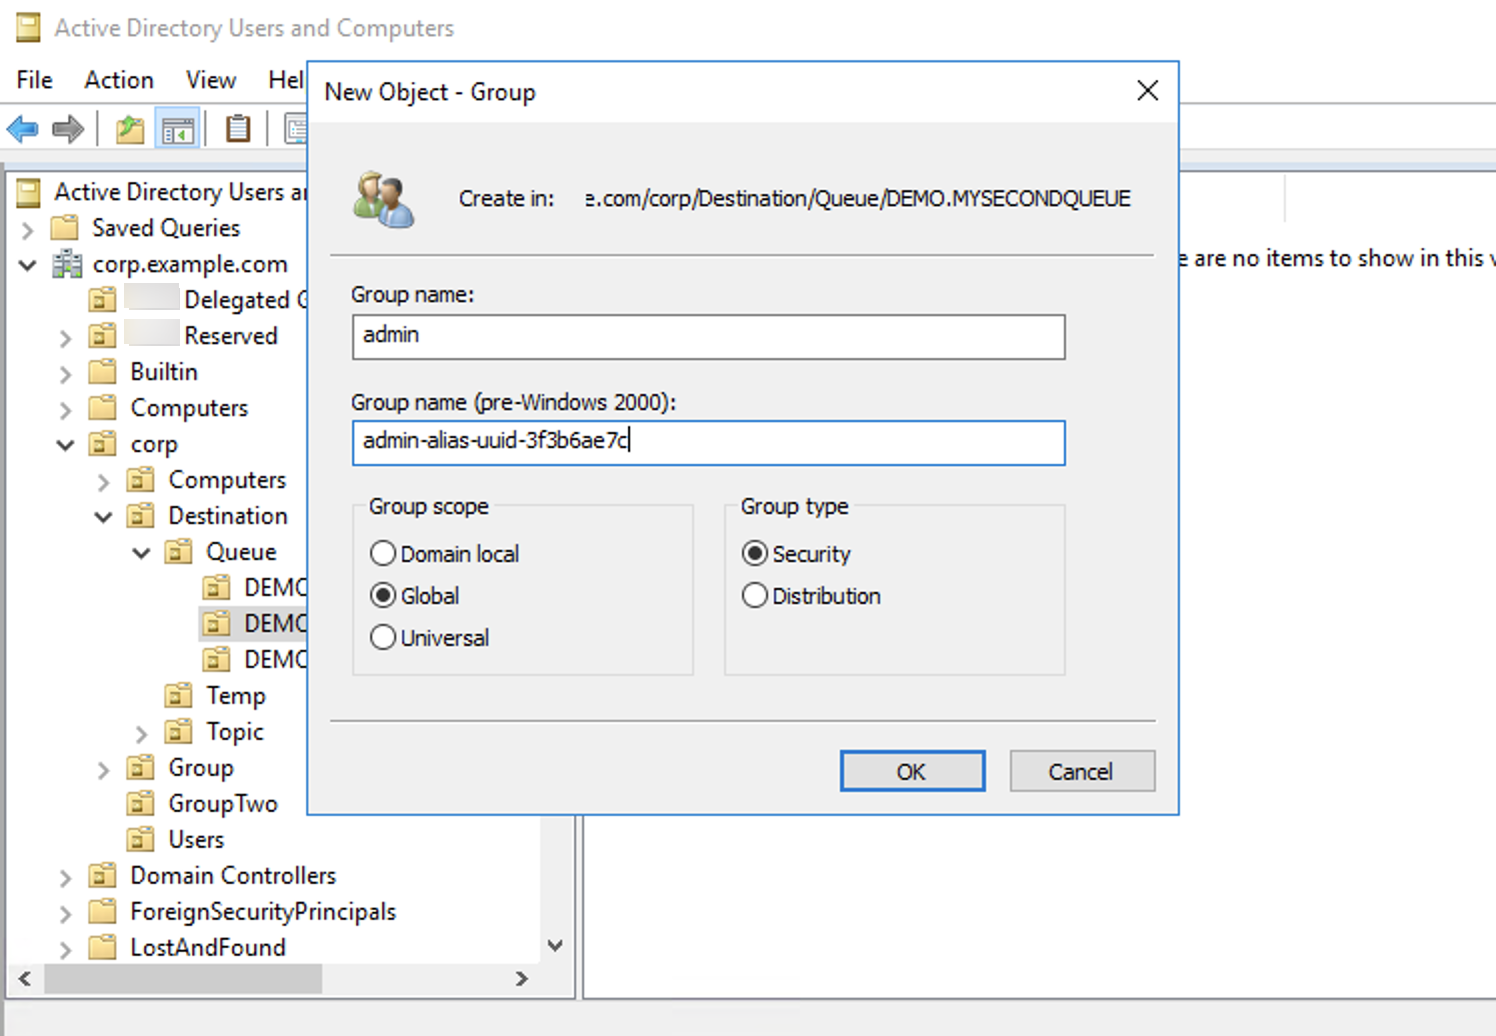
Note
When you create the admin group, a conflict will arise with the group name.
This conflict happens because the legacy pre-Windows 2000 rules do not allow
groups to share the same name, even if the groups are in different locations of
the DIT. The value in the pre-Windows 2000 text box has no
impact on the setup, but it must be globally unique. To avoid this conflict, you
can append a uuid suffix to each admin group.
Adding a user to the admin security group for a particular
destination will enable the user to create and delete that topic. Adding them to the
read security group will enable them to read from the destination,
and adding them to the write group will enable them to write to the
destination.
In addition to adding individual users to security group permissions, you can also
add entire groups. However, because ActiveMQ again hardcodes attribute names for
groups, you must ensure the group you want to add has the object class
groupOfNames, as shown in the activemq
To do this, follow the same process as with the uid for users. See
Configuring ID mappings in Active Directory Users and Computers for Windows
Server 2016 (and subsequent) versions