Using GraphQL mutations to add data to a DynamoDB table in the Amazon AppSync console
Your next step is to add data to your blank DynamoDB table using a GraphQL mutation. Mutations are one of the
fundamental operation types in GraphQL. They are defined in the schema and allow you to manipulate data in your
data source. In terms of REST APIs, these are very similar to operations like PUT or
POST.
To add data to your data source
-
If you haven't already done so, sign in to the Amazon Web Services Management Console and open the AppSync console
. -
Choose your API from the table.
-
In the tab to the left, choose Queries.
-
In the Explorer tab to the left of the table, you might see several mutations and queries already defined in the query editor:
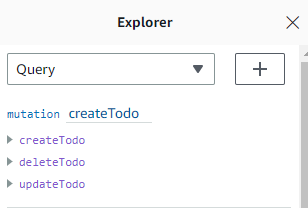
Note
This mutation is actually sitting in your schema as the
Mutationtype. It has the code:type Mutation { createTodo(input: CreateTodoInput!): Todo updateTodo(input: UpdateTodoInput!): Todo deleteTodo(input: DeleteTodoInput!): Todo }As you can see, the operations here are similar to what's inside the query editor.
Amazon AppSync automatically generated these from the model we defined earlier. This example will use the
createTodomutation to add entries to ourTodoAPITabletable. -
Choose the
createTodooperation by expanding it under thecreateTodomutation: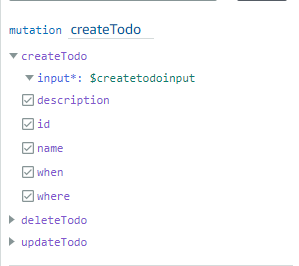
Enable the checkboxes for all of the fields like the picture above.
Note
The attributes you see here are the different modifiable elements of the mutation. Your
inputcan be thought of as the parameter ofcreateTodo. The various options with checkboxes are the fields that will be returned in the response once an operation is performed. -
In the code editor in the center of the screen, you'll notice that the operation appears underneath the
createTodomutation:mutation createTodo($createtodoinput: CreateTodoInput!) { createTodo(input: $createtodoinput) { where when name id description } }Note
To explain this snippet properly, we must also look at the schema code. The declaration
mutation createTodo($createtodoinput: CreateTodoInput!){}is the mutation with one of its operations,createTodo. The full mutation is located in the schema:type Mutation { createTodo(input: CreateTodoInput!): Todo updateTodo(input: UpdateTodoInput!): Todo deleteTodo(input: DeleteTodoInput!): Todo }Going back to the mutation declaration from the editor, the parameter is an object called
$createtodoinputwith a required input type ofCreateTodoInput. Note thatCreateTodoInput(and all inputs in the mutation) are also defined in the schema. For example, here's the boilerplate code forCreateTodoInput:input CreateTodoInput { name: String when: String where: String description: String }It contains the fields we defined in our model, namely
name,when,where, anddescription.Going back to the editor code, in
createTodo(input: $createtodoinput) {}, we declare the input as$createtodoinput, which was also used in the mutation declaration. We do this because this allows GraphQL to validate our inputs against the provided types and ensure that they are being used with the correct inputs.The final part of the editor code shows the fields that will be returned in the response after an operation is performed:
{ where when name id description }In the Query variables tab below this editor, there will be a generic
createtodoinputobject that may have the following data:{ "createtodoinput": { "name": "Hello, world!", "when": "Hello, world!", "where": "Hello, world!", "description": "Hello, world!" } }Note
This is where we allocate the values for the input mentioned earlier:
input CreateTodoInput { name: String when: String where: String description: String }Change the
createtodoinputby adding information we want to put in our DynamoDB table. In this case, we wanted to create someTodoitems as reminders:{ "createtodoinput": { "name": "Shopping List", "when": "Friday", "where": "Home", "description": "I need to buy eggs" } } -
Choose Run at the top of the editor. Choose createTodo in the drop-down list. On the right-hand side of the editor, you should see the response. It may look something like this:
{
  "data": {
    "createTodo": {
      "where": "Home",
      "when": "Friday",
      "name": "Shopping List",
      "id": "abcdefgh-1234-1234-1234-abcdefghijkl",
      "description": "I need to buy eggs"
    }
  }
}
If you navigate to the DynamoDB service, you'll now see an entry in your data source with this information:
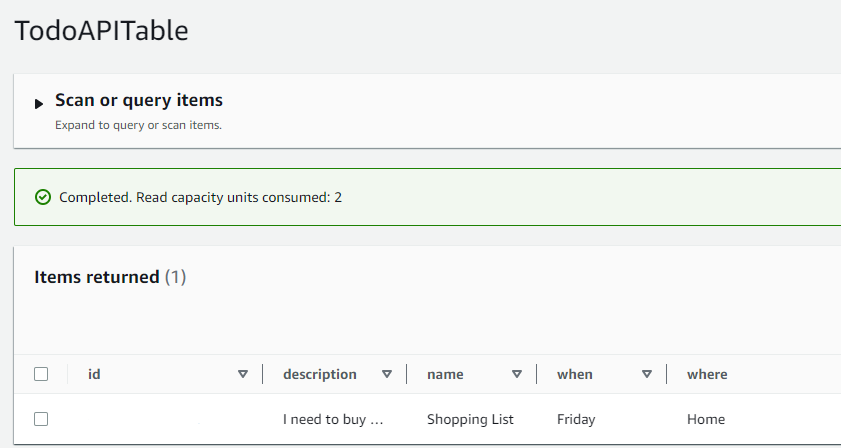
To summarize the operation, the GraphQL engine parsed the record, and a resolver inserted it into your
Amazon DynamoDB table. Again, you can verify this in the DynamoDB console. Notice that you don’t need to pass in an
id value. An id is generated and returned in the results. This is because the
example used an autoId() function in a GraphQL resolver for the partition key set on your DynamoDB
resources. We will cover how you can build resolvers in a different section. Take note of the returned
id value; you will use it in the next section to retrieve data with a GraphQL query.