Tutorial: Using the array job index to control job differentiation
This tutorial describes how to use the AWS_BATCH_JOB_ARRAY_INDEX
environment
variable to differentiate the child jobs. Each child job is assigned to this variable. The example
uses the child job's index number to read a specific line in a file. Then, it substitutes the
parameter associated with that line number with a command inside the job's container. The result
is that you can have multiple Amazon Batch jobs that run the same Docker image and command arguments.
However, the results are different because the array job index is used as a modifier.
In this tutorial, you create a text file that has all of the colors of the rainbow, each on its own line. Then,
you create an entrypoint script for a Docker container that converts the index into a value that can be used for a
line number in the color file. The index starts at zero, but line numbers start at one. Create a Dockerfile that
copies the color and index files to the container image and sets ENTRYPOINT
for the image to the
entrypoint script. The Dockerfile and resources are built to a Docker image that's pushed to Amazon ECR. You then register
a job definition that uses your new container image, submit an Amazon Batch array job with that job definition, and view
the results.
Prerequisites
This tutorial has the following prerequisites:
-
An Amazon Batch compute environment. For more information, see Creating a compute environment.
-
An Amazon Batch job queue and associated compute environment. For more information, see Creating a job queue.
-
The Amazon CLI installed on your local system. For more information, see Installing the Amazon Command Line Interface in the Amazon Command Line Interface User Guide.
-
Docker installed on your local system. For more information, see About Docker CE
in the Docker documentation.
Step 1: Build a container image
You can use the AWS_BATCH_JOB_ARRAY_INDEX
in a job definition in the command
parameter. However, we recommend that you create a container image that uses the variable in an
entrypoint script instead. This section describes how to create such a container image.
To build your Docker container image
-
Create a new directory to use as your Docker image workspace and navigate to it.
-
Create a file named
colors.txt
in your workspace directory and paste the following into it.red orange yellow green blue indigo violet
-
Create a file named
print-color.sh
in your workspace directory and paste the following into it.Note
The
LINE
variable is set to theAWS_BATCH_JOB_ARRAY_INDEX
+ 1 because the array index starts at 0, but line numbers start at 1. TheCOLOR
variable is set to the color incolors.txt
that's associated with its line number.#!/bin/sh LINE=$((AWS_BATCH_JOB_ARRAY_INDEX + 1)) COLOR=$(sed -n ${LINE}p /tmp/colors.txt) echo My favorite color of the rainbow is $COLOR.
-
Create a file named
Dockerfile
in your workspace directory and paste the following content into it. This Dockerfile copies the previous files to your container and sets the entrypoint script to run when the container starts.FROM busybox COPY print-color.sh /tmp/print-color.sh COPY colors.txt /tmp/colors.txt RUN chmod +x /tmp/print-color.sh ENTRYPOINT /tmp/print-color.sh
-
Build your Docker image.
$
docker build -t print-color .
-
Test your container with the following script. This script sets the
AWS_BATCH_JOB_ARRAY_INDEX
variable to 0 locally and then increments it to simulate what an array job with seven children does.$
AWS_BATCH_JOB_ARRAY_INDEX=0 while [ $AWS_BATCH_JOB_ARRAY_INDEX -le 6 ] do docker run -e AWS_BATCH_JOB_ARRAY_INDEX=$AWS_BATCH_JOB_ARRAY_INDEX print-color AWS_BATCH_JOB_ARRAY_INDEX=$((AWS_BATCH_JOB_ARRAY_INDEX + 1)) done
The following is the output.
My favorite color of the rainbow is red. My favorite color of the rainbow is orange. My favorite color of the rainbow is yellow. My favorite color of the rainbow is green. My favorite color of the rainbow is blue. My favorite color of the rainbow is indigo. My favorite color of the rainbow is violet.
Step 2: Push your image to Amazon ECR
Now that you built and tested your Docker container, push it to an image repository. This example uses Amazon ECR, but you can use another registry, such as DockerHub.
-
Create an Amazon ECR image repository to store your container image. This example only uses the Amazon CLI, but you can also use the Amazon Web Services Management Console. For more information, see Creating a Repository in the Amazon Elastic Container Registry User Guide.
$
aws ecr create-repository --repository-name print-color
-
Tag your
print-color
image with your Amazon ECR repository URI that was returned from the previous step.$
docker tag print-color
aws_account_id
.dkr.ecr.region
.amazonaws.com/print-color -
Log in to your Amazon ECR registry. For more information, see Registry Authentication in the Amazon Elastic Container Registry User Guide.
$
aws ecr get-login-password \ --region
region
| docker login \ --username AWS \ --password-stdinaws_account_id
.dkr.ecr.region
.amazonaws.com -
Push your image to Amazon ECR.
$
docker push
aws_account_id
.dkr.ecr.region
.amazonaws.com/print-color
Step 3: Create and register a job definition
Now that your Docker image is in an image registry, you can specify it in an Amazon Batch job definition. Then, you can use it later to run an array job. This example only uses the Amazon CLI. However, you can also use the Amazon Web Services Management Console. For more information, see Creating a single-node job definition .
To create a job definition
-
Create a file named
print-color-job-def.json
in your workspace directory and paste the following into it. Replace the image repository URI with your own image's URI.{ "jobDefinitionName": "print-color", "type": "container", "containerProperties": { "image": "
aws_account_id
.dkr.ecr.region
.amazonaws.com/print-color", "resourceRequirements": [ { "type": "MEMORY", "value": "250" }, { "type": "VCPU", "value": "1" } ] } } -
Register the job definition with Amazon Batch.
$
aws batch register-job-definition --cli-input-json file://print-color-job-def.json
Step 4: Submit an Amazon Batch array job
After you registered your job definition, you can submit an Amazon Batch array job that uses your new container image.
To submit an Amazon Batch array job
-
Create a file named
print-color-job.json
in your workspace directory and paste the following into it.Note
This example uses the job queue mentioned in the Prerequisites section.
{ "jobName": "print-color", "jobQueue": "
", "arrayProperties": { "size": 7 }, "jobDefinition": "print-color" }existing-job-queue
-
Submit the job to your Amazon Batch job queue. Note the job ID that's returned in the output.
$
aws batch submit-job --cli-input-json file://print-color-job.json
-
Describe the job's status and wait for the job to move to
SUCCEEDED
.
Step 5: View your array job logs
After your job reaches the SUCCEEDED
status, you can view the CloudWatch Logs from the job's
container.
To view your job's logs in CloudWatch Logs
Open the Amazon Batch console at https://console.amazonaws.cn/batch/
. -
In the left navigation pane, choose Jobs.
-
For Job queue, select a queue.
-
In the Status section, choose succeeded.
-
To display all of the child jobs for your array job, select the job ID that was returned in the previous section.
-
To see the logs from the job's container, select one of the child jobs and choose View logs.
-
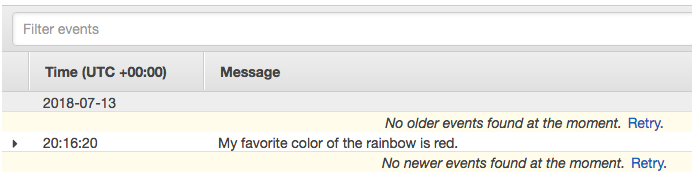
View the other child job's logs. Each job returns a different color of the rainbow.