Create a branch in Amazon CodeCommit
You can use the CodeCommit console or the Amazon CLI to create branches for your repository. This is a quick way to separate work on a new or different version of files without impacting work in the default branch. After you create a branch in the CodeCommit console, you must pull that change to your local repo. Alternatively, you can create a branch locally and then use Git from a local repo connected to the CodeCommit repository to push that change.
Create a branch (console)
You can use the CodeCommit console to create a branch in a CodeCommit repository. The next time users pull changes from the repository, they see the new branch.
Open the CodeCommit console at https://console.www.amazonaws.cn/codesuite/codecommit/home
. -
In Repositories, choose the name of the repository where you want to create a branch.
-
In the navigation pane, choose Branches.
-
Choose Create branch.
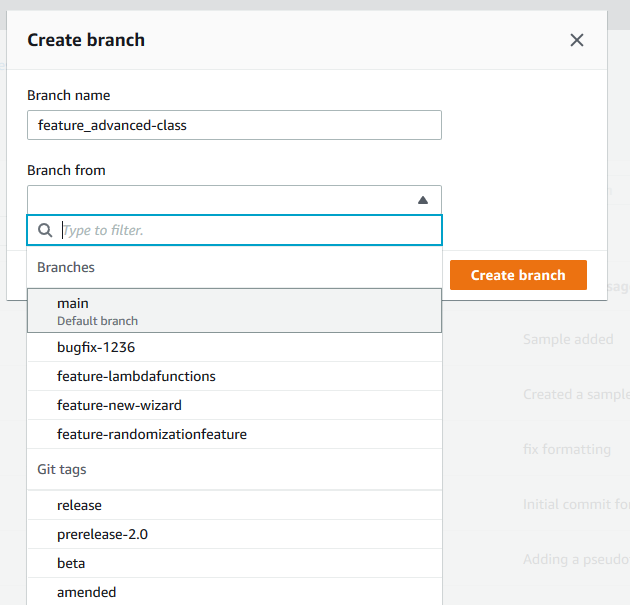
In Branch name, enter a name for the branch. In Branch from, choose a branch or tag from the list, or paste a commit ID. Choose Create branch.
Create a branch (Git)
Follow these steps to use Git from a local repo to create a branch in a local repo and then push that branch to the CodeCommit repository.
These steps are written with the assumption that you have already connected the local repo to the CodeCommit repository. For instructions, see Connect to a repository.
-
Create a branch in your local repo by running the git checkout -b
new-branch-namecommand, wherenew-branch-nameis the name of the new branch.For example, the following command creates a branch named
MyNewBranchin the local repo:git checkout -b MyNewBranch -
To push the new branch from the local repo to the CodeCommit repository, run the git push command, specifying both the
remote-nameand thenew-branch-name.For example, to push a new branch in the local repo named
MyNewBranchto the CodeCommit repository with the nicknameorigin:git push origin MyNewBranch
Note
If you add the -u option to git push (for example,
git push -u origin main), then
in the future you can run git push without
remote-name
branch-name. Upstream tracking information is set. To get
upstream tracking information, run git remote show
remote-name (for example, git remote show
origin).
To see a list of all of your local and remote tracking branches, run git branch --all.
To set up a branch in the local repo that is connected to a branch in the
CodeCommit repository, run git checkout
remote-branch-name.
For more options, see your Git documentation.
Create a branch (Amazon CLI)
To use Amazon CLI commands with CodeCommit, install the Amazon CLI. For more information, see Command line reference.
Follow these steps to use the Amazon CLI to create a branch in a CodeCommit repository and then push that branch to the CodeCommit repository. For steps to create an initial commit and specify the name of the default branch for an empty repository, see Create the first commit for a repository using the Amazon CLI.
-
Run the create-branch command, specifying:
-
The name of the CodeCommit repository where the branch is created (with the --repository-name option).
Note
To get the name of the CodeCommit repository, run the list-repositories command.
-
The name of the new branch (with the --branch-name option).
-
The ID of the commit to which the new branch points (with the --commit-id option).
For example, to create a branch named
MyNewBranchthat points to commit ID317f8570EXAMPLEin a CodeCommit repository namedMyDemoRepo:aws codecommit create-branch --repository-name MyDemoRepo --branch-name MyNewBranch --commit-id 317f8570EXAMPLEThis command produces output only if there are errors.
-
-
To update the list of available CodeCommit repository branches in your local repo with the new remote branch name, run git remote update
remote-name.For example, to update the list of available branches for the CodeCommit repository with the nickname
origin:git remote update originNote
Alternatively, you can run the git fetch command. You can also view all remote branches by running git branch --all, but until you update the list of your local repo, the remote branch you created does not appear in the list.
For more options, see your Git documentation.
-
To set up a branch in the local repo that is connected to the new branch in the CodeCommit repository, run git checkout
remote-branch-name.
Note
To get a list of CodeCommit repository names and their URLs, run the git remote -v command.