Step 3: Use the CodeDeploy console to deploy your application
In this section, you create a CodeDeploy application and deployment group to deploy your updated application into Amazon ECS. During deployment, CodeDeploy shifts the production traffic for your application to its new version in a new, replacement task set. To complete this step, you need the following items:
-
Your Amazon ECS cluster name.
-
Your Amazon ECS service name.
-
Your Application Load Balancer name.
-
Your production listener port.
-
Your target group names.
-
The name of the S3 bucket you created.
To create a CodeDeploy application
-
Sign in to the Amazon Web Services Management Console and open the CodeDeploy console at https://console.amazonaws.cn/codedeploy/
. -
Choose Create application.
-
In Application name, enter
ecs-demo-codedeploy-app. -
In Compute platform, choose Amazon ECS.
-
Choose Create application.
To create a CodeDeploy deployment group
-
On the Deployment groups tab of your application page, choose Create deployment group.
-
In Deployment group name, enter
ecs-demo-dg. -
In Service role, choose a service role that grants CodeDeploy access to Amazon ECS. For more information, see Identity and access management for Amazon CodeDeploy.
-
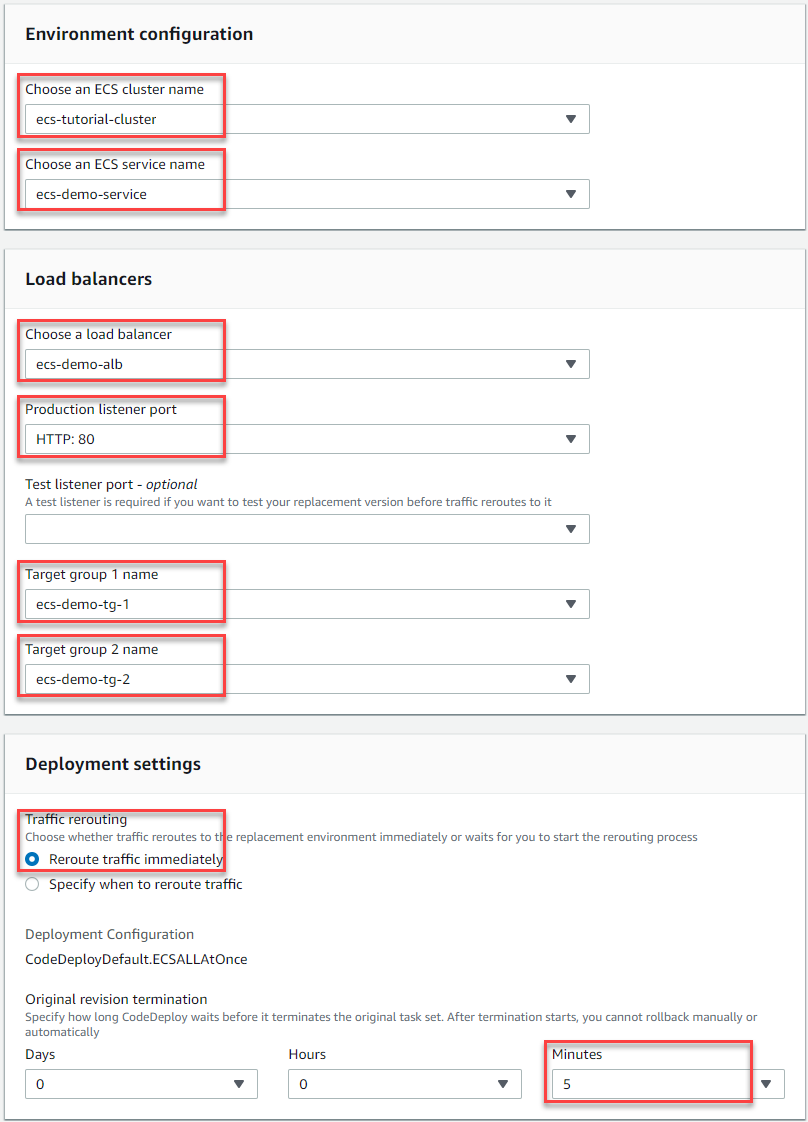
In Environment configuration, choose your Amazon ECS cluster name and service name.
-
From Load balancers, choose the name of the load balancer that serves traffic to your Amazon ECS service.
-
From Production listener port, choose the port and protocol for the listener that serves production traffic to your Amazon ECS service (for example, HTTP: 80). This tutorial does not include an optional test listener, so do not choose a port from Test listener port.
-
From Target group 1 name and Target group 2 name, choose two different target groups to route traffic during your deployment. Make sure that these are the target groups you created for your load balancer. It does not matter which is used for target group 1 and which is used for target group 2.
-
Choose Reroute traffic immediately.
-
For Original revision termination, choose 0 days, 0 hours, and 5 minutes. This lets you see your deployment complete faster than if you use the default (1 hour).
-
Choose Create deployment group.
To deploy your Amazon ECS application
-
From your deployment group console page, choose Create deployment.
-
For Deployment group, choose ecs-demo-dg.
-
For Revision type, choose My application is stored in Amazon S3. In Revision location, enter the name of your S3 bucket.
-
For Revision file type, choose .json or .yaml, as appropriate.
-
(Optional) In Deployment description, enter a description for your deployment.
-
Choose Create deployment.
-
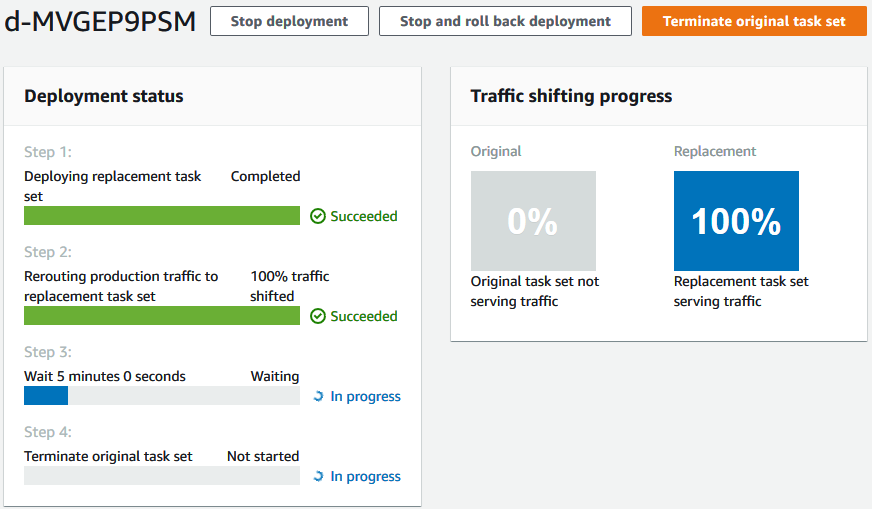
In Deployment status, you can monitor your deployment. After 100% of production traffic is routed to the replacement task set and before the five-minute wait time expires, you can choose Terminate original task set to immediately terminate the original task set. If you do not choose Terminate original task set, the original task set terminates after the five-minute wait time you specified expires.