Scaling the Amazon DCV Connection Gateway
The following topics describe how to scale Amazon DCV Connection Gateway using a fleet of gateway hosts and a Network Load Balancer.
The simplified high-level overview includes a single Connection Gateway which forwards connections to a fleet of Amazon DCV server hosts. In this architecture the Connection Gateway is a single point of failure. To increase robustness and scalability, we can use a fleet of Connection Gateway hosts and front them with a Network Load Balancer, in order to preserve the ability for clients to target a single entry point to the server-side infrastructure.
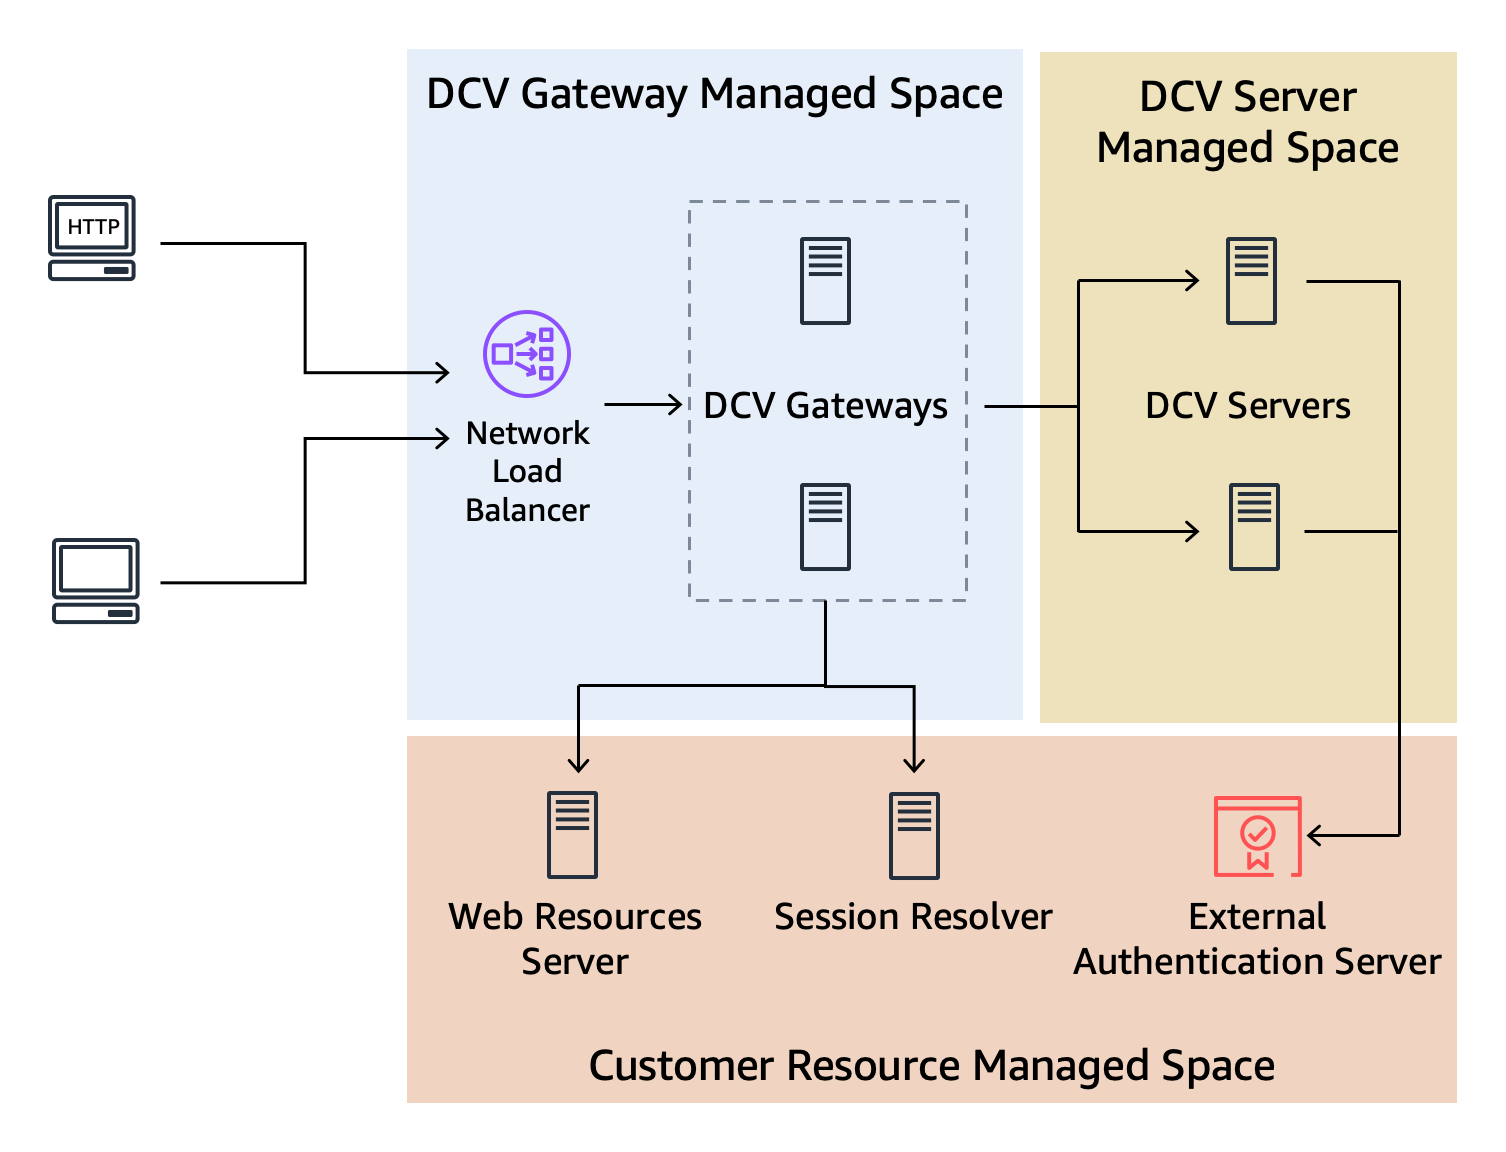
With this architecture, gateway nodes can be added or removed according to the system load without any disruption for the clients.
The Network Load Balancer can check the health of each instance of the Connection Gateway and uses this information to select whether one of the Connection Gateway should or should not be used to handle incoming connections.
Reporting the Health of the Connection Gateway
The Amazon DCV Connection Gateway can be configured to listen on an additional TCP port that will be used to check the health of the Connection Gateway service.
To enable the health check service in the Amazon DCV Connection Gateway, edit the /etc/dcv-connection-gateway/dcv-connection-gateway.conf and add the following:
[health-check]
bind-addr = "::"
port = 8989
The bind-addr and port are the IP address and TCP port used by the health check service.
They need to be reachable from the Network Load Balancer. bind-addr can use IPv4 or IPv6 addresses.
Configuring a Network Load Balancer
The following steps summarize how to create a Network Load Balancer and highlight the settings which are needed to use a Network Load Balancer with Amazon DCV Connection Gateway. See the Network Load Balancer documentation for more detailed information.
To create a Network Load Balancer for a fleet of Amazon DCV Connection Gateway hosts
-
Navigate to the EC2 Console
, select Load Balancer from the navigation pane and then choose Create Load Balancer. For load balancer type, choose Network Load Balancer. -
For Basic Configuration assign a Name, set Scheme to internet-facing, and set Ip address type to IPv4.
-
For Network mapping select your VPC and then select all the availability zones and subnets in that VPC. Make sure that your DCV Connection Gateway instances security groups allow traffic from the selected subnets.
-
For Listeners and routing create a TCP target group, specifying the
web-portof the Amazon DCV Connection Gateway configuration as the port.For the health check, make sure TCP is used and override the TCP port with the one specified in the
[health-check]section of the Amazon DCV Connection Gateway configuration.If you also want QUIC support, create a UDP target group, specifying the
quic-portof the Amazon DCV Connection Gateway configuration as the port.For the health check use the same values as before: make sure TCP is used and override the TCP port with the one specified in the
[health-check]section of the Amazon DCV Connection Gateway configuration.Note
When using a TLS listener on your Elastic Load Balancer, the Target Group also needs to be set to TLS.
If you have enabled QUIC, once the Network Load Balancer is created, select it from the list, select the UDP listener and make sure the Stickiness check box is active.