Getting started with AD Connector
With AD Connector you can connect Amazon Directory Service to your existing enterprise Active Directory. When connected to your existing directory, all of your directory data remains on your domain controllers. Amazon Directory Service does not replicate any of your directory data.
AD Connector prerequisites
To connect to your existing directory with AD Connector, you need the following:
- Amazon VPC
-
Set up a VPC with the following:
-
At least two subnets. Each of the subnets must be in a different Availability Zone and must be of same network type.
You can use IPv6 for your VPC. For more information, see IPv6 support for your VPC in the Amazon Virtual Private Cloud User Guide.
-
The VPC must be connected to your existing network through a virtual private network (VPN) connection or Amazon Direct Connect.
-
The VPC must have default hardware tenancy.
Amazon Directory Service uses a two VPC structure. The EC2 instances which make up your directory run outside of your Amazon account, and are managed by Amazon. They have two network adapters,
ETH0andETH1.ETH0is the management adapter, and exists outside of your account.ETH1is created within your account.The management IP range of your directory's
ETH0network is chosen programmatically to ensure it does not conflict with the VPC where your directory is deployed. This IP range can be in either of the following pairs (as Directories run in two subnets):-
10.0.1.0/24 & 10.0.2.0/24
-
169.254.0.0/16
-
192.168.1.0/24 & 192.168.2.0/24
We avoid conflicts by checking the first octet of the
ETH1CIDR. If it starts with a 10, then we choose a 192.168.0.0/16 VPC with 192.168.1.0/24 and 192.168.2.0/24 subnets. If the first octet is anything else other than a 10 we choose a 10.0.0.0/16 VPC with 10.0.1.0/24 and 10.0.2.0/24 subnets.The selection algorithm does not include routes on your VPC. It is therefore possible to have an IP routing conflict result from this scenario.
For more information, see the following topics in the Amazon VPC User Guide:
For more information about Amazon Direct Connect, see the Amazon Direct Connect User Guide.
-
- Existing Active Directory
-
You will need to connect to an existing network with an Active Directory domain.
Note
AD Connector does not support Single Label Domains
. The functional level of this Active Directory domain must be
Windows Server
                            2003
or higher. AD Connector also supports connecting to a domain hosted on an Amazon EC2 instance.Note
AD Connector does not support Read-only domain controllers (RODC) when used in combination with the Amazon EC2 domain-join feature.
- Service account
-
You must have credentials for a service account in the existing directory which has been delegated the following privileges:
-
Read users and groups - Required
-
Join computers to the domain - Required only when using Seamless Domain Join and WorkSpaces
-
Create computer objects - Required only when using Seamless Domain Join and WorkSpaces
-
The service account password should be compliant with Amazon password requirements. Amazon passwords should be:
-
Between 8 and 128 characters in length, inclusive.
-
Contain at least one character from three of the following four categories:
-
Lowercase letters (a-z)
-
Uppercase letters (A-Z)
-
Numbers (0-9)
-
Non-alphanumeric characters (~!@#$%^&*_-+=`|\(){}[]:;"'<>,.?/)
-
-
For more information, see Delegate privileges to your service account.
Note
AD Connector uses Kerberos for authentication and authorization of Amazon applications. LDAP is only used for user and group object lookups (read operations). With the LDAP transactions, nothing is mutable and credentials are not passed in clear text. Authentication is handled by an Amazon internal service, which uses Kerberos tickets to perform LDAP operations as a user.
-
- User permissions
-
All Active Directory users must have permissions to read their own attributes. Specifically the following attributes:
-
GivenName
-
SurName
-
Mail
-
SamAccountName
-
UserPrincipalName
-
UserAccountControl
-
MemberOf
By default, Active Directory users do have read permission to these attributes. However, Administrators can alter these permissions over time so you might want to verify your users have these read permissions prior to setting up AD Connector for the first time.
-
- IP addresses
-
Get the IP addresses of two DNS servers or domain controllers in your existing directory.
AD Connector obtains the
_ldap._tcp.and<DnsDomainName>_kerberos._tcp.SRV records from these servers when connecting to your directory, so these servers must contain these SRV records. The AD Connector attempts to find a common domain controller that will provide both LDAP and Kerberos services, so these SRV records must include at least one common domain controller. For more information about SRV records, go to SRV Resource Records<DnsDomainName>on Microsoft TechNet. - Ports for subnets
-
For AD Connector to redirect directory requests to your existing Active Directory domain controllers, the firewall for your existing network must have the following ports open to the CIDRs for both subnets in your Amazon VPC.
-
TCP/UDP 53 - DNS
-
TCP/UDP 88 - Kerberos authentication
-
TCP/UDP 389 - LDAP
These are the minimum ports that are needed before AD Connector can connect to your directory. Your specific configuration may require additional ports be open.
If you want to use AD Connector and Amazon WorkSpaces, the DisableVLVSupportLDAP attribute needs to be set to 0 for your domain controllers. This is the default setting for the domain controllers. AD Connector will be unable to query users in the directory if the DisableVLVSupportLDAP attribute is enabled. This prevents AD Connector from working with Amazon WorkSpaces.
Note
If the DNS servers or Domain Controller servers for your existing Active Directory Domain are within the VPC, the security groups associated with those servers must have the above ports open to the CIDRs for both subnets in the VPC.
For additional port requirements, see AD and AD DS Port Requirements
on Microsoft documentation. -
- Kerberos preauthentication
-
Your user accounts must have Kerberos preauthentication enabled. For detailed instructions on how to enable this setting, see Ensure that Kerberos pre-authentication is enabled. For general information about this setting, go to Preauthentication
on Microsoft TechNet. - Encryption types
-
AD Connector supports the following encryption types when authenticating via Kerberos to your Active Directory domain controllers:
-
AES-256-HMAC
-
AES-128-HMAC
-
RC4-HMAC
-
Amazon IAM Identity Center prerequisites
If you plan to use IAM Identity Center with AD Connector, you need to ensure that the following are true:
-
Your AD Connector is set up in your Amazon organization's management account.
-
Your instance of IAM Identity Center is in the same Region where your AD Connector is set up.
For more information, see IAM Identity Center prerequisites in the Amazon IAM Identity Center User Guide.
Multi-factor authentication prerequisites
To support multi-factor authentication with your AD Connector directory, you need the following:
-
A Remote Authentication Dial-In User Service
(RADIUS) server in your existing network that has two client endpoints. The RADIUS client endpoints have the following requirements: -
To create the endpoints, you need the IP addresses of the Amazon Directory Service servers. These IP addresses can be obtained from the Directory IP Address field of your directory details.
-
Both RADIUS endpoints must use the same shared secret code.
-
-
Your existing network must allow inbound traffic over the default RADIUS server port (1812) from the Amazon Directory Service servers.
-
The usernames between your RADIUS server and your existing directory must be identical.
For more information about using AD Connector with MFA, see Enabling multi-factor authentication for AD Connector.
Delegate privileges to your service account
To connect to your existing directory, you must have the credentials for your
AD Connector service account in the existing directory that has been delegated
certain privileges. While members of the Domain Admins group
have sufficient privileges to connect to the directory, as a best practice, you
should use a service account that only has the minimum privileges necessary to
connect to the directory. The following procedure demonstrates how to create a new
group called Connectors, delegate the necessary
privileges that are needed to connect Amazon Directory Service to this group, and then add a new
service account to this group.
This procedure must be performed on a machine that is joined to your directory and has the Active Directory User and Computers MMC snap-in installed. You must also be logged in as a domain administrator.
To delegate privileges to your service account
-
Open Active Directory User and Computers and select your domain root in the navigation tree.
-
In the list in the left-hand pane, right-click Users, select New, and then select Group.
-
In the New Object - Group dialog box, enter the following and click OK.
Field Value/Selection Group name ConnectorsGroup scope Global Group type Security -
In the Active Directory User and Computers navigation tree, select identify the Organizational Unit (OU) where the computer accounts will be created. In the menu, select Action, and then Delegate Control. You may select a parent OU up to the domain as permissions propagate to the child OUs. If your AD Connector is connected to Amazon Managed Microsoft AD, you will not have access to delegate control at the domain root level. In this case, to delegate control, select the OU under your directory OU where your computer objects will be created.
-
On the Delegation of Control Wizard page, click Next, then click Add.
-
In the Select Users, Computers, or Groups dialog box, enter
Connectorsand click OK. If more than one object is found, select theConnectorsgroup created above. Click Next. -
On the Tasks to Delegate page, select Create a custom task to delegate, and then choose Next.
-
Select Only the following objects in the folder, and then select Computer objects and User objects.
-
Select Create selected objects in this folder and Delete selected objects in this folder. Then choose Next.

-
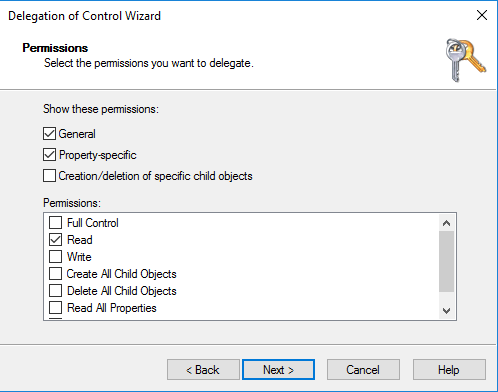
Select Read, and then choose Next.
Note
If you will be using Seamless Domain Join or WorkSpaces, you must also enable Write permissions so that the Active Directory can create computer objects.
-
Verify the information on the Completing the Delegation of Control Wizard page, and click Finish.
-
Create a user account with a strong password and add that user to the
Connectorsgroup. This user will be known as your AD Connector service account and since it is now a member of theConnectorsgroup it now has sufficient privileges to connect Amazon Directory Service to the directory.
Test your AD Connector
For AD Connector to connect to your existing directory, the firewall for your existing network must have certain ports open to the CIDRs for both subnets in the VPC. To test if these conditions are met, perform the following steps:
To test the connection
-
Launch a Windows instance in the VPC and connect to it over RDP. The instance must be a member of your existing domain. The remaining steps are performed on this VPC instance.
-
Download and unzip the DirectoryServicePortTest test application. The source code and Visual Studio project files are included so you can modify the test application if desired.
Note
This script is not supported on Windows Server 2003 or older operating systems.
-
From a Windows command prompt, run the DirectoryServicePortTest test application with the following options:
Note
The DirectoryServicePortTest test application can only be used when the domain and forest functional levels are set to Windows Server 2012 R2 and below.
DirectoryServicePortTest.exe -d<domain_name>-ip<server_IP_address>-tcp "53,88,389" -udp "53,88,389"<domain_name>-
The fully qualified domain name. This is used to test the forest and domain functional levels. If you exclude the domain name, the functional levels won't be tested.
<server_IP_address>-
The IP address of a domain controller in your existing domain. The ports will be tested against this IP address. If you exclude the IP address, the ports won't be tested.
This test app determines if the necessary ports are open from the VPC to your domain, and also verifies the minimum forest and domain functional levels.
The output will be similar to the following:
Testing forest functional level. Forest Functional Level = Windows2008R2Forest : PASSED Testing domain functional level. Domain Functional Level = Windows2008R2Domain : PASSED Testing required TCP ports to<server_IP_address>: Checking TCP port 53: PASSED Checking TCP port 88: PASSED Checking TCP port 389: PASSED Testing required UDP ports to<server_IP_address>: Checking UDP port 53: PASSED Checking UDP port 88: PASSED Checking UDP port 389: PASSED
The following is the source code for the DirectoryServicePortTest application.
using System;
using System.Collections.Generic;
using System.IO;
using System.Linq;
using System.Net;
using System.Net.Sockets;
using System.Text;
using System.Threading.Tasks;
using System.DirectoryServices.ActiveDirectory;
using System.Threading;
using System.DirectoryServices.AccountManagement;
using System.DirectoryServices;
using System.Security.Authentication;
using System.Security.AccessControl;
using System.Security.Principal;

namespace DirectoryServicePortTest
{
    class Program
    {
        private static List<int> _tcpPorts;
        private static List<int> _udpPorts;

        private static string _domain = "";
        private static IPAddress _ipAddr = null;

        static void Main(string[] args)
        {
            if (ParseArgs(args))
            {
                try
                {
                    if (_domain.Length > 0)
                    {
                        try
                        {
                            TestForestFunctionalLevel();

                            TestDomainFunctionalLevel();
                        }
                        catch (ActiveDirectoryObjectNotFoundException)
                        {
                            Console.WriteLine("The domain {0} could not be found.\n", _domain);
                        }
                    }

                    if (null != _ipAddr)
                    {
                        if (_tcpPorts.Count > 0)
                        {
                            TestTcpPorts(_tcpPorts);
                        }

                        if (_udpPorts.Count > 0)
                        {
                            TestUdpPorts(_udpPorts);
                        }
                    }
                }
                catch (AuthenticationException ex)
                {
                    Console.WriteLine(ex.Message);
                }
            }
            else
            {
                PrintUsage();
            }

            Console.Write("Press <enter> to continue.");
            Console.ReadLine();
        }

        static void PrintUsage()
        {
            string currentApp = Path.GetFileName(System.Reflection.Assembly.GetExecutingAssembly().Location);
            Console.WriteLine("Usage: {0} \n-d <domain> \n-ip \"<server IP address>\" \n[-tcp \"<tcp_port1>,<tcp_port2>,etc\"] \n[-udp \"<udp_port1>,<udp_port2>,etc\"]", currentApp);
        }

        static bool ParseArgs(string[] args)
        {
            bool fReturn = false;
            string ipAddress = "";

            try
            {
                _tcpPorts = new List<int>();
                _udpPorts = new List<int>();

                for (int i = 0; i < args.Length; i++)
                {
                    string arg = args[i];

                    if ("-tcp" == arg | "/tcp" == arg)
                    {
                        i++;
                        string portList = args[i];
                        _tcpPorts = ParsePortList(portList);
                    }

                    if ("-udp" == arg | "/udp" == arg)
                    {
                        i++;
                        string portList = args[i];
                        _udpPorts = ParsePortList(portList);
                    }

                    if ("-d" == arg | "/d" == arg)
                    {
                        i++;
                        _domain = args[i];
                    }

                    if ("-ip" == arg | "/ip" == arg)
                    {
                        i++;
                        ipAddress = args[i];
                    }
                }
            }
            catch (ArgumentOutOfRangeException)
            {
                return false;
            }

            if (_domain.Length > 0 || ipAddress.Length > 0)
            {
                fReturn = true;
            }

            if (ipAddress.Length > 0)
            {
                _ipAddr = IPAddress.Parse(ipAddress);
            }

            return fReturn;
        }

        static List<int> ParsePortList(string portList)
        {
            List<int> ports = new List<int>();

            char[] separators = {',', ';', ':'};

            string[] portStrings = portList.Split(separators);
            foreach (string portString in portStrings)
            {
                try
                {
                    ports.Add(Convert.ToInt32(portString));
                }
                catch (FormatException)
                {
                }
            }

            return ports;
        }

        static void TestForestFunctionalLevel()
        {
            Console.WriteLine("Testing forest functional level.");

            DirectoryContext dirContext = new DirectoryContext(DirectoryContextType.Forest, _domain, null, null);
            Forest forestContext = Forest.GetForest(dirContext);

            Console.Write("Forest Functional Level = {0} : ", forestContext.ForestMode);

            if (forestContext.ForestMode >= ForestMode.Windows2003Forest)
            {
                Console.WriteLine("PASSED");
            }
            else
            {
                Console.WriteLine("FAILED");
            }

            Console.WriteLine();
        }

        static void TestDomainFunctionalLevel()
        {
            Console.WriteLine("Testing domain functional level.");

            DirectoryContext dirContext = new DirectoryContext(DirectoryContextType.Domain, _domain, null, null);
            Domain domainObject = Domain.GetDomain(dirContext);

            Console.Write("Domain Functional Level = {0} : ", domainObject.DomainMode);

            if (domainObject.DomainMode >= DomainMode.Windows2003Domain)
            {
                Console.WriteLine("PASSED");
            }
            else
            {
                Console.WriteLine("FAILED");
            }

            Console.WriteLine();
        }

        static List<int> TestTcpPorts(List<int> portList)
        {
            Console.WriteLine("Testing TCP ports to {0}:", _ipAddr.ToString());

            List<int> failedPorts = new List<int>();

            foreach (int port in portList)
            {
                Console.Write("Checking TCP port {0}: ", port);

                TcpClient tcpClient = new TcpClient();

                try
                {
                    tcpClient.Connect(_ipAddr, port);

                    tcpClient.Close();
                    Console.WriteLine("PASSED");
                }
                catch (SocketException)
                {
                    failedPorts.Add(port);
                    Console.WriteLine("FAILED");
                }
            }

            Console.WriteLine();

            return failedPorts;
        }

        static List<int> TestUdpPorts(List<int> portList)
        {
            Console.WriteLine("Testing UDP ports to {0}:", _ipAddr.ToString());

            List<int> failedPorts = new List<int>();

            foreach (int port in portList)
            {
                Console.Write("Checking UDP port {0}: ", port);

                UdpClient udpClient = new UdpClient();

                try
                {
                    udpClient.Connect(_ipAddr, port);
                    udpClient.Close();
                    Console.WriteLine("PASSED");
                }
                catch (SocketException)
                {
                    failedPorts.Add(port);
                    Console.WriteLine("FAILED");
                }
            }

            Console.WriteLine();

            return failedPorts;
        }
    }
}
Create an AD Connector
To connect to your existing directory with AD Connector, perform the following steps. Before starting this procedure, make sure you have completed the prerequisites identified in AD Connector prerequisites.
Note
You cannot create an AD Connector with a Cloud Formation template.
To connect with AD Connector
-
In the Amazon Directory Service console
navigation pane, choose Directories and then choose Set up directory. -
On the Select directory type page, choose AD Connector, and then choose Next.
-
On the Enter AD Connector information page, provide the following information:
- Directory size
-
Choose from either the Small or Large size option. For more information about sizes, see AD Connector.
- Directory description
-
An optional description for the directory.
-
On the Choose VPC and subnets page, provide the following information, and then choose Next.
- VPC
-
The VPC for the directory.
- Subnets
-
Choose the subnets for the domain controllers. The two subnets must be in different Availability Zones.
-
On the Connect to AD page, provide the following information:
- Directory DNS name
-
The fully qualified name of your existing directory, such as
corp.example.com. - Directory NetBIOS name
-
The short name of your existing directory, such as
CORP. - DNS IP addresses
-
The IP address of at least one DNS server in your existing directory. These servers must be accessible from each subnet specified in step 4. These servers can be located outside of Amazon, as long as there is network connectivity between the specified subnets and the DNS server IP addresses.
- Service account username
-
The user name of a user in the existing directory. For more information about this account, see the AD Connector prerequisites.
- Service account password
-
The password for the existing user account. This password is case-sensitive and must be between 8 and 128 characters in length, inclusive. It must also contain at least one character from three of the following four categories:
-
Lowercase letters (a-z)
-
Uppercase letters (A-Z)
-
Numbers (0-9)
-
Non-alphanumeric characters (~!@#$%^&*_-+=`|\(){}[]:;"'<>,.?/)
-
- Confirm password
-
Retype the password for the existing user account.
-
On the Review & create page, review the directory information and make any necessary changes. When the information is correct, choose Create directory. It takes several minutes for the directory to be created. Once created, the Status value changes to Active.
For more information on what is created with your AD Connector, see What gets created with your AD Connector.