Connecting your Amazon Managed Microsoft AD to Microsoft Entra Connect Sync
This tutorial walks you through the necessary steps to install Microsoft Entra Connect Sync
In this tutorial, you do the following:
-
Create an Amazon Managed Microsoft AD domain user.
-
Download Entra Connect Sync.
-
Use PowerShell to run a script to provision the appropriate permissions for the newly created user.
-
Install Entra Connect Sync.
Prerequisites
You will need the following to complete this tutorial:
-
An Amazon Managed Microsoft AD. For more information, see Creating your Amazon Managed Microsoft AD.
-
An Amazon EC2 Windows Server instance joined to your Amazon Managed Microsoft AD. For more information, see Joining a Windows instance.
-
An EC2 Windows Server with Active Directory Administration Tools installed to manage your Amazon Managed Microsoft AD. For more information, see Installing Active Directory Administration Tools for Amazon Managed Microsoft AD.
Create an Active Directory domain user
This tutorial assumes you already have an Amazon Managed Microsoft AD as well as an EC2 Windows Server instance with Active Directory Administration Tools installed. For more information, see Installing Active Directory Administration Tools for Amazon Managed Microsoft AD.
-
Connect to the instance where the Active Directory Administration Tools were installed.
-
Create an Amazon Managed Microsoft AD domain user. This user will become the Active Directory Directory Service (AD DS) Connector account for Entra Connect Sync. For detailed steps on this process, see Creating an Amazon Managed Microsoft AD user.
Download Entra Connect Sync
-
Download Entra Connect Sync from Microsoft website
onto the EC2 instance that is the Amazon Managed Microsoft AD admin.
Warning
Do not open or run Entra Connect Sync at this point. The next steps will provision the necessary permissions for your domain user created in Step 1.
Run PowerShell Script
-
Open PowerShell as an Administrator
and run the following script. While the script is running, you will be asked to enter the sAMAccountName
for the newly created domain user from Step 1. Note
See the following for more information on running the script:
-
You can save the script with the
ps1extension to a folder liketemp. Then, you can use the following PowerShell command to load the script:import-module "c:\temp\entra.ps1" -
After loading the script, you can use the following command to set the necessary permissions to run the script, replacing
Entra_Service_Account_Namewith your Entra service account name:Set-EntraConnectSvcPerms -ServiceAccountNameEntra_Service_Account_Name
-
$modulePath = "C:\Program Files\Microsoft Azure Active Directory Connect\AdSyncConfig\AdSyncConfig.psm1"

try {
    # Attempt to import the module
    Write-Host -ForegroundColor Green "Importing Module for Azure Entra Connect..."
    Import-Module $modulePath -ErrorAction Stop
    Write-Host -ForegroundColor Green "Success!"
}
catch {
    # Display the exception message
    Write-Host -ForegroundColor Red "An error occurred: $($_.Exception.Message)"
}

Function Set-EntraConnectSvcPerms {
    [CmdletBinding()]
    Param (
        [String]$ServiceAccountName
    )

    #Requires -Modules 'ActiveDirectory' -RunAsAdministrator

    Try {
        $Domain = Get-ADDomain -ErrorAction Stop
    } Catch [System.Exception] {
        Write-Output "Failed to get AD domain information $_"
    }

    $BaseDn = $Domain | Select-Object -ExpandProperty 'DistinguishedName'
    $Netbios = $Domain | Select-Object -ExpandProperty 'NetBIOSName'

    Try {
        $OUs = Get-ADOrganizationalUnit -SearchBase "OU=$Netbios,$BaseDn" -SearchScope 'Onelevel' -Filter * -ErrorAction Stop | Select-Object -ExpandProperty 'DistinguishedName'
    } Catch [System.Exception] {
        Write-Output "Failed to get OUs under OU=$Netbios,$BaseDn $_"
    }

    Try {
        $ADConnectorAccountDN = Get-ADUser -Identity $ServiceAccountName -ErrorAction Stop | Select-Object -ExpandProperty 'DistinguishedName'
    } Catch [System.Exception] {
        Write-Output "Failed to get service account DN $_"
    }

    Foreach ($OU in $OUs) {
        try {
        Set-ADSyncMsDsConsistencyGuidPermissions -ADConnectorAccountDN $ADConnectorAccountDN -ADobjectDN $OU -Confirm:$false -ErrorAction Stop
        Write-Host "Permissions set successfully for $ADConnectorAccountDN and $OU"

        Set-ADSyncBasicReadPermissions -ADConnectorAccountDN $ADConnectorAccountDN -ADobjectDN $OU -Confirm:$false -ErrorAction Stop
        Write-Host "Basic read permissions set successfully for $ADConnectorAccountDN on OU $OU"
    }
    catch {
        Write-Host "An error occurred while setting permissions for $ADConnectorAccountDN on OU $OU : $_"
    }
    }
}
Install Entra Connect Sync
-
Once the script has completed, you can run the downloaded Microsoft Entra Connect (formerly known as Azure Active Directory Connect) configuration file.
-
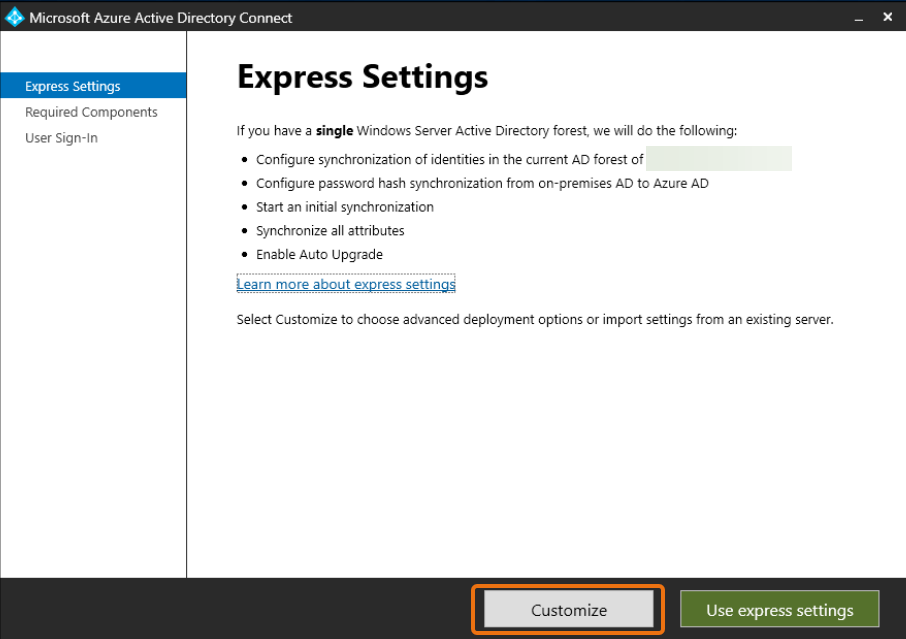
A Microsoft Azure Active Directory Connect window opens after running the configuration file from the previous step. On the Express Settings window, select Customize.
-
On the Install required components window, select the Use an existing service account checkbox. In SERVICE ACCOUNT NAME and SERVICE ACCOUNT PASSWORD, enter the AD DS Connector account name and password for the user you created in Step 1. For example, if your AD DS Connector account name is
entra, the account name would becorp\entra. Then select Install.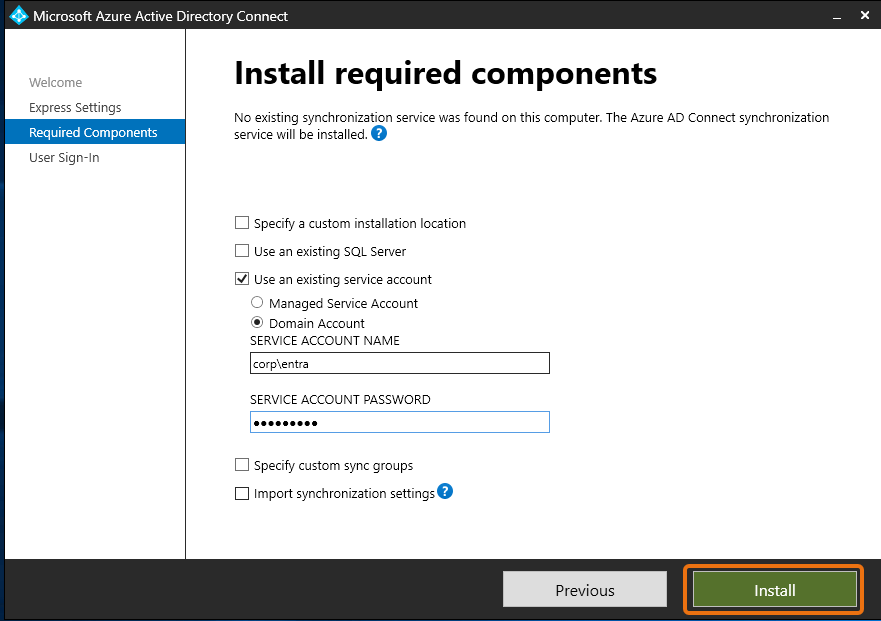
-
On the User Sign-in window, select one of the following options:
-
Pass-through Authentication
- This option allows you to sign in to your Active Directory with your username and password. -
Do not configure - This allows you to use federated sign in with Microsoft Entra (formerly known as Azure Active Directory (Azure AD)) or Office 365.
Then select Next.
-
-
On the Connect to Azure window, enter your Global Administrator
username and password for Entra ID and select Next. -
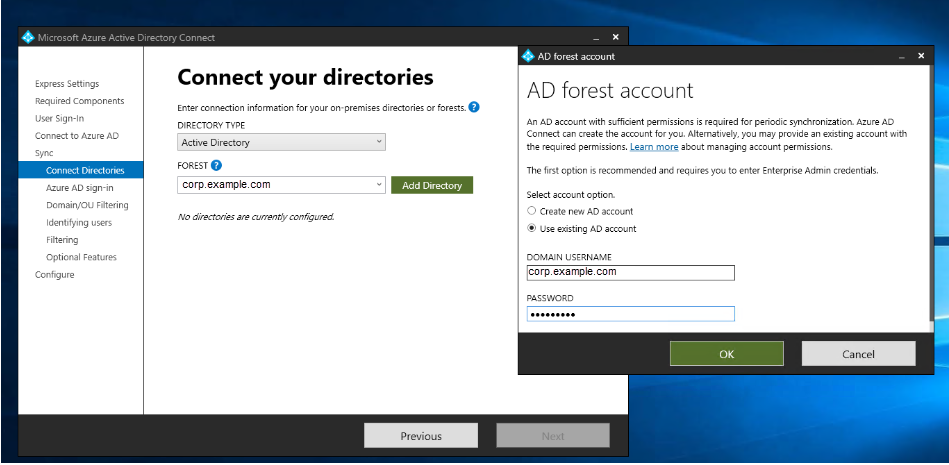
On the Connect your directories window, choose Active Directory for DIRECTORY TYPE. Choose the forest for your Amazon Managed Microsoft AD for FOREST. Then select Add Directory.
-
A pop-up box appears requesting your account options. Select Use existing AD account. Enter the AD DS Connector account username and password created in Step 1 and then select OK. Then select Next.
-
On the Azure AD Sign-in window, select Continue without matching all UPN suffixes to verified domains, only if you do not have a verified vanity domain added to Entra ID. Then select Next.
-
On Domain/OU filtering window, select the options to suit your needs. For more information, see Entra Connect Sync: Configure filtering
in Microsoft documentation. Then select Next. -
On the Identifying Users, Filtering and Optional Features window, keep the default values and select Next.
-
On the Configure window, review the configuration settings and select Configure. The installation for Entra Connect Sync will finalize and users will begin to synchronize with Microsoft Entra ID.