Step 1: Prepare your Amazon Managed Microsoft AD
In this section, you will get your Amazon Managed Microsoft AD ready for the trust relationship with another Amazon Managed Microsoft AD. Many of the following steps are almost identical to what you completed in Tutorial: Create a trust relationship between your Amazon Managed Microsoft AD and your self-managed Active Directory domain. This time, however, you are configuring your Amazon Managed Microsoft AD environments to work with each other.
Configure your VPC subnets and security groups
You must allow traffic from one Amazon Managed Microsoft AD network to the VPC containing your other Amazon Managed Microsoft AD. To do this, you will need to make sure that the ACLs associated with the subnets used to deploy your Amazon Managed Microsoft AD and the security group rules configured on your domain controllers, both allow the requisite traffic to support trusts.
Port requirements vary based on the version of Windows Server used by your domain controllers and the services or applications that will be leveraging the trust. For the purposes of this tutorial, you will need to open the following ports:
Inbound
TCP/UDP 53 - DNS
TCP/UDP 88 - Kerberos authentication
UDP 123 - NTP
TCP 135 - RPC
TCP/UDP 389 - LDAP
TCP/UDP 445 - SMB
Note
SMBv1 is no longer supported.
-
TCP/UDP 464 - Kerberos authentication
TCP 636 - LDAPS (LDAP over TLS/SSL)
TCP 3268-3269 - Global Catalog
-
TCP/UDP 1024-65535 - Ephemeral ports for RPC
Outbound
ALL
Note
These are the minimum ports that are needed to be able to connect the VPCs from both
Amazon Managed Microsoft AD's. Your specific configuration may require additional ports be open.
For more information, see How to configure a firewall for Active Directory domains and trusts
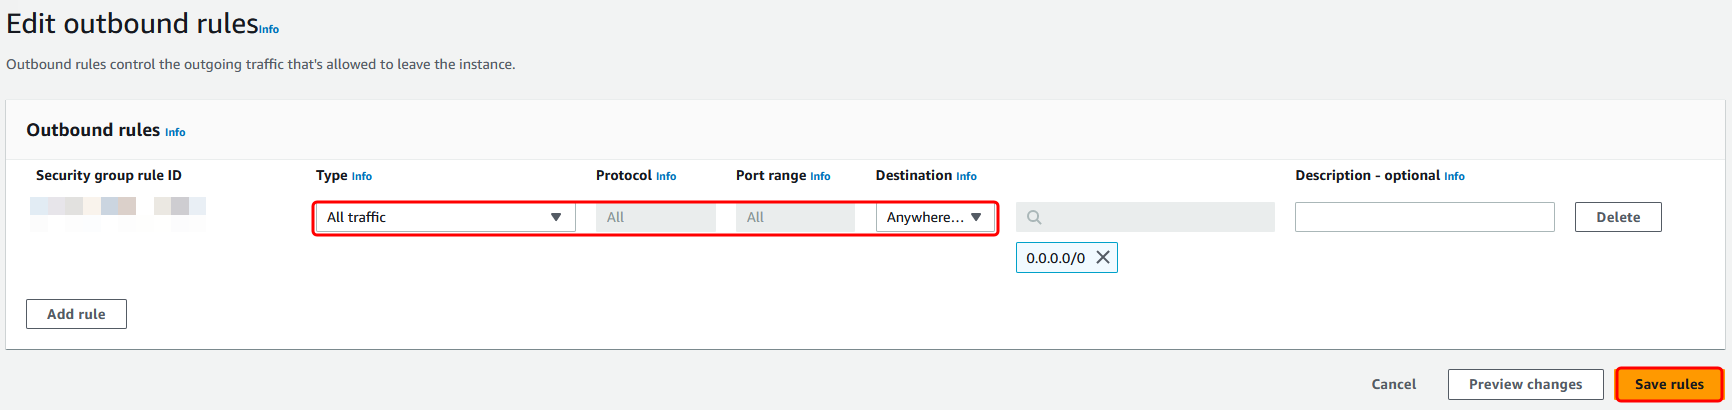
To configure your Amazon Managed Microsoft AD domain controller outbound rules
Note
Repeat steps 1-6 below for each directory.
-
Go to the Amazon Directory Service console
. In the list of directories, take note the directory ID for your Amazon Managed Microsoft AD directory. Open the Amazon VPC console at https://console.amazonaws.cn/vpc/
. -
In the navigation pane, choose Security Groups.
-
Use the search box to search for your Amazon Managed Microsoft AD directory ID. In the search results, select the item with the description
Amazon created security group for.yourdirectoryIDdirectory controllers
-
Go to the Outbound Rules tab for that security group. Choose Edit, and then Add another rule. For the new rule, enter the following values:
-
Type: ALL Traffic
-
Protocol: ALL
-
Destination determines the traffic that can leave your domain controllers and where it can go. Specify a single IP address or an IP address range in CIDR notation (for example, 203.0.113.5/32). You can also specify the name or ID of another security group in the same Region. For more information, see Understand your directory's Amazon security group configuration and use.
-
-
Select Save.
Ensure that Kerberos pre-authentication is enabled
Now you want to confirm that users in your Amazon Managed Microsoft AD also have Kerberos pre-authentication enabled. This is the same process you completed for your on-premises directory. This is the default, but let's check to make sure nothing has changed.
To view user kerberos settings
-
Log in to an instance that is a member of your Amazon Managed Microsoft AD directory using either the Amazon Managed Microsoft AD Administrator account and group permissions for the domain or an account that has been delegated permissions to manage users in the domain.
-
If they are not already installed, install the Active Directory Users and Computers tool and the DNS tool. Learn how to install these tools in Installing Active Directory Administration Tools for Amazon Managed Microsoft AD.
-
Open Server Manager. On the Tools menu, choose Active Directory Users and Computers.
-
Choose the Users folder in your domain. Note that this is the Users folder under your NetBIOS name, not the Users folder under the fully qualified domain name (FQDN).

In the list of users, right-click on a user, and then choose Properties.
-
Choose the Account tab. In the Account options list, ensure that Do not require Kerberos preauthentication is not checked.
Next Step
Step 2: Create the trust relationship with another Amazon Managed Microsoft AD domain