Help improve this page
To contribute to this user guide, choose the Edit this page on GitHub link that is located in the right pane of every page.
Use Network Policies with EKS Auto Mode
Overview
As customers scale their application environments using EKS, network traffic isolation becomes increasingly fundamental for preventing unauthorized access to resources inside and outside the cluster. This is especially important in a multi-tenant environment with multiple unrelated workloads running side by side in the cluster. Kubernetes network policies enable you to enhance the network security posture for your Kubernetes workloads, and their integrations with cluster-external endpoints. EKS Auto Mode supports different types of network policies.
Layer 3 and 4 isolation
Standard Kubernetes network policies operate at layers 3 and 4 of the OSI network model and allow you to control traffic flow at the IP address or port level within your Amazon EKS cluster.
Use cases
-
Segment network traffic between workloads to ensure that only related applications can talk to each other.
-
Isolate tenants at the namespace level using policies to enforce network separation.
DNS-based enforcement
Customers typically deploy workloads in EKS that are part of a broader distributed environment, some of which have to communicate with systems and services outside the cluster (northbound traffic). These systems and services can be in the Amazon cloud or outside Amazon altogether. Domain Name System (DNS) based policies allow you to strengthen your security posture by adopting a more stable and predictable approach for preventing unauthorized access from pods to cluster-external resources or endpoints. This mechanism eliminates the need to manually track and allow list specific IP addresses. By securing resources with a DNS-based approach, you also have more flexibility to update external infrastructure without having to relax your security posture or modify network policies amid changes to upstream servers and hosts. You can filter egress traffic to external endpoints using either a Fully Qualified Domain Name (FQDN), or a matching pattern for a DNS domain name. This gives you the added flexibility of extending access to multiple subdomains associated with a particular cluster-external endpoint.
Use cases
-
Standardize on a DNS-based approach for filtering access from a Kubernetes environment to cluster-external endpoints.
-
Secure access to Amazon services in a multi-tenant environment.
-
Manage network access from pods to on-prem workloads in your Hybrid cloud environments.
Admin (or cluster-scoped) rules
In some cases, like multi-tenant scenarios, customers may have the requirement to enforce a network security standard that applies to the whole cluster. Instead of repetitively defining and maintaining a distinct policy for each namespace, you can use a single policy to centrally manage network access controls for different workloads in the cluster, irrespective of their namespace. These types of policies allow you to extend the scope of enforcement for your network filtering rules applied at layer 3, layer 4, and when using DNS rules.
Use cases
-
Centrally manage network access controls for all (or a subset of) workloads in your EKS cluster.
-
Define a default network security posture across the cluster.
-
Extend organizational security standards to the scope of the cluster in a more operationally efficient way.
Getting started
Prerequisites
-
An Amazon EKS cluster with EKS Auto Mode enabled
-
kubectl configured to connect to your cluster
Step 1: Enable Network Policy Controller
To use network policies with EKS Auto Mode, you first need to enable the Network Policy Controller by applying a ConfigMap to your cluster.
-
Create a file named
enable-network-policy.yamlwith the following content:apiVersion: v1 kind: ConfigMap metadata: name: amazon-vpc-cni namespace: kube-system data: enable-network-policy-controller: "true" -
Apply the ConfigMap to your cluster:
kubectl apply -f enable-network-policy.yaml
Step 2: Create and test network policies
Your EKS Auto Mode cluster is now configured to support Kubernetes network policies. You can test this with the Stars demo of network policy for Amazon EKS.
Step 3: Adjust Network Policy Agent configuration in Node Class (Optional)
You can optionally create a new Node Class to change the default behavior of the Network Policy Agent on the nodes or enable the logging of Network Policy events. To do this, follow these steps:
-
Create or edit a Node Class YAML file (e.g.,
nodeclass-network-policy.yaml) with the following content:apiVersion: eks.amazonaws.com/v1 kind: NodeClass metadata: name: network-policy-config spec: # Optional: Changes default network policy behavior networkPolicy: DefaultAllow # Optional: Enables logging for network policy events networkPolicyEventLogs: Enabled # Include other Node Class configurations as needed -
Apply the Node Class configuration to your cluster:
kubectl apply -f nodeclass-network-policy.yaml
-
Verify that the Node Class has been created:
kubectl get nodeclass network-policy-config
-
Update your Node Pool to use this Node Class. For more information, see Create a Node Pool for EKS Auto Mode.
How does it work?
DNS-based network policy


-
The platform team applies a DNS-based policy to the EKS cluster.
-
The Network Policy Controller is responsible for monitoring the creation of policies within the cluster and then reconciling policy endpoints. In this use case, the network policy controller instructs the node agent to filter DNS requests based on the allow-listed domains in the created policy. Domain names are allow-listed using the FQDN or a domain name that matches a pattern defined in the Kubernetes resource configuration.
-
Workload A attempts to resolve the IP for a cluster-external endpoint. The DNS request first goes through a proxy that filters such requests based on the allow list applied through the network policy.
-
Once the DNS request goes through the DNS filter allow list, it is proxied to CoreDNS,
-
CoreDNS in turn sends the request to the External DNS Resolver (Amazon Route 53 Resolver) to get the list of IP addresses behind the domain name.
-
The resolved IPs with TTL are returned in the response to the DNS request. These IPs are then written in an eBPF map which is used in the next step for IP layer enforcement.
-
The eBPF probes attached to the Pod veth interface will then filter egress traffic from Workload A to the cluster-external endpoint based on the rules in place. This ensures pods can only send cluster-external traffic to the IPs of allow listed domains. The validity of these IPs is based on the TTL retrieved from the External DNS Resolver (Amazon Route 53 Resolver).
Using the Application Network Policy
The ApplicationNetworkPolicy combines the capabilities of standard Kubernetes network policies with DNS based filtering at a namespace level using a single Custom Resource Definition (CRD). Therefore, the ApplicationNetworkPolicy can be used for:
-
Defining restrictions at layers 3 and 4 of the network stack using IP blocks and port numbers.
-
Defining rules that operate at layer 7 of the network stack and letting you filter traffic based on FQDNs.
Important
DNS based rules defined using the ApplicationNetworkPolicy are only applicable to workloads running in EKS Auto Mode-launched EC2 instances.
ApplicationNetworkPolicy supports all fields of the standard Kubernetes NetworkPolicy, with an additional FQDN filter for egress rules.
Warning
Do not use the same name for an ApplicationNetworkPolicy and a NetworkPolicy within the same namespace. If the names collide, the resulting PolicyEndpoints objects may not reflect either policy correctly. Both resources are accepted without error, making this issue difficult to diagnose.
To resolve a naming conflict, rename either the ApplicationNetworkPolicy or the NetworkPolicy so they are unique within the namespace, then verify that the corresponding PolicyEndpoints objects are updated correctly.
Example
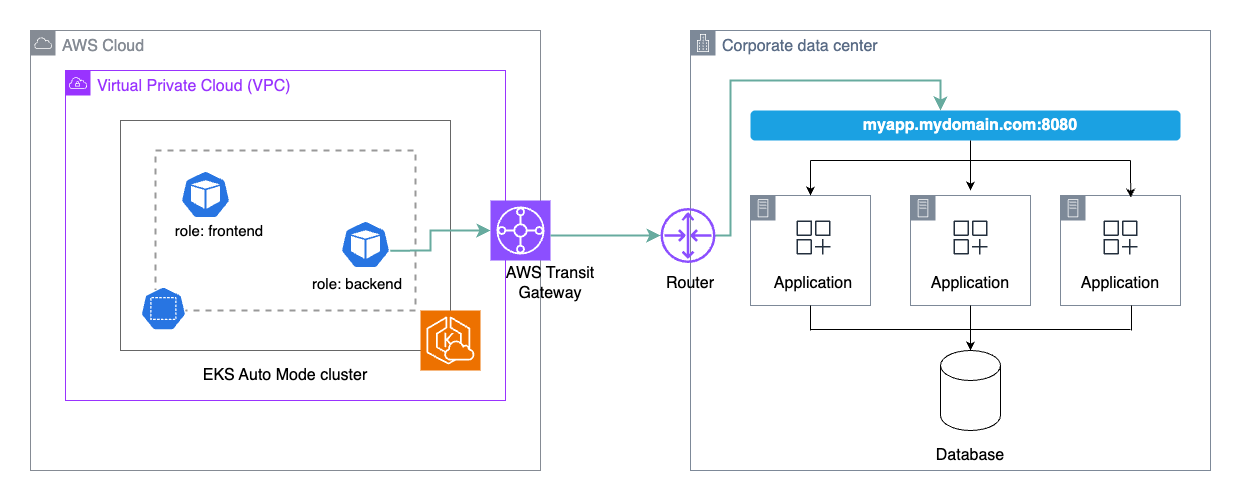
You have a workload in your EKS Auto Mode cluster that needs to communicate with an application on-prem which is behind a load balancer with a DNS name. You could achieve this using the following network policy:
apiVersion: networking.k8s.aws/v1alpha1
kind: ApplicationNetworkPolicy
metadata:
  name: my-onprem-app-egress
  namespace: galaxy
spec:
  podSelector:
    matchLabels:
      role: backend
  policyTypes:
  - Egress
  egress:
  - to:
    - domainNames:
      - "myapp.mydomain.com"
    ports:
    - protocol: TCP
      port: 8080
At the Kubernetes network level, this would allow egress from any pods in the "galaxy" namespace labelled with role: backend to connect to the domain name myapp.mydomain.com on TCP port 8080. In addition, you would need to set up the network connectivity for egress traffic from your VPC to your corporate data center.
Admin (or cluster) network policy
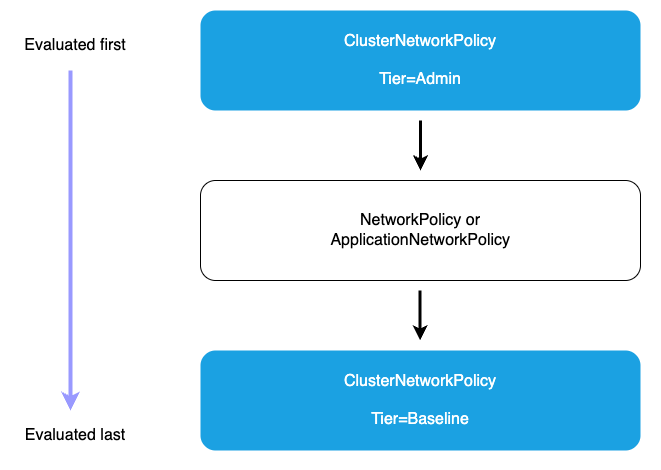
Using the Cluster Network Policy
When using a ClusterNetworkPolicy, the Admin tier policies are evaluated first and cannot be overridden. When the Admin tier policies have been evaluated, the standard namespace scoped policies are used to execute the applied network segmentation rules. This can be accomplished by using either ApplicationNetworkPolicy or NetworkPolicy. Lastly, the Baseline tier rules that define the default network restrictions for cluster workloads will be enforced. These Baseline tier rules can be overridden by the namespace scoped policies if needed.
Example
You have an application in your cluster that you want to isolate from other tenant workloads. You can explicitly block cluster traffic from other namespaces to prevent network access to the sensitive workload namespace.
apiVersion: networking.k8s.aws/v1alpha1
kind: ClusterNetworkPolicy
metadata:
  name: protect-sensitive-workload
spec:
  tier: Admin
  priority: 10
  subject:
    namespaces:
      matchLabels:
        kubernetes.io/metadata.name: earth
  ingress:
    - action: Deny
      from:
      - namespaces:
          matchLabels: {} # Match all namespaces.
      name: select-all-deny-all
Considerations
Understand policy evaluation order
The network policy capabilities supported in EKS are evaluated in a specific order to ensure predictable and secure traffic management. Therefore, it’s important to understand the evaluation flow to design an effective network security posture for your environment.
-
Admin tier policies (evaluated first): All Admin tier ClusterNetworkPolicies are evaluated before any other policies. Within the Admin tier, policies are processed in priority order (lowest priority number first). The action type determines what happens next.
-
Deny action (highest precedence): When an Admin policy with a Deny action matches traffic, that traffic is immediately blocked regardless of any other policies. No further ClusterNetworkPolicy or NetworkPolicy rules are processed. This ensures that organization-wide security controls cannot be overridden by namespace-level policies.
-
Allow action: After Deny rules are evaluated, Admin policies with Allow actions are processed in priority order (lowest priority number first). When an Allow action matches, the traffic is accepted and no further policy evaluation occurs. These policies can grant access across multiple namespaces based on label selectors, providing centralized control over which workloads can access specific resources.
-
Pass action: Pass actions in Admin tier policies delegate decision-making to lower tiers. When traffic matches a Pass rule, evaluation skips all remaining Admin tier rules for that traffic and proceeds directly to the NetworkPolicy tier. This allows administrators to explicitly delegate control for certain traffic patterns to application teams. For example, you might use Pass rules to delegate intra-namespace traffic management to namespace administrators while maintaining strict controls over external access.
-
-
Network policy tier: If no Admin tier policy matches with Deny or Allow, or if a Pass action was matched, namespace-scoped ApplicationNetworkPolicy and traditional NetworkPolicy resources are evaluated next. These policies provide fine-grained control within individual namespaces and are managed by application teams. Namespace-scoped policies can only be more restrictive than Admin policies. They cannot override an Admin policy’s Deny decision, but they can further restrict traffic that was allowed or passed by Admin policies.
-
Baseline tier Admin policies: If no Admin or namespace-scoped policies match the traffic, Baseline tier ClusterNetworkPolicies are evaluated. These provide default security postures that can be overridden by namespace-scoped policies, allowing administrators to set organization-wide defaults while giving teams flexibility to customize as needed. Baseline policies are evaluated in priority order (lowest priority number first).
-
Default deny (if no policies match): This deny-by-default behavior ensures that only explicitly permitted connections are allowed, maintaining a strong security posture.
Applying the principle of least privilege
-
Start with restrictive policies and gradually add permissions as needed - Begin by implementing deny-by-default policies at the cluster level, then incrementally add allow rules as you validate legitimate connectivity requirements. This approach forces teams to explicitly justify each external connection, creating a more secure and auditable environment.
-
Regularly audit and remove unused policy rules - Network policies can accumulate over time as applications evolve, leaving behind obsolete rules that unnecessarily expand your attack surface. Implement a regular review process to identify and remove policy rules that are no longer needed, ensuring your security posture remains tight and maintainable.
-
Use specific domain names rather than broad patterns when possible - While wildcard patterns like
*.amazonaws.comprovide convenience, they also grant access to a wide range of services. Whenever feasible, specify exact domain names likes3.us-west-2.amazonaws.comto limit access to only the specific services your applications require, reducing the risk of lateral movement if a workload is compromised.
Using DNS-based policies in EKS
-
DNS based rules defined using the
ApplicationNetworkPolicyare only applicable to workloads running in EKS Auto Mode-launched EC2 instances. If you are running a mixed mode cluster (consisting of both EKS Auto and non EKS Auto worker nodes), your DNS-based rules are only effective in the EKS Auto mode worker nodes (EC2 managed instances).
Validating your DNS policies
-
Use staging clusters that mirror production network topology for testing - Your staging environment should replicate the network architecture, external dependencies, and connectivity patterns of production to ensure accurate policy testing. This includes matching VPC configurations, DNS resolution behavior, and access to the same external services your production workloads require.
-
Implement automated testing for critical network paths - Build automated tests that validate connectivity to essential external services as part of your CI/CD pipeline. These tests should verify that legitimate traffic flows are permitted while unauthorized connections are blocked, providing continuous validation that your network policies maintain the correct security posture as your infrastructure evolves.
-
Monitor application behavior after policy changes - After deploying new or modified network policies to production, closely monitor application logs, error rates, and performance metrics to quickly identify any connectivity issues. Establish clear rollback procedures so you can rapidly revert policy changes if they cause unexpected application behavior or service disruptions.
Interaction with Amazon Route 53 DNS firewall
EKS Admin and Network policies are evaluated first at the pod level when traffic is initiated. If an EKS network policy allows egress to a specific domain, the pod then performs a DNS query that reaches the Route 53 Resolver. At this point, Route 53 DNS Firewall rules are evaluated. If DNS Firewall blocks the domain query, DNS resolution fails and the connection cannot be established, even though the EKS network policy allowed it. This creates complementary security layers: EKS DNS-based network policies provide pod-level egress control for application-specific access requirements and multi-tenant security boundaries, while DNS Firewall provides VPC-wide protection against known malicious domains and enforces organization-wide blocklists.