Help improve this page
To contribute to this user guide, choose the Edit this page on GitHub link that is located in the right pane of every page.
Limit Pod traffic with Kubernetes network policies
Overview
By default, there are no restrictions in Kubernetes for IP addresses, ports, or connections between any Pods in your cluster or between your Pods and resources in any other network. You can use Kubernetes network policy to restrict network traffic to and from your Pods. For more information, see Network Policies
Standard network policy
You can use the standard NetworkPolicy to segment pod-to-pod traffic in the cluster. These network policies operate at layers 3 and 4 of the OSI network model, allowing you to control traffic flow at the IP address or port level within your Amazon EKS cluster. Standard network policies are scoped to the namespace level.
Use cases
-
Segment network traffic between workloads to ensure that only related applications can talk to each other.
-
Isolate tenants at the namespace level using policies to enforce network separation.
Example
In the policy below, egress traffic from the webapp pods in the sun namespace is restricted.
apiVersion: networking.k8s.io/v1
kind: NetworkPolicy
metadata:
  name: webapp-egress-policy
  namespace: sun
spec:
  podSelector:
    matchLabels:
      role: webapp
  policyTypes:
  - Egress
  egress:
  - to:
    - namespaceSelector:
        matchLabels:
          name: moon
      podSelector:
        matchLabels:
          role: frontend
    ports:
    - protocol: TCP
      port: 8080
  - to:
    - namespaceSelector:
        matchLabels:
          name: stars
      podSelector:
        matchLabels:
          role: frontend
    ports:
    - protocol: TCP
      port: 8080
The policy applies to pods with the label role: webapp in the sun namespace.
-
Allowed traffic: Pods with the label
role: frontendin themoonnamespace on TCP port8080 -
Allowed traffic: Pods with the label role: frontend in the
starsnamespace on TCP port8080 -
Blocked traffic: All other outbound traffic from
webapppods is implicitly denied
Admin (or cluster) network policy
You can use the ClusterNetworkPolicy to enforce a network security standard that applies to the whole cluster. Instead of repetitively defining and maintaining a distinct policy for each namespace, you can use a single policy to centrally manage network access controls for different workloads in the cluster, irrespective of their namespace.
Use cases
-
Centrally manage network access controls for all (or a subset of) workloads in your EKS cluster.
-
Define a default network security posture across the cluster.
-
Extend organizational security standards to the scope of the cluster in a more operationally efficient way.
Example
In the policy below, you can explicitly block cluster traffic from other namespaces to prevent network access to a sensitive workload namespace.
apiVersion: networking.k8s.aws/v1alpha1
kind: ClusterNetworkPolicy
metadata:
  name: protect-sensitive-workload
spec:
  tier: Admin
  priority: 10
  subject:
    namespaces:
      matchLabels:
        kubernetes.io/metadata.name: earth
  ingress:
    - action: Deny
      from:
      - namespaces:
          matchLabels: {} # Match all namespaces.
      name: select-all-deny-all
Important notes
Network policies in the Amazon VPC CNI plugin for Kubernetes are supported in the configurations listed below.
-
Version 1.21.0 (or later) of Amazon VPC CNI plugin for both standard and admin network policies.
-
Cluster configured for
IPv4orIPv6addresses. -
You can use network policies with security groups for Pods. With network policies, you can control all in-cluster communication. With security groups for Pods, you can control access to Amazon services from applications within a Pod.
-
You can use network policies with custom networking and prefix delegation.
Considerations
Architecture
-
When applying Amazon VPC CNI plugin for Kubernetes network policies to your cluster with the Amazon VPC CNI plugin for Kubernetes , you can apply the policies to Amazon EC2 Linux nodes only. You can’t apply the policies to Fargate or Windows nodes.
-
Network policies only apply either
IPv4orIPv6addresses, but not both. In anIPv4cluster, the VPC CNI assignsIPv4address to pods and appliesIPv4policies. In anIPv6cluster, the VPC CNI assignsIPv6address to pods and appliesIPv6policies. AnyIPv4network policy rules applied to anIPv6cluster are ignored. AnyIPv6network policy rules applied to anIPv4cluster are ignored.
Network Policies
-
Network Policies are only applied to Pods that are part of a Deployment. Standalone Pods that don’t have a
metadata.ownerReferencesset can’t have network policies applied to them. -
You can apply multiple network policies to the same Pod. When two or more policies that select the same Pod are configured, all policies are applied to the Pod.
-
The maximum number of combinations of ports and protocols for a single IP address range (CIDR) is 24 across all of your network policies. Selectors such as
namespaceSelectorresolve to one or more CIDRs. If multiple selectors resolve to a single CIDR or you specify the same direct CIDR multiple times in the same or different network policies, these all count toward this limit. -
For any of your Kubernetes services, the service port must be the same as the container port. If you’re using named ports, use the same name in the service spec too.
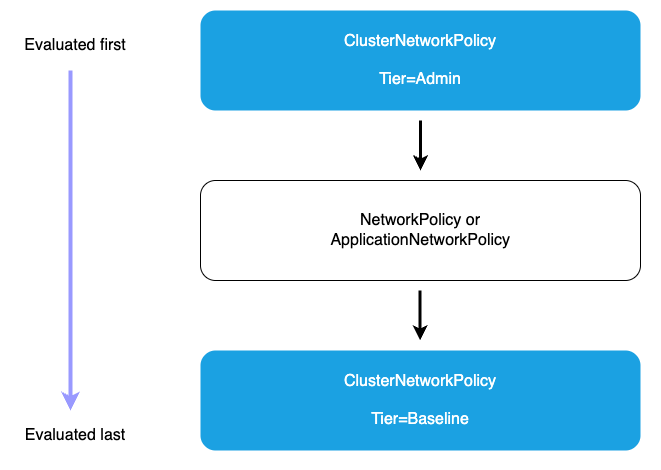
Admin Network Policies
-
Admin tier policies (evaluated first): All Admin tier ClusterNetworkPolicies are evaluated before any other policies. Within the Admin tier, policies are processed in priority order (lowest priority number first). The action type determines what happens next.
-
Deny action (highest precedence): When an Admin policy with a Deny action matches traffic, that traffic is immediately blocked regardless of any other policies. No further ClusterNetworkPolicy or NetworkPolicy rules are processed. This ensures that organization-wide security controls cannot be overridden by namespace-level policies.
-
Allow action: After Deny rules are evaluated, Admin policies with Allow actions are processed in priority order (lowest priority number first). When an Allow action matches, the traffic is accepted and no further policy evaluation occurs. These policies can grant access across multiple namespaces based on label selectors, providing centralized control over which workloads can access specific resources.
-
Pass action: Pass actions in Admin tier policies delegate decision-making to lower tiers. When traffic matches a Pass rule, evaluation skips all remaining Admin tier rules for that traffic and proceeds directly to the NetworkPolicy tier. This allows administrators to explicitly delegate control for certain traffic patterns to application teams. For example, you might use Pass rules to delegate intra-namespace traffic management to namespace administrators while maintaining strict controls over external access.
-
-
Network policy tier: If no Admin tier policy matches with Deny or Allow, or if a Pass action was matched, namespace-scoped NetworkPolicy resources are evaluated next. These policies provide fine-grained control within individual namespaces and are managed by application teams. Namespace-scoped policies can only be more restrictive than Admin policies. They cannot override an Admin policy’s Deny decision, but they can further restrict traffic that was allowed or passed by Admin policies.
-
Baseline tier Admin policies: If no Admin or namespace-scoped policies match the traffic, Baseline tier ClusterNetworkPolicies are evaluated. These provide default security postures that can be overridden by namespace-scoped policies, allowing administrators to set organization-wide defaults while giving teams flexibility to customize as needed. Baseline policies are evaluated in priority order (lowest priority number first).
-
Default deny (if no policies match): This deny-by-default behavior ensures that only explicitly permitted connections are allowed, maintaining a strong security posture.
Migration
-
If your cluster is currently using a third party solution to manage Kubernetes network policies, you can use those same policies with the Amazon VPC CNI plugin for Kubernetes. However you must remove your existing solution so that it isn’t managing the same policies.
Warning
We recommend that after you remove a network policy solution, then you replace all of the nodes that had the network policy solution applied to them. This is because the traffic rules might get left behind by a pod of the solution if it exits suddenly.
Installation
-
The network policy feature creates and requires a
PolicyEndpointCustom Resource Definition (CRD) calledpolicyendpoints.networking.k8s.aws.PolicyEndpointobjects of the Custom Resource are managed by Amazon EKS. You shouldn’t modify or delete these resources. -
If you run pods that use the instance role IAM credentials or connect to the EC2 IMDS, be careful to check for network policies that would block access to the EC2 IMDS. You may need to add a network policy to allow access to EC2 IMDS. For more information, see Instance metadata and user data in the Amazon EC2 User Guide.
Pods that use IAM roles for service accounts or EKS Pod Identity don’t access EC2 IMDS.
-
The Amazon VPC CNI plugin for Kubernetes doesn’t apply network policies to additional network interfaces for each pod, only the primary interface for each pod (
eth0). This affects the following architectures:-
IPv6pods with theENABLE_V4_EGRESSvariable set totrue. This variable enables theIPv4egress feature to connect the IPv6 pods toIPv4endpoints such as those outside the cluster. TheIPv4egress feature works by creating an additional network interface with a local loopback IPv4 address. -
When using chained network plugins such as Multus. Because these plugins add network interfaces to each pod, network policies aren’t applied to the chained network plugins.
-