Target groups for your Network Load Balancers
Each target group is used to route requests to one or more registered targets. When you create a listener, you specify a target group for its default action. Traffic is forwarded to the target group specified in the listener rule. You can create different target groups for different types of requests. For example, create one target group for general requests and other target groups for requests to the microservices for your application. For more information, see Network Load Balancer components.
You define health check settings for your load balancer on a per target group basis. Each target group uses the default health check settings, unless you override them when you create the target group or modify them later on. After you specify a target group in a rule for a listener, the load balancer continually monitors the health of all targets registered with the target group that are in an Availability Zone enabled for the load balancer. The load balancer routes requests to the registered targets that are healthy. For more information, see Health checks for Network Load Balancer target groups.
Contents
Routing configuration
By default, a load balancer routes requests to its targets using the protocol and port number that you specified when you created the target group. Alternatively, you can override the port used for routing traffic to a target when you register it with the target group.
Target groups for Network Load Balancers support the following protocols and ports:
-
Protocols: TCP, TLS, UDP, TCP_UDP, QUIC, TCP_QUIC
-
Ports: 1-65535
If a target group is configured with the TLS protocol, the load balancer establishes TLS connections with the targets using certificates that you install on the targets. The load balancer does not validate these certificates. Therefore, you can use self-signed certificates or certificates that have expired. Because the load balancer is in a virtual private cloud (VPC), traffic between the load balancer and the targets is authenticated at the packet level, so it is not at risk of man-in-the-middle attacks or spoofing even if the certificates on the targets are not valid.
The following table summarizes the supported combinations of listener protocol and target group settings.
| Listener protocol | Target group protocol | Target group type | Health check protocol |
|---|---|---|---|
|
TCP |
TCP | TCP_UDP | TCP_QUIC |
instance | ip |
HTTP | HTTPS | TCP |
|
TCP |
TCP |
alb |
HTTP | HTTPS |
|
TLS |
TCP | TLS |
instance | ip |
HTTP | HTTPS | TCP |
|
UDP |
UDP | TCP_UDP |
instance | ip |
HTTP | HTTPS | TCP |
|
TCP_UDP |
TCP_UDP |
instance | ip |
HTTP | HTTPS | TCP |
|
QUIC |
QUIC | TCP_QUIC |
instance | ip |
HTTP | HTTPS | TCP |
|
TCP_QUIC |
TCP_QUIC |
instance | ip |
HTTP | HTTPS | TCP |
Target type
When you create a target group, you specify its target type, which determines how you specify its targets. After you create a target group, you can't change its target type.
The following are the possible target types:
instance-
The targets are specified by instance ID.
ip-
The targets are specified by IP address.
alb-
The target is an Application Load Balancer.
When the target type is ip, you can specify IP addresses from one of the
following CIDR blocks:
Important
You can't specify publicly routable IP addresses.
All of the supported CIDR blocks enable you to register the following targets with a target group:
-
Amazon resources that are addressable by IP address and port (for example, databases).
-
On-premises resources linked to Amazon through Amazon Direct Connect or a Site-to-Site VPN connection.
When client IP preservation is disabled for your target groups, the load balancer can support about 55,000 connections per minute for each combination of Network Load Balancer IP address and unique target (IP address and port). If you exceed these connections, there is an increased chance of port allocation errors. If you get port allocation errors, add more targets to the target group.
When launching a Network Load Balancer in a shared VPC (as a participant), you can only register targets in subnets that have been shared with you.
When the target type is alb, you can register a single Application Load Balancer as a target.
For more information, see Use an Application Load Balancer as a target of a Network Load Balancer.
Network Load Balancers do not support the lambda target type. Application Load Balancers are the only load
balancers that support the lambda target type. For more information, see
Lambda functions as targets
in the User Guide for Application Load Balancers.
If you have microservices on instances that are registered with a Network Load Balancer, you can't use the load balancer to provide communication between them unless the load balancer is internet-facing or the instances are registered by IP address. For more information, see Connections time out for requests from a target to its load balancer.
Request routing and IP addresses
If you specify targets using an instance ID, traffic is routed to instances using the primary private IP address that is specified in the primary network interface for the instance. The load balancer rewrites the destination IP address from the data packet before forwarding it to the target instance.
If you specify targets using IP addresses, you can route traffic to an instance using any private IP address from one or more network interfaces. This enables multiple applications on an instance to use the same port. Note that each network interface can have its own security group. The load balancer rewrites the destination IP address before forwarding it to the target.
For more information about allowing traffic to your instances, see Target security groups.
On premises resources as targets
On premises resources linked through Amazon Direct Connect or a Site-to-Site VPN connection can serve
as a target, when the target type is ip.
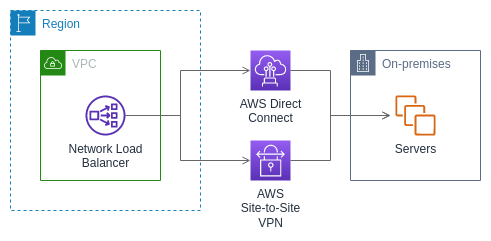
When using on premises resources, the IP addresses of these targets must still come from one of the following CIDR blocks:
For more information about Amazon Direct Connect, see What is Amazon Direct Connect?
For more information about Amazon Site-to-Site VPN, see What is Amazon Site-to-Site VPN?
IP address type
When creating a new target group, you can select the IP address type of your target group. This controls the IP version used to communicate with targets and check their health status.
Target groups for your Network Load Balancers support the following IP address types:
ipv4-
The load balancer communicates with targets using IPv4.
ipv6-
The load balancer communicates with targets using IPv6.
Considerations
-
The load balancer communicates with targets based on the IP address type of the target group. The targets of an IPv4 target group must accept IPv4 traffic from the load balancer and the targets of an IPv6 target group must accept IPv6 traffic from the load balancer.
-
You can't use an IPv6 target group with an
ipv4load balancer. -
You can't use an IPv4 target group with a UDP listener for a
dualstackload balancer. -
You can't register an Application Load Balancer with an IPv6 target group.
-
You can't use an IPv6 target group with QUIC or TCP_QUIC protocols.
Registered targets
Your load balancer serves as a single point of contact for clients and distributes incoming traffic across its healthy registered targets. Each target group must have at least one registered target in each Availability Zone that is enabled for the load balancer. You can register each target with one or more target groups.
If demand on your application increases, you can register additional targets with one or more target groups in order to handle the demand. The load balancer starts routing traffic to a newly registered target as soon as the registration process completes and the target passes the first initial health check, irrespective of the configured threshold.
If demand on your application decreases, or if you need to service your targets, you
can deregister targets from your target groups. Deregistering a target removes it from
your target group, but does not affect the target otherwise. The load balancer stops
routing traffic to a target as soon as it is deregistered. The target enters the
draining state until in-flight requests have completed. You can
register the target with the target group again when you are ready for it to resume
receiving traffic.
If you are registering targets by instance ID, you can use your load balancer with an Auto Scaling group. After you attach a target group to an Auto Scaling group, Auto Scaling registers your targets with the target group for you when it launches them. For more information, see Attaching a load balancer to your Auto Scaling group in the Amazon EC2 Auto Scaling User Guide.
Requirements and considerations
-
You can't register instances by instance ID if they use one of the following instance types: C1, CC1, CC2, CG1, CG2, CR1, G1, G2, HI1, HS1, M1, M2, M3, or T1.
-
When registering targets by instance ID for a IPv6 target group, the targets must have an assigned primary IPv6 address. To learn more, see IPv6 addresses in the Amazon EC2 User Guide
-
When registering targets by instance ID, instances must be in the same VPC as the Network Load Balancer. You can't register instances by instance ID if they are in an VPC that is peered to the load balancer VPC (same Region or different Region). You can register these instances by IP address.
-
If you register a target by IP address and the IP address is in the same VPC as the load balancer, the load balancer verifies that it is from a subnet that it can reach.
-
The load balancer routes traffic to targets only in Availability Zones that are enabled. Targets in zones that are not enabled are unused.
-
For UDP, TCP_UDP, QUIC, and TCP_QUIC target groups, do not register instances by IP address if they reside outside of the load balancer VPC or if they use one of the following instance types: C1, CC1, CC2, CG1, CG2, CR1, G1, G2, HI1, HS1, M1, M2, M3, or T1. Targets that reside outside the load balancer VPC or use an unsupported instance type might be able to receive traffic from the load balancer but then be unable to respond.
Target group attributes
You can configure a target group by editing its attributes. For more information, see Edit target group attributes.
The following target group attributes are supported. You can modify these attributes
only if the target group type is instance or ip. If the target
group type is alb, these attributes always use their default values.
deregistration_delay.timeout_seconds-
The amount of time for Elastic Load Balancing to wait before changing the state of a deregistering target from
drainingtounused. The range is 0-3600 seconds. The default value is 300 seconds. For QUIC traffic, the value is always 300 seconds. deregistration_delay.connection_termination.enabled-
Indicates whether the load balancer terminates connections at the end of the deregistration timeout. The value is
trueorfalse. For new UDP/TCP_UDP target groups the default istrue. Otherwise, the default isfalse. This attribute does not apply to QUIC traffic. load_balancing.cross_zone.enabled-
Indicates whether cross zone load balancing is enabled. The value is
true,falseoruse_load_balancer_configuration. The default isuse_load_balancer_configuration. preserve_client_ip.enabled-
Indicates whether client IP preservation is enabled. The value is
trueorfalse. The default is disabled if the target group type is IP address and the target group protocol is TCP or TLS. Otherwise, the default is enabled. Client IP preservation can't be disabled for UDP, TCP_UDP, QUIC, and TCP_QUIC target groups. proxy_protocol_v2.enabled-
Indicates whether proxy protocol version 2 is enabled. By default, proxy protocol is disabled.
stickiness.enabled-
Indicates whether sticky sessions are enabled. The value is
trueorfalse. The default isfalse. This attribute does not apply to QUIC traffic. stickiness.type-
The type of stickiness. The possible value is
source_ip. target_group_health.dns_failover.minimum_healthy_targets.count-
The minimum number of targets that must be healthy. If the number of healthy targets is below this value, mark the zone as unhealthy in DNS, so that traffic is routed only to healthy zones. The possible values are
offor an integer from 1 to the maximum number of targets. Whenoff, DNS fail away is disabled, meaning that even if all targets in the target group are unhealthy, the zone is not removed from DNS. The default is 1. target_group_health.dns_failover.minimum_healthy_targets.percentage-
The minimum percentage of targets that must be healthy. If the percentage of healthy targets is below this value, mark the zone as unhealthy in DNS, so that traffic is routed only to healthy zones. The possible values are
offor an integer from 1 to 100. Whenoff, DNS fail away is disabled, meaning that even if all targets in the target group are unhealthy, the zone is not removed from DNS. The default isoff. target_group_health.unhealthy_state_routing.minimum_healthy_targets.count-
The minimum number of targets that must be healthy. If the number of healthy targets is below this value, send traffic to all targets, including unhealthy targets. The possible values are 1 to the maximum number of targets. The default is 1.
target_group_health.unhealthy_state_routing.minimum_healthy_targets.percentage-
The minimum percentage of targets that must be healthy. If the percentage of healthy targets is below this value, send traffic to all targets, including unhealthy targets. The possible values are
offor an integer from 1 to 100. The default isoff. target_health_state.unhealthy.connection_termination.enabled-
Indicates whether the load balancer terminates connections to unhealthy targets. The value is
trueorfalse. The default istrue. target_health_state.unhealthy.draining_interval_seconds-
The amount of time for Elastic Load Balancing to wait before changing the state of an unhealthy target from
unhealthy.drainingtounhealthy. The range is 0-360000 seconds. The default value is 0 seconds.Note: This attribute can only be configured when
target_health_state.unhealthy.connection_termination.enabledisfalse.
Target group health
By default, a target group is considered healthy as long as it has at least one healthy target. If you have a large fleet, having only one healthy target serving traffic is not sufficient. Instead, you can specify a minimum count or percentage of targets that must be healthy, and what actions the load balancer takes when the healthy targets fall below the specified threshold. This improves the availability of your application.
Contents
Unhealthy state actions
You can configure healthy thresholds for the following actions:
-
DNS failover – When the healthy targets in a zone fall below the threshold, we mark the IP addresses of the load balancer node for the zone as unhealthy in DNS. Therefore, when clients resolve the load balancer DNS name, the traffic is routed only to healthy zones.
-
Routing failover – When the healthy targets in a zone fall below the threshold, the load balancer sends traffic to all targets that are available to the load balancer node, including unhealthy targets. This increases the chances that a client connection succeeds, especially when targets temporarily fail to pass health checks, and reduces the risk of overloading the healthy targets.
Requirements and considerations
-
If you specify both types of thresholds for an action (count and percentage), the load balancer takes the action when either threshold is breached.
-
If you specify thresholds for both actions, the threshold for DNS failover must be greater than or equal to the threshold for routing failover, so that DNS failover occurs either with or before routing failover.
-
If you specify the threshold as a percentage, we calculate the value dynamically, based on the total number of targets that are registered with the target groups.
-
The total number of targets is based on whether cross-zone load balancing is off or on. If cross-zone load balancing is off, each node sends traffic only to the targets in its own zone, which means that the thresholds apply to the number of targets in each enabled zone separately. If cross-zone load balancing is on, each node sends traffic to all targets in all enabled zones, which means that the specified thresholds apply to the total number targets in all enabled zones. For more information, see Cross-zone load balancing.
-
When DNS failover occurs, it impacts all target groups associated with the load balancer. Ensure that you have enough capacity in your remaining zones to handle this additional traffic, especially if cross-zone load balancing is off.
-
With DNS failover, we remove the IP addresses of the unhealthy zones from the DNS hostname for the load balancer. However, the local client DNS cache might contain these IP addresses until the time-to-live (TTL) in the DNS record expires (60 seconds).
-
With DNS failover, if there are multiple target groups attached to a Network Load Balancer and one target group is unhealthy in a zone, DNS failover occurs, even if another target group is healthy in that zone.
-
With DNS failover, if all load balancer zones are considered unhealthy, the load balancer sends traffic to all zones, including the unhealthy zones.
-
There are factors other than whether there are enough healthy targets that might lead to DNS failover, such as the health of the zone.
Example
The following example demonstrates how target group health settings are applied.
Scenario
-
A load balancer that supports two Availability Zones, A and B
-
Each Availability Zone contains 10 registered targets
-
The target group has the following target group health settings:
DNS failover - 50%
Routing failover - 50%
-
Six targets fail in Availability Zone B
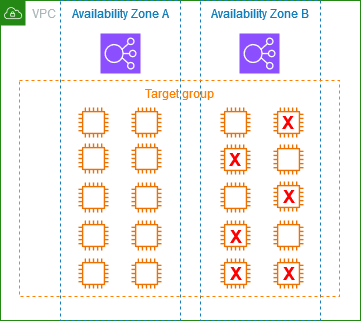
If cross-zone load balancing is off
-
The load balancer node in each Availability Zone can send traffic only to the 10 targets in its Availability Zone.
-
There are 10 healthy targets in Availability Zone A, which meets the required percentage of healthy targets. The load balancer continues to distribute traffic between the 10 healthy targets.
-
There are only 4 healthy targets in Availability Zone B, which is 40% of the targets for the load balancer node in Availability Zone B. Because this is less than the required percentage of healthy targets, the load balancer takes the following actions:
-
DNS failover - Availability Zone B is marked as unhealthy in DNS. Because clients can't resolve the load balancer name to the load balancer node in Availability Zone B, and Availability Zone A is healthy, clients send new connections to Availability Zone A.
-
Routing failover - When new connections are sent explicitly to Availability Zone B, the load balancer distributes traffic to all targets in Availability Zone B, including the unhealthy targets. This prevents outages among the remaining healthy targets.
-
If cross-zone load balancing is on
-
Each load balancer node can send traffic to all 20 registered targets across both Availability Zones.
-
There are 10 healthy targets in Availability Zone A and 4 healthy targets in Availability Zone B, for a total of 14 healthy targets. This is 70% of the targets for the load balancer nodes in both Availability Zones, which meets the required percentage of healthy targets.
-
The load balancer distributes traffic between the 14 healthy targets in both Availability Zones.
Using Route 53 DNS failover for your load balancer
If you use Route 53 to route DNS queries to your load balancer, you can also configure DNS failover for your load balancer using Route 53. In a failover configuration, Route 53 checks the health of the target group targets for the load balancer to determine whether they are available. If there are no healthy targets registered with the load balancer, or if the load balancer itself is unhealthy, Route 53 routes traffic to another available resource, such as a healthy load balancer or a static website in Amazon S3.
For example, suppose that you have a web application for
www.example.com, and you want redundant instances running behind
two load balancers residing in different Regions. You want the traffic to be
primarily routed to the load balancer in one Region, and you want to use the load
balancer in the other Region as a backup during failures. If you configure DNS
failover, you can specify your primary and secondary (backup) load balancers. Route 53
directs traffic to the primary load balancer if it is available, or to the secondary
load balancer otherwise.
How evaluate target health works
-
If evaluate target health is set to
Yeson an alias record for a Network Load Balancer, Route 53 evaluates the health of the resource specified by thealias targetvalue. Route 53 uses the target group health checks. -
If all target groups attached to a Network Load Balancer are healthy, Route 53 marks the alias record as healthy. If you configured a threshold for a target group and it meets its threshold, it passes health checks. Otherwise, if a target group contains at least one healthy target, it passes health checks. If health checks pass, Route 53 returns records according to your routing policy. If a failover routing policy is used, Route 53 returns the primary record.
-
If all target groups attached to a Network Load Balancer are unhealthy, the alias record fails the Route 53 health check (fail-open). If using evaluate target health, this causes the failover routing policy to redirect traffic to the secondary resource.
-
If all of the target groups in a Network Load Balancer are empty (no targets), Route 53 considers the record unhealthy (fail-open). If using evaluate target health, this causes the failover routing policy to redirect traffic to the secondary resource.
For more information, see Using load balancer target group health thresholds to improve availability