Create Amazon CloudFormation templates for Amazon EMR Studio
About EMR Studio cluster templates
You can create Amazon CloudFormation templates to help EMR Studio users launch new Amazon EMR clusters in a Workspace. CloudFormation templates are formatted text files in JSON or YAML. In a template, you describe a stack of Amazon resources and tell CloudFormation how to provision those resources for you. For EMR Studio, you can create one or more templates that describe an Amazon EMR cluster.
You organize your templates in Amazon Service Catalog. Amazon Service Catalog lets you create and manage commonly deployed IT services called products on Amazon. You collect your templates as products in a portfolio that you share with your EMR Studio users. After you create cluster templates, Studio users can launch a new cluster for a Workspace with one of your templates. Users must have permission to create new clusters from templates. You can set user permissions in your EMR Studio permissions policies.
To learn more about CloudFormation templates, see Templates in the Amazon CloudFormation User Guide. For more information about Amazon Service Catalog, see What is Amazon Service Catalog.
The following video demonstrates how to set up cluster templates in
Amazon Service Catalog for EMR Studio. You can also learn more in the Build a self-service environment for each line of business using Amazon EMR and Service Catalog
Optional template parameters
You can include additional options in the Parameters section of your template. Parameters let Studio users input or select custom values for a
cluster. For example, you could add a parameter that lets users select a particular Amazon EMR
release. For more information, see Parameters in the Amazon CloudFormation User Guide.
The following example Parameters section defines additional input
parameters such as ClusterName, EmrRelease version, and
ClusterInstanceType.
Parameters:
  ClusterName:
    Type: "String"
    Default: "Cluster_Name_Placeholder"
  EmrRelease:
    Type: "String"
    Default: "emr-6.2.0"
    AllowedValues:
    - "emr-6.2.0"
    - "emr-5.32.0"
  ClusterInstanceType:
    Type: "String"
    Default: "m5.xlarge"
    AllowedValues:
    - "m5.xlarge"
    - "m5.2xlarge"
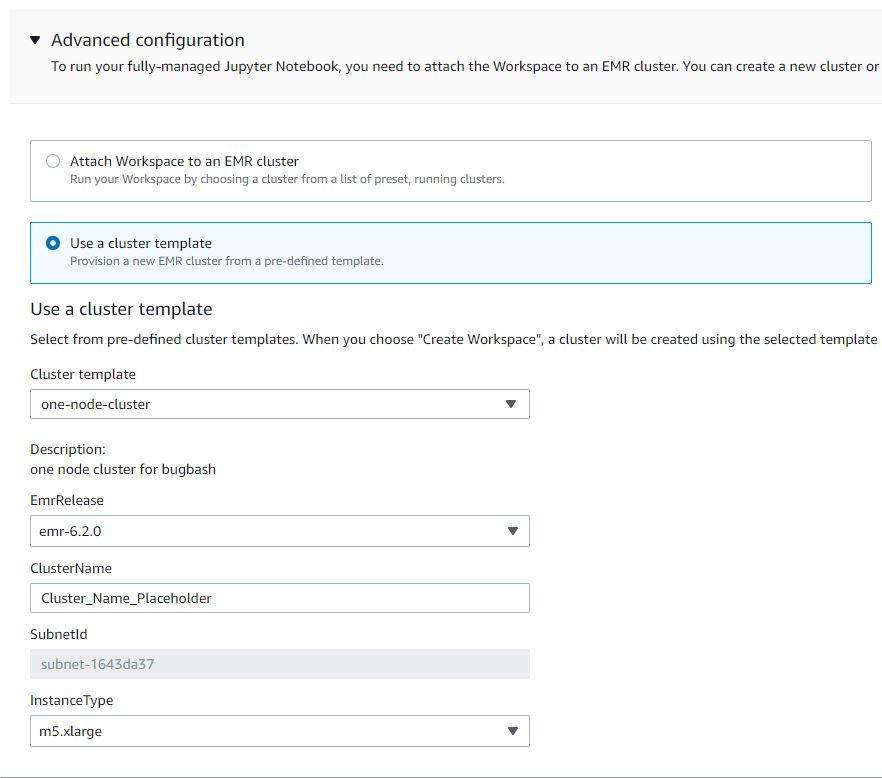
When you add parameters, Studio users see additional form options after selecting a cluster template. The following image shows additional form options for EmrRelease version, ClusterName, and InstanceType.
Prerequisites
Before you create a cluster template, make sure you have IAM permissions to access the Service Catalog administrator console view. You also need the required IAM permissions to perform Service Catalog administrative tasks. For more information, see Grant permissions to Service Catalog administrators.
Create EMR cluster templates
To create EMR cluster templates using Service Catalog
-
Create one or more CloudFormation templates. Where you store your templates is up to you. Since templates are formatted text files, you can upload them to Amazon S3 or keep them in your local file system. To learn more about CloudFormation templates, see Templates in the Amazon CloudFormation User Guide.
Use the following rules to name your templates, or check your names against the pattern
[a-zA-Z0-9][a-zA-Z0-9._-]*.-
Template names must start with a letter or a number.
-
Template names can only consist of letters, numbers, periods (.), underscores (_), and hyphens (-).
Each cluster template that you create must include the following options:
Input parameters
-
ClusterName – A name for the cluster to help users identify it after it has been provisioned.
Output
-
ClusterId– The ID of the newly-provisioned EMR cluster.
Following is an example Amazon CloudFormation template in YAML format for a cluster with two nodes. The example template includes the required template options and defines additional input parameters for
EmrReleaseandClusterInstanceType.awsTemplateFormatVersion: 2010-09-09 Parameters: ClusterName: Type: "String" Default: "Example_Two_Node_Cluster" EmrRelease: Type: "String" Default: "emr-6.2.0" AllowedValues: - "emr-6.2.0" - "emr-5.32.0" ClusterInstanceType: Type: "String" Default: "m5.xlarge" AllowedValues: - "m5.xlarge" - "m5.2xlarge" Resources: EmrCluster: Type: AWS::EMR::Cluster Properties: Applications: - Name: Spark - Name: Livy - Name: JupyterEnterpriseGateway - Name: Hive EbsRootVolumeSize: '10' Name: !Ref ClusterName JobFlowRole: EMR_EC2_DefaultRole ServiceRole: EMR_DefaultRole_V2 ReleaseLabel: !Ref EmrRelease VisibleToAllUsers: true LogUri: Fn::Sub: 's3://aws-logs-${AWS::AccountId}-${AWS::Region}/elasticmapreduce/' Instances: TerminationProtected: false Ec2SubnetId: 'subnet-ab12345c' MasterInstanceGroup: InstanceCount: 1 InstanceType: !Ref ClusterInstanceType CoreInstanceGroup: InstanceCount: 1 InstanceType: !Ref ClusterInstanceType Market: ON_DEMAND Name: Core Outputs: ClusterId: Value: Ref: EmrCluster Description: The ID of the EMR cluster -
-
Create a portfolio for your cluster templates in the same Amazon account as your Studio.
-
Open the Amazon Service Catalog console at https://console.amazonaws.cn/servicecatalog/
. -
Choose Portfolios in the left navigation menu.
-
Enter the requested information on the Create portfolio page.
-
Choose Create. Amazon Service Catalog creates the portfolio and displays the portfolio details.
-
-
Use the following steps to add your cluster templates as Amazon Service Catalog products.
-
Navigate to the Products page under Administration in the Amazon Service Catalog management console.
-
Choose Upload new product.
-
Enter a Product name and Owner.
-
Specify your template file under Version details.
-
Choose Review to review your product settings, then choose Create product.
-
-
Complete the following steps to add your products to your portfolio.
-
Navigate to the Products page in the Amazon Service Catalog management console.
-
Choose your product, choose Actions, then choose Add product to portfolio.
-
Choose your portfolio, then choose Add product to portfolio.
-
-
Create a launch constraint for your products. A launch constraint is an IAM role that specifies user permissions for launching a product. You can tailor your launch constraints, but must allow permissions to use CloudFormation, Amazon EMR, and Amazon Service Catalog. For more information and instructions, see Service Catalog launch constraints.
-
Apply your launch constraint to each product in your portfolio. You must apply the launch constraint to each product individually.
-
Select your portfolio from the Portfolios page in the Amazon Service Catalog management console.
-
Choose the Constraints tab and choose Create constraint.
-
Choose your product and choose Launch under Constraint type. Choose Continue.
-
Select your launch constraint role in the Launch constraint section, then choose Create.
-
-
Grant access to your portfolio.
-
Select your portfolio from the Portfolios page in the Amazon Service Catalog management console.
-
Expand the Groups, roles, and users tab and choose Add groups, roles, users.
-
Search for your EMR Studio IAM role in the Roles tab, select your role, and choose Add access.
If you use.... Grant access to... IAM authentication Your native a users IAM federation Your IAM role for federation IAM Identity Center federation Your EMR Studio user role
-