Enhance kernels with magic commands in EMR Studio
Overview
EMR Studio and EMR Notebooks support magic commands. Magic commands, or magics, are enhancements that the IPython kernel provides to help you run and analyze data. IPython is an interactive shell environment that is built with Python.
Amazon EMR also supports Sparkmagic, a package that provides Spark-related kernels (PySpark, SparkR, and Scala kernels) with specific magic commands and that uses Livy on the cluster to submit Spark jobs.
You can use magic commands as long as you have a Python kernel in your EMR notebook. Similarly, any Spark-related kernel supports Sparkmagic commands.
Magic commands, also called magics, come in two varieties:
-
Line magics – These magic commands are denoted by a single
%prefix and operate on a single line of code -
Cell magics – These magic commands are denoted by a double
%%prefix and operate on multiple lines of code
For all available magics, see List magic and Sparkmagic commands.
Considerations and limitations
-
EMR Serverless doesn't support
%%shto runspark-submit. It doesn't support the EMR Notebooks magics. -
Amazon EMR on EKS clusters don't support Sparkmagic commands for EMR Studio. This is because Spark kernels that you use with managed endpoints are built into Kubernetes, and they aren't supported by Sparkmagic and Livy. You can set the Spark configuration directly into the SparkContext object as a workaround, as the following example demonstrates.
spark.conf.set("spark.driver.maxResultSize", '6g') -
The following magic commands and actions are prohibited by Amazon:
-
%alias -
%alias_magic -
%automagic -
%macro -
Modifying
proxy_userwith%configure -
Modifying
KERNEL_USERNAMEwith%envor%set_env
-
List magic and Sparkmagic commands
Use the following commands to list the available magic commands:
-
%lsmagiclists all currently-available magic functions. -
%%helplists currently-available Spark-related magic functions provided by the Sparkmagic package.
Use %%configure to configure Spark
One of the most useful Sparkmagic commands is the
%%configure command, which configures the session creation parameters. Using
conf settings, you can configure any Spark configuration that's mentioned in
the configuration
documentation for Apache Spark
Example Add external JAR file to EMR Notebooks from Maven repository or Amazon S3
You can use the following approach to add an external JAR file dependency to any Spark-related kernel that's supported by Sparkmagic.
%%configure -f
{"conf": {
    "spark.jars.packages": "com.jsuereth:scala-arm_2.11:2.0,ml.combust.bundle:bundle-ml_2.11:0.13.0,com.databricks:dbutils-api_2.11:0.0.3",
    "spark.jars": "s3://amzn-s3-demo-bucket/my-jar.jar"
    }
}
Example: Configure Hudi
You can use the notebook editor to configure your EMR notebook to use Hudi.
%%configure
{ "conf": {
     "spark.jars": "hdfs://apps/hudi/lib/hudi-spark-bundle.jar,hdfs:///apps/hudi/lib/spark-spark-avro.jar",
     "spark.serializer": "org.apache.spark.serializer.KryoSerializer",
     "spark.sql.hive.convertMetastoreParquet":"false"
     }
}
Use %%sh to run spark-submit
The %%sh magic runs shell commands in a subprocess on an instance of your
attached cluster. Typically, you'd use one of the Spark-related kernels to run Spark
applications on your attached cluster. However, if you want to use a Python kernel to submit
a Spark application, you can use the following magic, replacing the bucket name with your
bucket name in lowercase.
%%sh
spark-submit --master yarn --deploy-mode cluster s3://amzn-s3-demo-bucket/test.py
In this example, the cluster needs access to the location of
s3://, or the command
will fail.amzn-s3-demo-bucket/test.py
You can use any Linux command with the %%sh magic. If you want to run any
Spark or YARN commands, use one of the following options to create an
emr-notebook Hadoop user and grant the user permissions to run the
commands:
-
You can explicitly create a new user by running the following commands.
hadoop fs -mkdir /user/emr-notebook hadoop fs -chown emr-notebook /user/emr-notebook -
You can turn on user impersonation in Livy, which automatically creates the user. See Enabling user impersonation to monitor Spark user and job activity for more information.
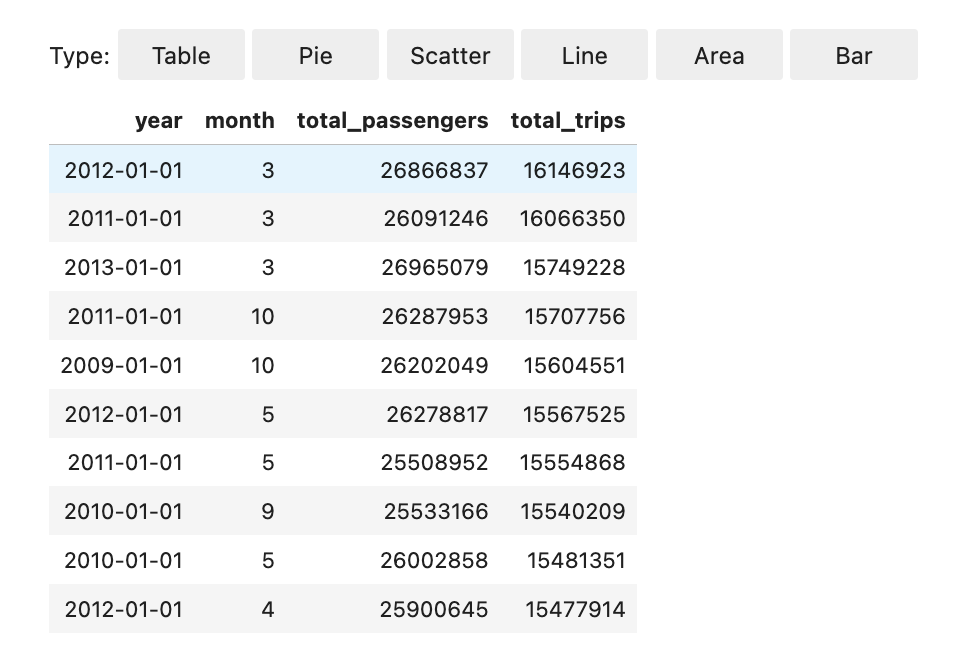
Use %%display to visualize Spark dataframes
You can use the %%display magic to visualize a Spark dataframe. To use
this magic, run the following command.
%%display df
Choose to view the results in a table format, as the following image shows.
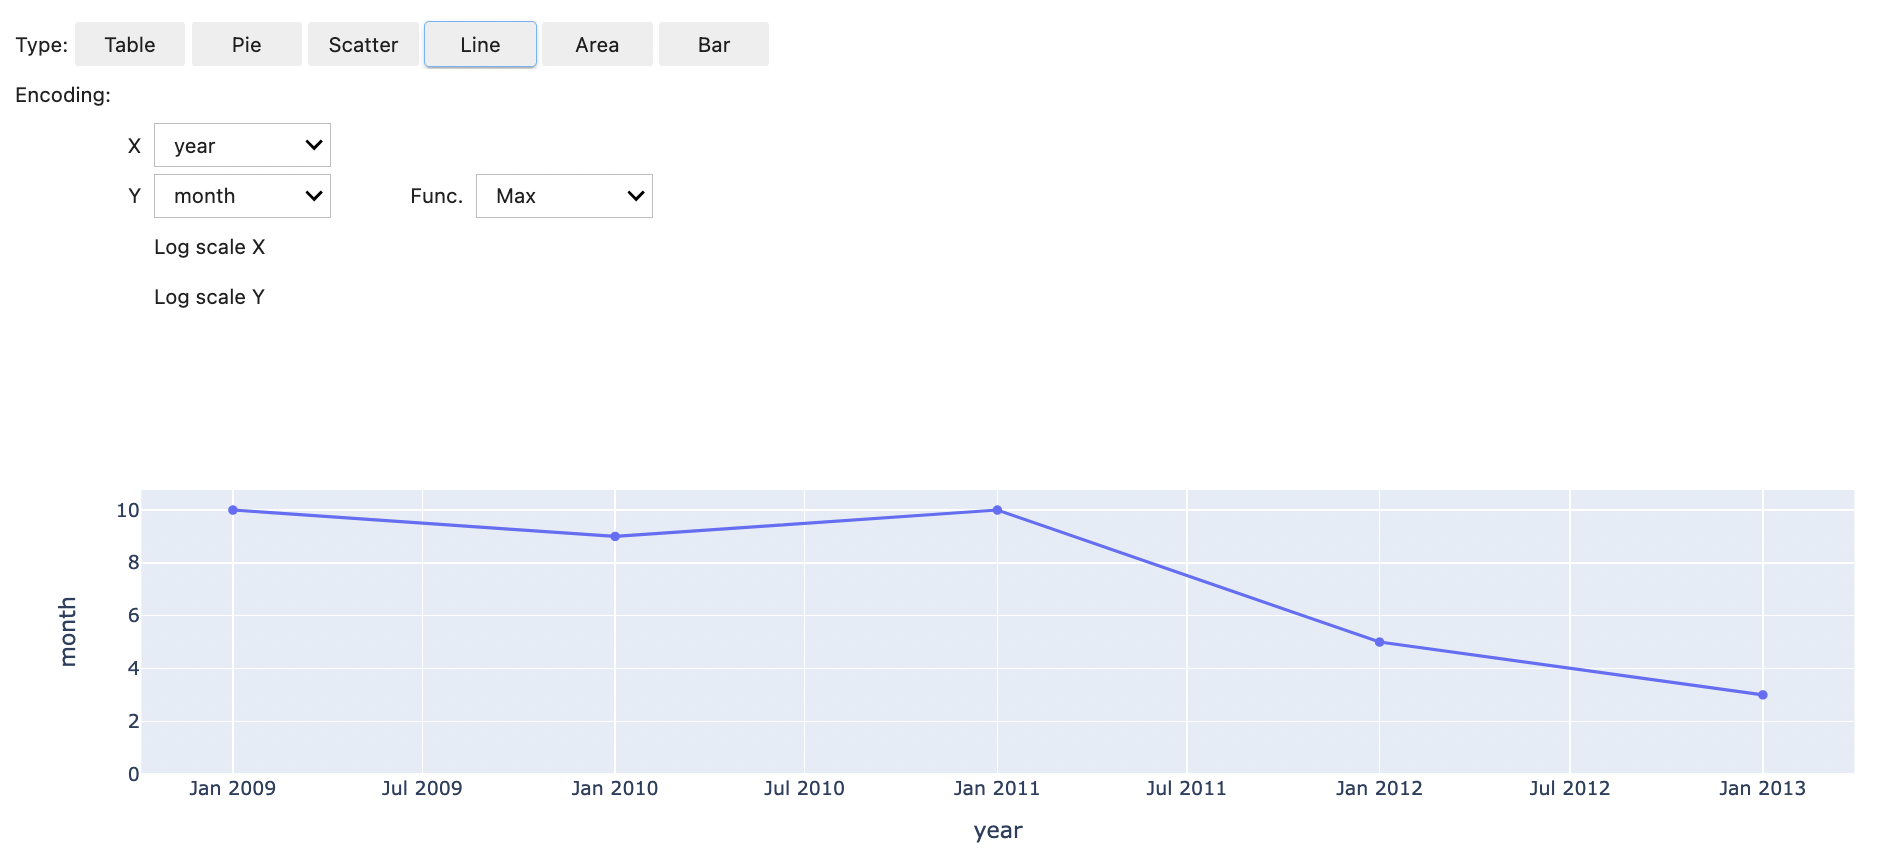
You can also choose to visualize your data with five types of charts. Your options include pie, scatter, line, area, and bar charts.
Use EMR Notebooks magics
Amazon EMR provides the following EMR Notebooks magics that you can use with Python3 and Spark-based kernels:
-
%mount_workspace_dir- Mounts your Workspace directory to your cluster so that you can import and run code from other files in your WorkspaceNote
With
%mount_workspace_dir, only the Python 3 kernel can access your local file systems. Spark executors will not have access to the mounted directory with this kernel. -
%umount_workspace_dir- Unmounts your Workspace directory from your cluster -
%generate_s3_download_url- Generates a temporary download link in your notebook output for an Amazon S3 object
Prerequisites
Before you install EMR Notebooks magics, complete the following tasks:
-
Make sure that your Service role for cluster EC2 instances (EC2 instance profile) has read access for Amazon S3. The
EMR_EC2_DefaultRolewith theAmazonElasticMapReduceforEC2Rolemanaged policy fulfills this requirement. If you use a custom role or policy, make sure that it has the necessary S3 permissions.Note
EMR Notebooks magics run on a cluster as the notebook user and use the EC2 instance profile to interact with Amazon S3. When you mount a Workspace directory on an EMR cluster, all Workspaces and EMR notebooks with permission to attach to that cluster can access the mounted directory.
Directories are mounted as read-only by default. While
s3fs-fuseandgoofysallow read-write mounts, we strongly recommend that you do not modify mount parameters to mount directories in read-write mode. If you allow write access, any changes made to the directory are written to the S3 bucket. To avoid accidental deletion or overwriting, you can enable versioning for your S3 bucket. To learn more, see Using versioning in S3 buckets. -
Run one of the following scripts on your cluster to install the dependencies for EMR Notebooks magics. To run a script, you can either Use custom bootstrap actions or follow the instructions in Run commands and scripts on an Amazon EMR cluster when you already have a running cluster.
You can choose which dependency to install. Both s3fs-fuse
and goofys are FUSE (Filesystem in Userspace) tools that let you mount an Amazon S3 bucket as a local file system on a cluster. The s3fstool provides an experience similar to POSIX. Thegoofystool is a good choice when you prefer performance over a POSIX-compliant file system.The Amazon EMR 7.x series uses Amazon Linux 2023, which doesn't support EPEL repositories. If you're running Amazon EMR 7.x, follow the s3fs-fuse GitHub
instructions to install s3fs-fuse. If you use the 5.x or 6.x series, use the following commands to installs3fs-fuse.#!/bin/sh # Install the s3fs dependency for EMR Notebooks magics sudo amazon-linux-extras install epel -y sudo yum install s3fs-fuse -yOR
#!/bin/sh

# Install the goofys dependency for EMR Notebooks magics
sudo wget https://github.com/kahing/goofys/releases/latest/download/goofys -P /usr/bin/
sudo chmod ugo+x /usr/bin/goofys
Install EMR Notebooks magics
Note
With Amazon EMR releases 6.0 through 6.9.0, and 5.0 through 5.36.0, only
emr-notebooks-magics package versions 0.2.0 and higher support
%mount_workspace_dir magic.
Complete the following steps to install EMR Notebooks magics.
-
In your notebook, run the following commands to install the
emr-notebooks-magicspackage. %pip install boto3 --upgrade %pip install botocore --upgrade %pip install emr-notebooks-magics --upgrade -
Restart your kernel to load the EMR Notebooks magics.
-
Verify your installation with the following command, which should display output help text for
%mount_workspace_dir.%mount_workspace_dir?
Mount a Workspace directory with %mount_workspace_dir
The %mount_workspace_dir magic lets you mount your Workspace
directory onto your EMR cluster so that you can import and run other files, modules, or
packages stored in your directory.
The following example mounts the entire Workspace directory onto a cluster,
and specifies the optional
<--fuse-type>
%mount_workspace_dir .<--fuse-type goofys>
To verify that your Workspace directory is mounted, use the following example
to display the current working directory with the ls command. The output
should display all of the files in your Workspace.
%%sh
ls
When you're done making changes in your Workspace, you can unmount the Workspace directory with the following command:
Note
Your Workspace directory stays mounted to your cluster even when the Workspace is stopped or detached. You must explicitly unmount your Workspace directory.
%umount_workspace_dir
Download an Amazon S3 object with %generate_s3_download_url
The generate_s3_download_url command creates a presigned URL for an
object stored in Amazon S3. You can use the presigned URL to download the object
to your local machine. For example, you might run generate_s3_download_url to
download the result of a SQL query that your code writes to Amazon S3.
The presigned URL is valid for 60 minutes by default. You can change the expiration
time by specifying a number of seconds for the --expires-in flag. For
example, --expires-in 1800 creates a URL that is valid for 30
minutes.
The following example generates a download link for an object by specifying the full
Amazon S3 path:
s3://EXAMPLE-DOC-BUCKET/path/to/my/object
%generate_s3_download_urls3://EXAMPLE-DOC-BUCKET/path/to/my/object
To learn more about using generate_s3_download_url, run the following
command to display help text.
%generate_s3_download_url?
Run a notebook in headless mode with %execute_notebook
With %execute_notebook magic, you can run another notebook in headless
mode and view the output for each cell that you've run. This magic requires additional
permissions for the instance role that Amazon EMR and Amazon EC2 share. For more details on how to
grant additional permissions, run the command %execute_notebook?.
During a long-running job, your system might go to sleep because of inactivity, or might temporarily lose internet connectivity. This might disrupt the connection between your browser and the Jupyter Server. In this case, you might lose the output from the cells that you've run and sent from the Jupyter Server.
If you run the notebook in headless mode with %execute_notebook magic,
EMR Notebooks captures output from the cells that have run, even if the local network
experiences disruption. EMR Notebooks saves the output incrementally in a new notebook with
the same name as the notebook that you've run. EMR Notebooks then places the notebook into a
new folder within the workspace. Headless runs occur on the same cluster and uses service
role EMR_Notebook_DefaultRole, but additional arguments can alter the default
values.
To run a notebook in headless mode, use the following command:
%execute_notebook<relative-file-path>
To specify a cluster ID and service role for a headless run, use the following command:
%execute_notebook<notebook_name>.ipynb --cluster-id <emr-cluster-id> --service-role <emr-notebook-service-role>
When Amazon EMR and Amazon EC2 share an instance role, the role requires the following additional permissions:
Note
To use %execute_notebook magic, install the
emr-notebooks-magics package, version 0.2.3 or higher.