Getting started: Create an Amazon EventBridge pipe
To get familiar with pipes and their capabilities, we'll use a Amazon CloudFormation template to set up an EventBridge pipe and associated components. Then we can explore various pipe features.
Tip
For a more comprehensive, hands-on learning experience, try the EventBridge Pipes Workshop
The template creates an EventBridge pipe that connects a stream from a DynamoDB table to an Amazon SQS queue. Every time a record is created or modified in the database table, the pipe sends the resulting event to the queue.
The deployed pipe consists of:
A DynamoDB table (and stream) to act as the pipe source, and an Amazon SQS queue as the target.
An execution role that grants EventBridge the necessary permissions to access the DynamoDB table and Amazon SQS queue.
The pipe itself, which contains an event filter that selects only events generated when a table item is created (inserted) or modified.
For specific technical details of the template, see Template details.

Creating the pipe using CloudFormation
To create the pipe and its associated resources, we'll create a CloudFormation template and use it to create a stack containing a sample pipe, complete with source and target.
Important
You will be billed for the Amazon resources used if you create a stack from this template.
First, create the CloudFormation template.
In the Template section, click the copy icon on the JSON or YAML tab to copy the template contents.
Paste the template contents into a new file.
Save the file locally.
Next, use the template you've saved to provision a CloudFormation stack.
Open the CloudFormation console at https://console.aws.amazon.com/cloudformation/
. On the Stacks page, from the Create stack menu, choose with new resources (standard).
Specify the template:
Under Prerequisite, choose Choose an existing template.
Under Specify template, choose Upload a template file.
Choose Choose file, navigate to the template file, and choose it.
Choose Next.
Specify the stack details:
Enter a stack name.
For parameters, accept the default values or enter your own.
Choose Next.
Configure the stack options:
Under Stack failure options, choose Delete all newly created resources.
Note
Choosing this option prevents you from possibly being billed for resources whose deletion policy specifies they be retained even if the stack creation fails. For more information, see
DeletionPolicyattribute in the CloudFormation User Guide.Accept all other default values.
Under Capabilities, check the box to acknowledge that CloudFormation might create IAM resources in your account.
Choose Next.
Review the stack details and choose Submit.
Create the stack using CloudFormation (Amazon CLI)
You can also use the Amazon CLI to create the stack.
-
Use the
create-stackcommand.Accept the default template parameter values, specifying the stack name. Use the
template-bodyparameter to pass the template contents, ortemplate-urlto specify a URL location.aws cloudformation create-stack \ --stack-nameeventbridge-rule-tutorial\ --template-bodytemplate-contents\ --capabilities CAPABILITY_IAMOverride the default value(s) of one or more template parameters. For example:
aws cloudformation create-stack \ --stack-nameeventbridge-rule-tutorial\ --template-bodytemplate-contents\ --parameters \ ParameterKey=SourceTableName,ParameterValue=pipe-example-source\ ParameterKey=TargetQueueName,ParameterValue=pipe-example-target\ ParameterKey=PipeName,ParameterValue=pipe-with-filtering-example\ --capabilities CAPABILITY_IAM
CloudFormation creates the stack. Once the stack creation is complete, the stack resources are ready to use. You can use the Resources tab on the stack detail page to view the resources that where provisioned in your account.
Exploring pipe capabilities
Once the pipe has been created, you can use the EventBridge console to observe pipe operation and test event delivery.
Open the EventBridge console at https://console.aws.amazon.com/events/home?#/pipes
. -
Choose the pipe you created.
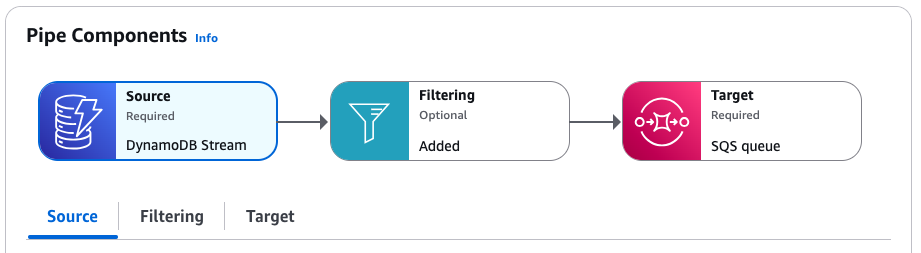
On the pipe detail page, the Pipe Components section displays the resources that make up the pipe, and contains tabs that provide more details on each component.
You can find the execution role we created for the pipe on the Settings tab, in the Permissions section.
Examining the pipe filter
Before we test the pipe operation, let's examine the filter we've specified to control which events are sent to the target. The pipe will only send events that match the filter criteria to the target; all others are discarded. In this case, we only want events generated when table entries are created or modified being sent to the Amazon SQS queue.
On the pipe detail page, under Pipe Components, choose the Filtering tab.
We've included a filter that selects only events where the
eventNameis set toINSERTorMODIFY.{ "eventName": ["INSERT", "MODIFY"] }
Sending events through the pipe
Next, we'll generate events in the pipe source to test that the pipe filtering and delivery is operating correctly. To do this, we'll create and edit an item in the DynamoDB table we specified as the pipe source.
On the pipe detail page, under Pipe Components, choose the Source tab.
Under Source, choose the DynamoDB stream name.
This opens the DynamoDB console in a separate window, with the source table details displayed.
Choose Explore items.
-
Generate an
INSERTevent by creating an item in the table:Choose Create item.
Add values for the Album and Artist attributes.
Choose Create item.
Generate a
DELETEand anINSERTevent by editing the item:Choose the item from the list, and from the Actions menu, choose Edit item.
Enter a new value for the Album or Artist attribute.
Tick the box that confirms you are changing the value of the item keys, and then choose Recreate item.
This results in the item being deleted and then recreated, generating a
DELETEevent, and then a newINSERTevent.
Generate a
MODIFYevent by adding an attribute to the item:Choose the item from the list, and from the Actions menu, choose Edit item.
From the Add new attribute menu, choose Number.
For the attribute name, enter Year, and then enter a value for the attribute. Choose Save and close.
Confirming event delivery through the pipe
Finally, we'll confirm that the pipe successfully filtered and delivered the events we generated by creating and editing the table item in DynamoDB.
On the pipe detail page, under Pipe Components, choose the Target tab.
Under Target, choose the Amazon SQS queue name.
This opens the Amazon SQS console in a separate window, with the target queue details displayed.
Choose Send and receive messages.
Under Receive messages, choose Poll for messages.
Amazon SQS loads messages received into the queue. Click on an individual message to see its details.
There should be three event messages in the queue:
Two of type
INSERT, one generated when you first created the table item, and the other generated when you recreated the item by changing a key value.One of type
MODIFY, generated when you added an attribute to the table item.
Notice that there isn't an event message of type
DELETEin the queue, even though one was generated when you deleted and recreated the table item by changing a key value. The pipe filter we specified only selects onINSERTandMODIFY, so the pipe filtered out theDELETEevent rather than deliver it to the queue.
Clean up: deleting resources
As a final step, we'll delete the stack and the resources it contains.
Important
You will be billed for the Amazon resources contained in the stack for as long as it exists.
Open the CloudFormation console at https://console.aws.amazon.com/cloudformation/
. -
On the Stacks page, choose the stack created from the template, and choose Delete, then confirm Delete.
CloudFormation initiates deletion of the stack and all resources it includes.
CloudFormation template details
This template creates resources and grants permissions in your account.
Resources
The CloudFormation template for this tutorial will create the following resources in your account:
Important
You will be billed for the Amazon resources used if you create a stack from this template.
AWS::DynamoDB::Table: A DynamoDB table that acts as the event source for the pipe.AWS::SQS::Queue: An Amazon SQS queue that acts as the target for the events flowing through the pipe.AWS::IAM::Role: An IAM execution role granting permissions to the EventBridge Pipes service in your account.AWS::Pipes::Pipe: The pipe connecting the DynamoDB table to the Amazon SQS queue.
Permissions
The template includes an AWS::IAM::Role resource that represents an
execution role. This role grants the EventBridge Pipes service
(pipes.amazonaws.com) the following permissions in your
account.
The following permissions are scoped to the DynamoDB table and stream the template creates as the event source for the pipe:
dynamodb:DescribeStreamdynamodb:GetRecordsdynamodb:GetShardIteratordynamodb:ListStreams
The following permission is scoped to the Amazon SQS queue the stack creates as the target of the pipe:
sqs:SendMessage
CloudFormation template
Save the following JSON or YAML code as a separate file to use as the CloudFormation template for this tutorial.