Using DFS Namespaces
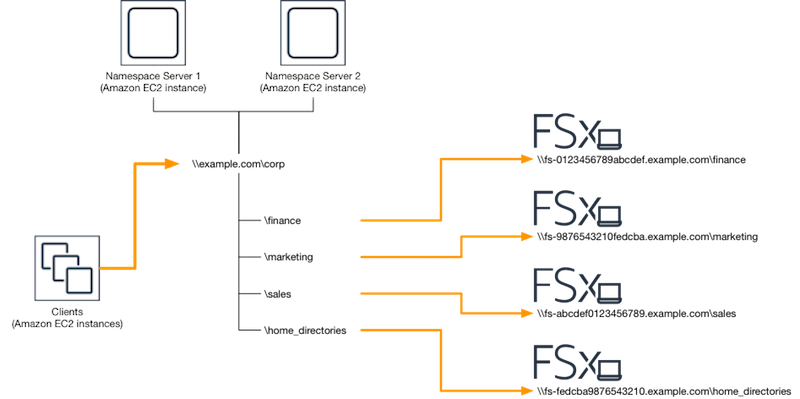
DFS Namespaces is a Windows Server role service that you use to group shared folders located on different servers into one or more logically structured namespaces. This makes it possible to give users a virtual view of shared folders, where a single path leads to files located on multiple file systems, as shown in the following diagram. In addition to organizing and unifying access to your file shares across multiple file systems,
Group multiple FSx for Windows File Server file systems with DFS Namespaces
You can use Microsoft's Distributed File System (DFS) Namespaces to group file shares on multiple FSx for Windows File Server file systems into one common folder structure, or namespace. Using DFS Namespaces, you can scale file storage beyond the maximum storage capacity of single file system (64 TiB) for large file datasets—up to hundreds of petabytes. This section shows you how to set up DFS namespaces on multiple FSx for Windows File Server file systems.
DFS Namespaces is a Windows Server role service that you use to group shared folders located on different servers into one or more logically structured namespaces. This makes it possible to give users a virtual view of shared folders, where a single path leads to files located on multiple file systems, as shown in the following diagram. In addition to organizing and unifying access to your file shares across multiple file systems,
For a step-by-step procedure for grouping FSx for Windows file systems using DFS Namespaces, see Group multiple file systems under a single namespace.
Improving performance with shards
Amazon FSx for Windows File Server supports the use of the Microsoft Distributed File System (DFS). By using DFS Namespaces, you can scale out performance (both read and write) to serve I/O-intensive workloads by spreading your file data across multiple Amazon FSx file systems. At the same time, you can still present a unified view under a common namespace to your applications. This solution involves dividing your file data into smaller datasets or shards and storing them across different file systems. Applications accessing your data from multiple instances can achieve high levels of performance by reading and writing to these shards in parallel.
You can use the solution provided in Sharding data using DFS Namespaces for scale-out performance to distribute read/write access to your data uniformly across your data multiple FSx for Windows File Server file systems.