Tutorial: Set up PyCharm professional with a development endpoint
This tutorial shows you how to connect the PyCharm Professional
To connect to a development endpoint interactively, you must have PyCharm Professional installed. You can't do this using the free edition.
Note
The tutorial uses Amazon S3 as a data source. If you want to use a JDBC data source instead,
you must run your development endpoint in a virtual private cloud (VPC). To connect with SSH
to a development endpoint in a VPC, you must create an SSH tunnel. This tutorial does not
include instructions for creating an SSH tunnel. For information on using SSH to connect to a
development endpoint in a VPC, see Securely Connect to Linux Instances Running in a Private Amazon VPC
Topics
Connecting PyCharm professional to a development endpoint
-
Create a new pure-Python project in PyCharm named
legislators. -
Create a file named
get_person_schema.pyin the project with the following content:from pyspark.context import SparkContext from awsglue.context import GlueContext def main(): # Create a Glue context glueContext = GlueContext(SparkContext.getOrCreate()) # Create a DynamicFrame using the 'persons_json' table persons_DyF = glueContext.create_dynamic_frame.from_catalog(database="legislators", table_name="persons_json") # Print out information about this data print("Count: ", persons_DyF.count()) persons_DyF.printSchema() if __name__ == "__main__": main() -
Do one of the following:
-
For Amazon Glue version 0.9, download the Amazon Glue Python library file,
PyGlue.zip, fromhttps://s3.amazonaws.com/aws-glue-jes-prod-us-east-1-assets/etl/python/PyGlue.zipto a convenient location on your local machine. -
For Amazon Glue version 1.0 and later, download the Amazon Glue Python library file,
PyGlue.zip, fromhttps://s3.amazonaws.com/aws-glue-jes-prod-us-east-1-assets/etl-1.0/python/PyGlue.zipto a convenient location on your local machine.
-
-
Add
PyGlue.zipas a content root for your project in PyCharm:-
In PyCharm, choose File, Settings to open the Settings dialog box. (You can also press
Ctrl+Alt+S.) -
Expand the
legislatorsproject and choose Project Structure. Then in the right pane, choose + Add Content Root. -
Navigate to the location where you saved
PyGlue.zip, select it, then choose Apply.
The Settings screen should look something like the following:
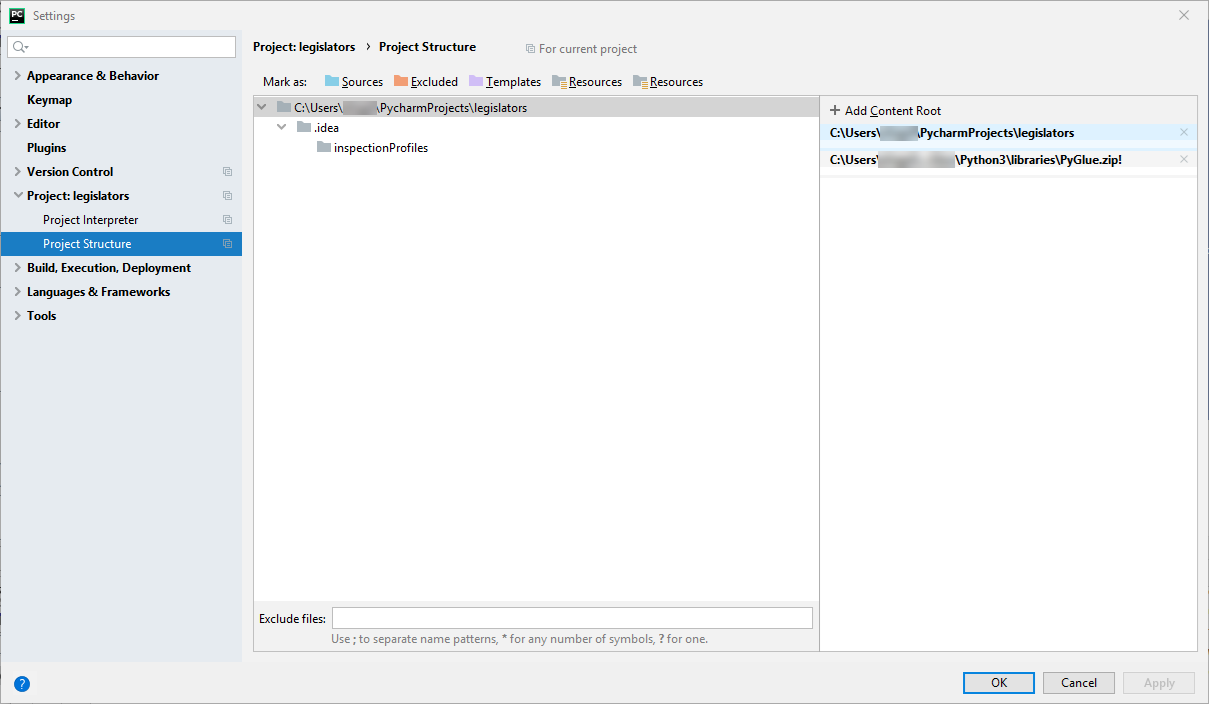
Leave the Settings dialog box open after you choose Apply.
-
-
Configure deployment options to upload the local script to your development endpoint using SFTP (this capability is available only in PyCharm Professional):
-
In the Settings dialog box, expand the Build, Execution, Deployment section. Choose the Deployment subsection.
-
Choose the + icon at the top of the middle pane to add a new server. Set its Type to
SFTPand give it a name. -
Set the SFTP host to the Public address of your development endpoint, as listed on its details page. (Choose the name of your development endpoint in the Amazon Glue console to display the details page). For a development endpoint running in a VPC, set SFTP host to the host address and local port of your SSH tunnel to the development endpoint.
-
Set the User name to
glue. -
Set the Auth type to Key pair (OpenSSH or Putty). Set the Private key file by browsing to the location where your development endpoint's private key file is located. Note that PyCharm only supports DSA, RSA and ECDSA OpenSSH key types, and does not accept keys in Putty's private format. You can use an up-to-date version of
ssh-keygento generate a key-pair type that PyCharm accepts, using syntax like the following:ssh-keygen -t rsa -f<key_file_name>-C "<your_email_address>" -
Choose Test connection, and allow the connection to be tested. If the connection succeeds, choose Apply.
The Settings screen should now look something like the following:
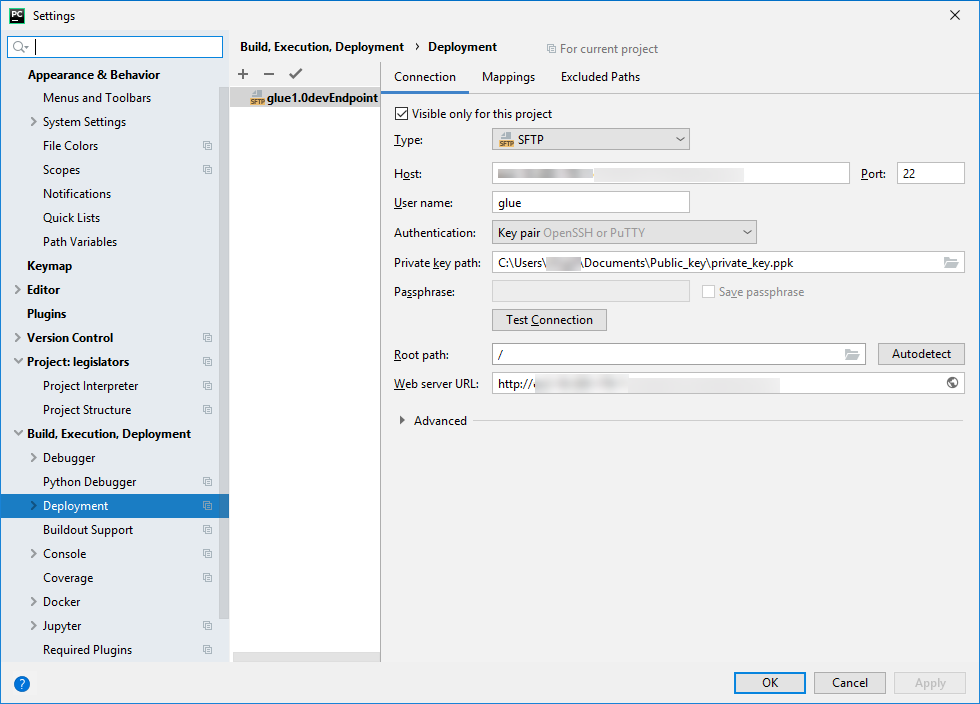
Again, leave the Settings dialog box open after you choose Apply.
-
-
Map the local directory to a remote directory for deployment:
-
In the right pane of the Deployment page, choose the middle tab at the top, labeled Mappings.
-
In the Deployment Path column, enter a path under
/home/glue/scripts/for deployment of your project path. For example:/home/glue/scripts/legislators. -
Choose Apply.
The Settings screen should now look something like the following:

Choose OK to close the Settings dialog box.
-
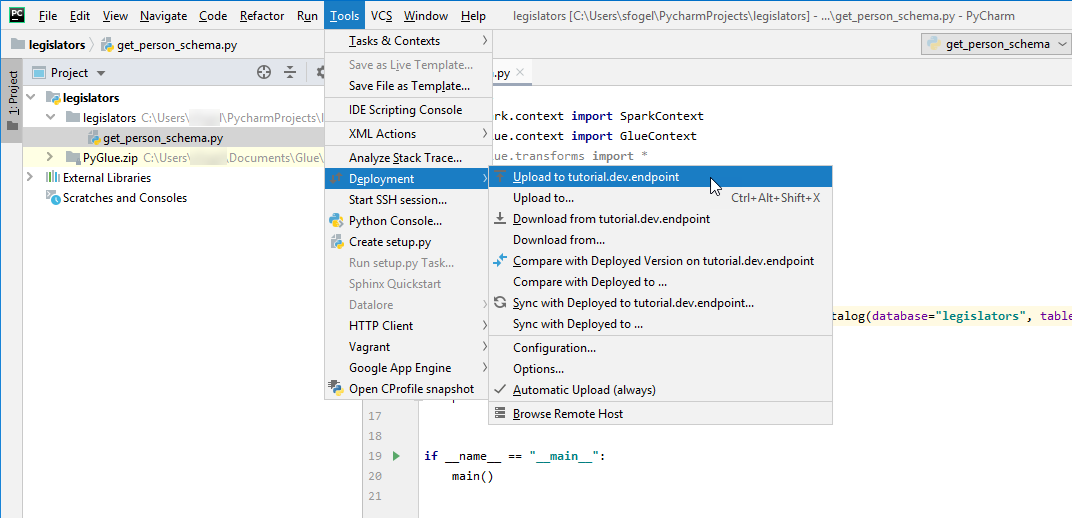
Deploying the script to your development endpoint
-
Choose Tools, Deployment, and then choose the name under which you set up your development endpoint, as shown in the following image:
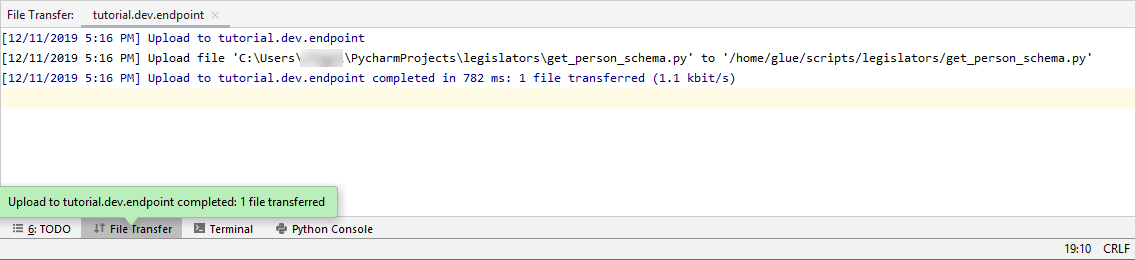
After your script has been deployed, the bottom of the screen should look something like the following:
-
On the menu bar, choose Tools, Deployment, Automatic Upload (always). Ensure that a check mark appears next to Automatic Upload (always).
When this option is enabled, PyCharm automatically uploads changed files to the development endpoint.
Configuring a remote interpreter
Configure PyCharm to use the Python interpreter on the development endpoint.
-
From the File menu, choose Settings.
-
Expand the project legislators and choose Project Interpreter.
-
Choose the gear icon next to the Project Interpreter list, and then choose Add.
-
In the Add Python Interpreter dialog box, in the left pane, choose SSH Interpreter.
-
Choose Existing server configuration, and in the Deployment configuration list, choose your configuration.
Your screen should look something like the following image.

-
Choose Move this server to IDE settings, and then choose Next.
-
In the Interpreter field, change the path to
/usr/bin/gluepythonif you are using Python 2, or to/usr/bin/gluepython3if you are using Python 3. Then choose Finish.
Running your script on the development endpoint
To run the script:
-
In the left pane, right-click the file name and choose Run '
<filename>'.After a series of messages, the final output should show the count and the schema.
Count:   1961
root
|-- family_name: string
|-- name: string
|-- links: array
|    |-- element: struct
|    |    |-- note: string
|    |    |-- url: string
|-- gender: string
|-- image: string
|-- identifiers: array
|    |-- element: struct
|    |    |-- scheme: string
|    |    |-- identifier: string
|-- other_names: array
|    |-- element: struct
|    |    |-- lang: string
|    |    |-- note: string
|    |    |-- name: string
|-- sort_name: string
|-- images: array
|    |-- element: struct
|    |    |-- url: string
|-- given_name: string
|-- birth_date: string
|-- id: string
|-- contact_details: array
|    |-- element: struct
|    |    |-- type: string
|    |    |-- value: string
|-- death_date: string


Process finished with exit code 0
You are now set up to debug your script remotely on your development endpoint.