Services or capabilities described in Amazon Web Services documentation might vary by Region. To see the differences applicable to the China Regions,
see Getting Started with Amazon Web Services in China
(PDF).
Enabling compaction optimizer
You can use Amazon Glue console, Amazon CLI, or Amazon API to enable compaction for your Apache Iceberg tables in the Amazon Glue Data Catalog.
For new tables, you can choose Apache Iceberg as table format and enable compaction when you create the table.
Compaction is disabled by default for new tables.
- Console
-
To enable compaction
-
Open the Amazon Glue console at https://console.amazonaws.cn/glue/ and sign in as a data lake administrator, the table creator, or a user who has been granted
the glue:UpdateTable and lakeformation:GetDataAccess permissions on the table.
-
In the navigation pane, under Data Catalog, choose Tables.
On the Tables page, choose a table in open table format that you want to
enable compaction for, then under Actions menu, choose
Optimization, and then choose
Enable.
You can also enable compaction by selecting the Table
optimization tab on the Table details page.
Choose the Table optimization tab on the lower section of the
page, and choose Enable compaction.
The Enable optimization option is also available when
you create a new Iceberg table in the Data Catalog.
-
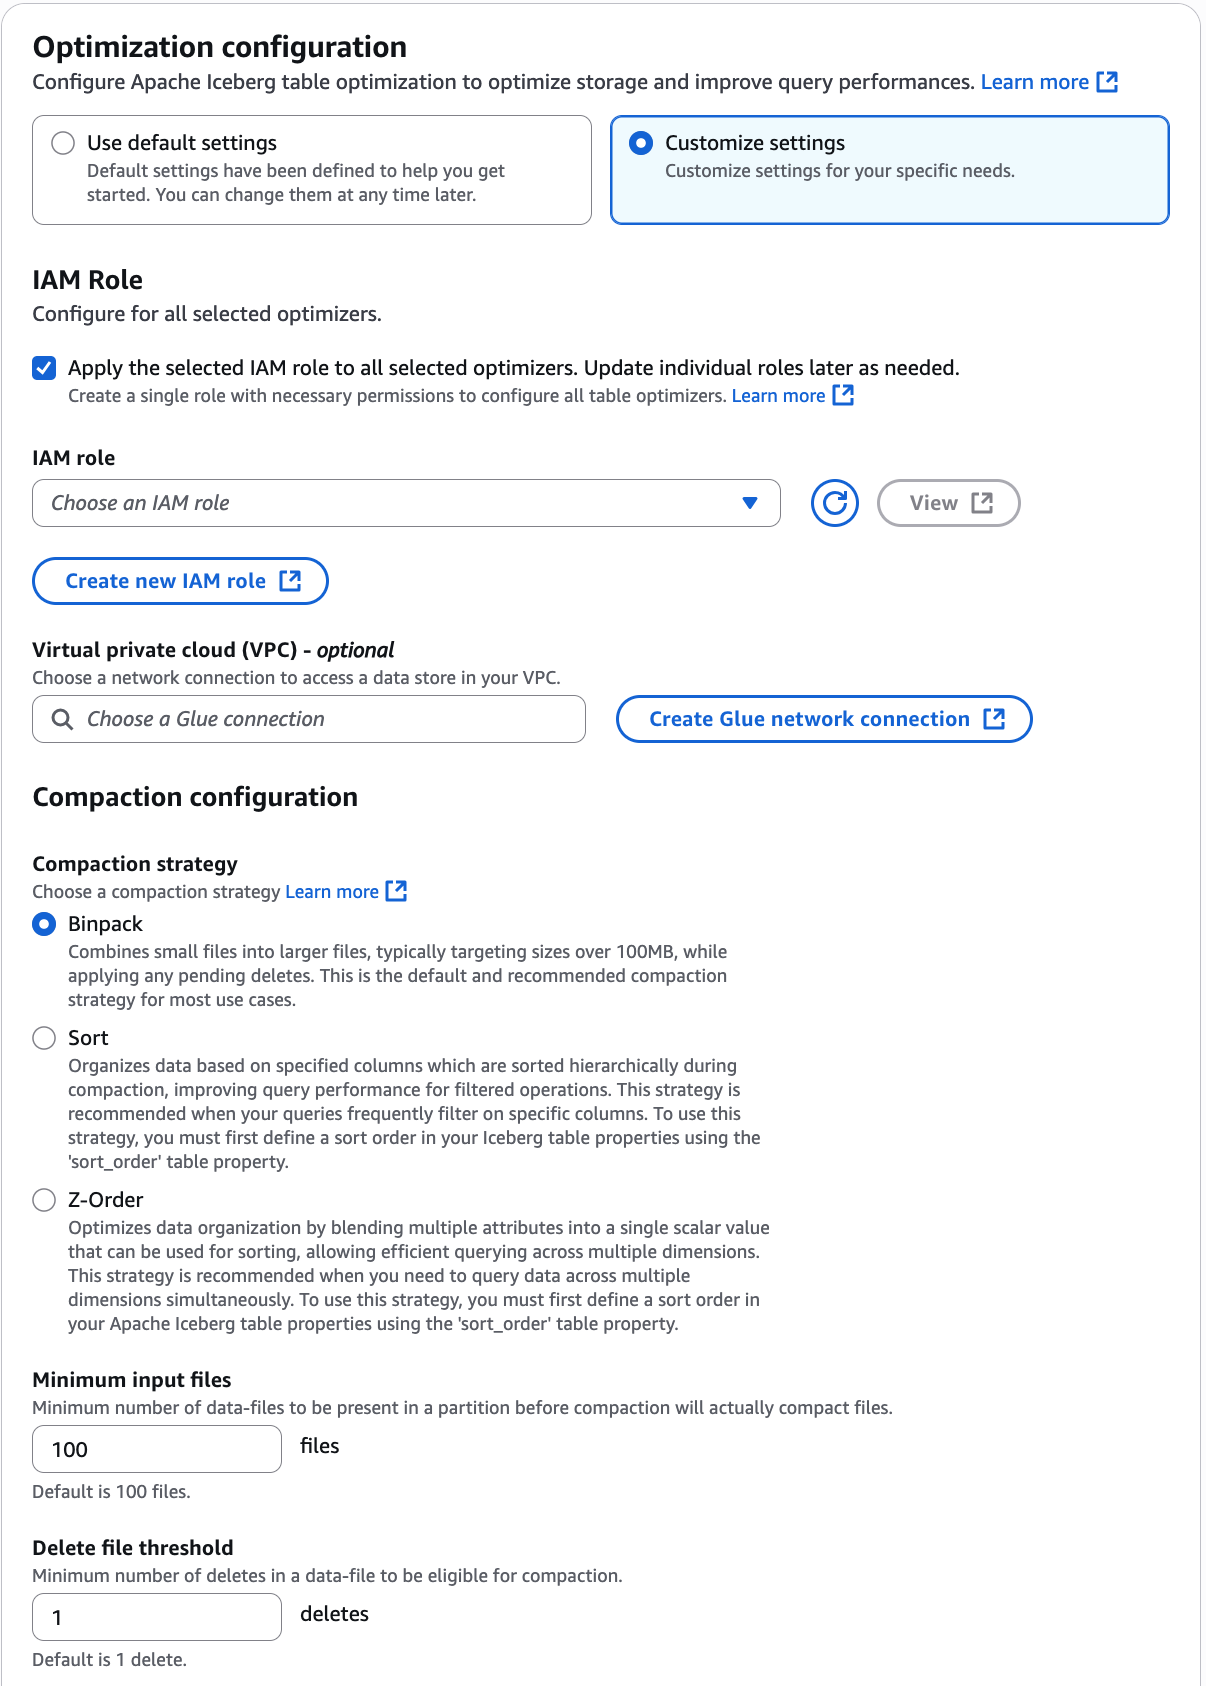
On the Enable optimization page, choose
Compaction under Optimization
options.
-
Next, select an IAM role from the drop down with the permissions shown in
the
Table optimization prerequisites
section.
You can also choose Create a new IAM role option to
create a custom role with the required permissions to run compaction.
Follow the steps below to update an existing IAM role:
-
To update the permissions policy for the IAM role, in the IAM console, go to the IAM role that is being used for running compaction.
-
In the Add permissions section, choose Create policy. In the newly opened browser window, create a new policy to use with your role.
-
On the Create policy page, choose the JSON tab. Copy the JSON
code shown in the Prerequisites into the policy editor field.
-
If you have security policy configurations where the Iceberg table
optimizer needs to access Amazon S3 buckets from a specific Virtual Private
Cloud (VPC), create an Amazon Glue network connection or use an existing
one.
If you don't have an Amazon Glue VPC connection set up already,
create a new one by following the steps in the Creating connections for connectors section using the Amazon Glue console or the Amazon CLI/SDK.
-
Choose a compaction strategy. The available options are:
Binpack – Binpack is the default compaction strategy in
Apache Iceberg. It combines smaller data files into larger ones for optimal
performance.
-
Sort – Sorting in Apache Iceberg is
a data organization technique that clusters information within files based on
specified columns, significantly improving query performance by reducing the
number of files that need to be processed. You define the sort order in
Iceberg's metadata using the sort-order field, and when multiple columns are
specified, data is sorted in the sequence the columns appear in the sort
order, ensuring records with similar values are stored together within files.
The sorting compaction strategy takes the optimization further by sorting data
across all files within a partition.
Z-order – Z-ordering is a way to organize data when you
need to sort by multiple columns with equal importance. Unlike traditional
sorting that prioritizes one column over others, Z-ordering gives balanced
weight to each column, helping your query engine read fewer files when
searching for data.
The technique works by weaving together the binary digits of values from
different columns. For example, if you have the numbers 3 and 4 from two
columns, Z-ordering first converts them to binary (3 becomes 011 and 4 becomes
100), then interleaves these digits to create a new value: 011010. This
interleaving creates a pattern that keeps related data physically close
together.
Z-ordering is particularly effective for multi-dimensional queries. For
example, a customer table Z-ordered by income, state, and zip code can deliver
superior performance compared to hierarchical sorting when querying across
multiple dimensions. This organization allows queries targeting specific
combinations of income and geographic location to quickly locate relevant data
while minimizing unnecessary file scans.
-
Minimum input files – The number of
data files required in a partition before compaction is triggered.
-
Delete files threshold – Minimum
delete operations required in a data file before it becomes eligible for
compaction.
-
Choose Enable optimization.
- Amazon CLI
-
The following example shows how to enable compaction. Replace the account ID
with a valid Amazon account ID. Replace the database name and table name with actual
Iceberg table name and the database name. Replace the roleArn with the
Amazon Resource Name (ARN) of the IAM role and name of the IAM role that has the
required permissions to run compaction. You can replace compaction strategy
sort with other supported strategies like z-order or
binpack.
order" depending on your requirements.
aws glue create-table-optimizer \
  --catalog-id 123456789012 \
  --database-name iceberg_db \
  --table-name iceberg_table \
  --table-optimizer-configuration '{
    "roleArn": "arn:aws:iam::123456789012:role/optimizer_role",
    "enabled": true,
    "vpcConfiguration": {"glueConnectionName": "glue_connection_name"},
    "compactionConfiguration": {
      "icebergConfiguration": {"strategy": "sort"}
    }
  }'\
--type compaction
- Amazon API
-
Call CreateTableOptimizer operation to enable compaction for a table.
After you enable compaction, Table optimization tab shows the
following compaction details once the compaction run is complete:
- Start time
-
The time at which the compaction process started within Data Catalog. The value is a timestamp in UTC time.
- End time
-
The time at which the compaction process ended in Data Catalog. The value is a timestamp in UTC time.
- Status
-
The status of the compaction run. Values are success or fail.
- Files compacted
Total number of files compacted.
- Bytes compacted
-
Total number of bytes compacted.
