Using FindMatches in a visual job
To use the FindMatches transform in Amazon Glue Studio, you can use the Custom Transform node that invokes the FindMatches API. For more information on how to use a custom transform, see Creating a custom transformation
Note
Currently, the FindMatches API only works with Glue 2.0. In order to run a job with the Custom transform that invokes the FindMatches API,
ensure the Amazon Glue version is Glue 2.0 in the Job details tab. If the version of Amazon Glue
is not Glue 2.0, the job will fail at runtime with the following error message:
“cannot import name 'FindMatches' from 'awsglueml.transforms'”.
Prerequisites
-
In order to use the Find Matches transform, open the Amazon Glue Studio console at https://console.aws.amazon.com/gluestudio/
. -
Create a machine learning transform. When created, a transformId is generated. You will need this ID for the steps below. For more information on how to create a machine learning transform, see Adding and editing machine learning transforms.
Adding a FindMatches transform
To add a FindMatches transform:
-
In the Amazon Glue Studio job editor, open the Resource panel by clicking on the cross symbol in the upper left-hand corner of the visual job graph and choose a Data source by choosing the Data tab. This is the data source you want to check for matches.
-
Choose the data source node, then open the Resource panel by clicking on the cross symbol in the upper left-hand corner of the visual job graph and search for 'custom transform'. Choose the Custom Transform node to add it to the graph. The Custom Transform is linked to the data source node. If it is not, you can click on the Custom Transform node and choose the Node properties tab, then under Node parents, choose the data source.
-
Click the Custom Transform node in the visual graph, then choose the Node properties tab and name the custom transform. It is recommended that you rename the transform so that the transform name is easily identifiable in the visual graph.
-
Choose the Transform tab, where you can edit the code block. This is where the code to invoke the FindMatches API can be added.
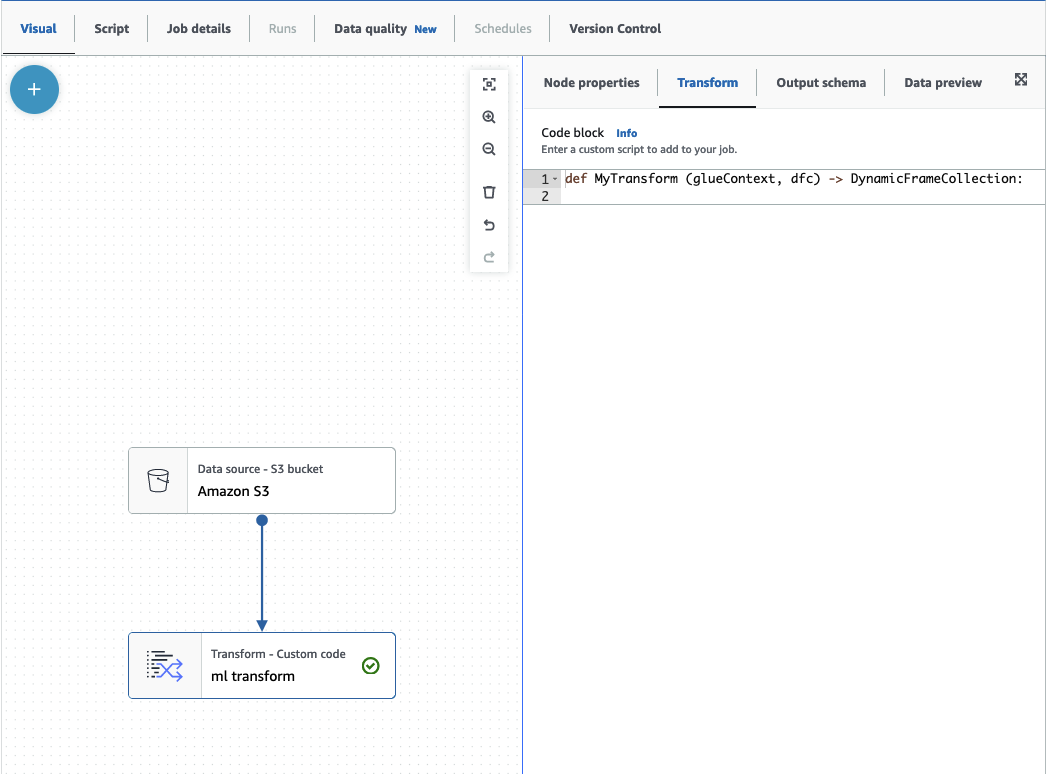
The code block contains pre-populated code to get you started. Overwrite the pre-populated code with the template below. The template has a placeholder for the transformId, which you can provide.
def MyTransform (glueContext, dfc) -> DynamicFrameCollection: dynf = dfc.select(list(dfc.keys())[0]) from awsglueml.transforms import FindMatches findmatches = FindMatches.apply(frame = dynf, transformId = "<your id>") return(DynamicFrameCollection({"FindMatches": findmatches}, glueContext)) -
Click the Custom Transform node in the visual graph, then open the Resource panel by clicking on the cross symbol in the upper left-hand corner of the visual job graph and search for 'Select From Collection'. There is no need to change the default selection since there is only one DynamicFrame in the collection.
-
You can continue adding transformations or store the result, which is now enriched with the find matches additional columns. If you want to reference those new columns in downstream transforms, you need to add them to the transform output schema. the easiest way to do that is to choose the Data preview tab and then in the schema tab choose “Use datapreview schema”.
-
To customize FindMatches, you can add additional parameters to pass to the 'apply' method. See FindMatches class.
Adding a FindMatches incrementally transformation
In the case of incremental matches, the process is the same as Adding a FindMatches transformation with the following differences:
-
Instead of a parent node for the custom transform, you need two parent nodes.
-
The first parent node should be the dataset.
-
The second parent node should be the incremental dataset.
Replace the
transformIdwith yourtransformIdin the template code block:def MyTransform (glueContext, dfc) -> DynamicFrameCollection: dfs = list(dfc.values()) dynf = dfs[0] inc_dynf = dfs[1] from awsglueml.transforms import FindIncrementalMatches findmatches = FindIncrementalMatches.apply(existingFrame = dynf, incrementalFrame = inc_dynf, transformId = "<your id>") return(DynamicFrameCollection({"FindMatches": findmatches}, glueContext)) -
For optional parameters, see FindIncrementalMatches class.