Creating a schema
You can create a schema using the Amazon Glue APIs or the Amazon Glue console.
Amazon Glue APIs
You can use these steps to perform this task using the Amazon Glue APIs.
To add a new schema, use the CreateSchema action (Python: create_schema) API.
Specify a RegistryId structure to indicate a registry for the schema. Or, omit the RegistryId to use the default registry.
Specify a SchemaName consisting of letters, numbers, hyphens, or underscores, and DataFormat as AVRO or JSON. DataFormat once set on a schema is not changeable.
Specify a Compatibility mode:
Backward (recommended) — Consumer can read both current and previous version.
Backward all — Consumer can read current and all previous versions.
Forward — Consumer can read both current and subsequent version.
Forward all — Consumer can read both current and all subsequent versions.
Full — Combination of Backward and Forward.
Full all — Combination of Backward all and Forward all.
None — No compatibility checks are performed.
Disabled — Prevent any versioning for this schema.
Optionally, specify Tags for your schema.
Specify a SchemaDefinition to define the schema in Avro, JSON, or Protobuf data format. See the examples.
For Avro data format:
aws glue create-schema --registry-id RegistryName="registryName1" --schema-name testschema --compatibility NONE --data-format AVRO --schema-definition "{\"type\": \"record\", \"name\": \"r1\", \"fields\": [ {\"name\": \"f1\", \"type\": \"int\"}, {\"name\": \"f2\", \"type\": \"string\"} ]}"
aws glue create-schema --registry-id RegistryArn="arn:aws:glue:us-east-2:901234567890:registry/registryName1" --schema-name testschema --compatibility NONE --data-format AVRO --schema-definition "{\"type\": \"record\", \"name\": \"r1\", \"fields\": [ {\"name\": \"f1\", \"type\": \"int\"}, {\"name\": \"f2\", \"type\": \"string\"} ]}"
For JSON data format:
aws glue create-schema --registry-id RegistryName="registryName" --schema-name testSchemaJson --compatibility NONE --data-format JSON --schema-definition "{\"$schema\": \"http://json-schema.org/draft-07/schema#\",\"type\":\"object\",\"properties\":{\"f1\":{\"type\":\"string\"}}}"
aws glue create-schema --registry-id RegistryArn="arn:aws:glue:us-east-2:901234567890:registry/registryName" --schema-name testSchemaJson --compatibility NONE --data-format JSON --schema-definition "{\"$schema\": \"http://json-schema.org/draft-07/schema#\",\"type\":\"object\",\"properties\":{\"f1\":{\"type\":\"string\"}}}"
For Protobuf data format:
aws glue create-schema --registry-id RegistryName="registryName" --schema-name testSchemaProtobuf --compatibility NONE --data-format PROTOBUF --schema-definition "syntax = \"proto2\";package org.test;message Basic { optional int32 basic = 1;}"
aws glue create-schema --registry-id RegistryArn="arn:aws:glue:us-east-2:901234567890:registry/registryName" --schema-name testSchemaProtobuf --compatibility NONE --data-format PROTOBUF --schema-definition "syntax = \"proto2\";package org.test;message Basic { optional int32 basic = 1;}"
Amazon Glue console
To add a new schema using the Amazon Glue console:
-
Sign in to the Amazon Management Console and open the Amazon Glue console at https://console.amazonaws.cn/glue/
. In the navigation pane, under Data catalog, choose Schemas.
Choose Add schema.
Enter a Schema name, consisting of letters, numbers, hyphens, underscores, dollar signs, or hashmarks. This name cannot be changed.
Choose the Registry where the schema will be stored from the drop-down menu. The parent registry cannot be changed post-creation.
Leave the Data format as Apache Avro or JSON. This format applies to all versions of this schema.
Choose a Compatibility mode.
Backward (recommended) — receiver can read both current and previous versions.
Backward All — receiver can read current and all previous versions.
Forward — sender can write both current and previous versions.
Forward All — sender can write current and all previous versions.
Full — combination of Backward and Forward.
Full All — combination of Backward All and Forward All.
None — no compatibility checks performed.
Disabled — prevent any versioning for this schema.
Enter an optional Description for the registry of up to 250 characters.

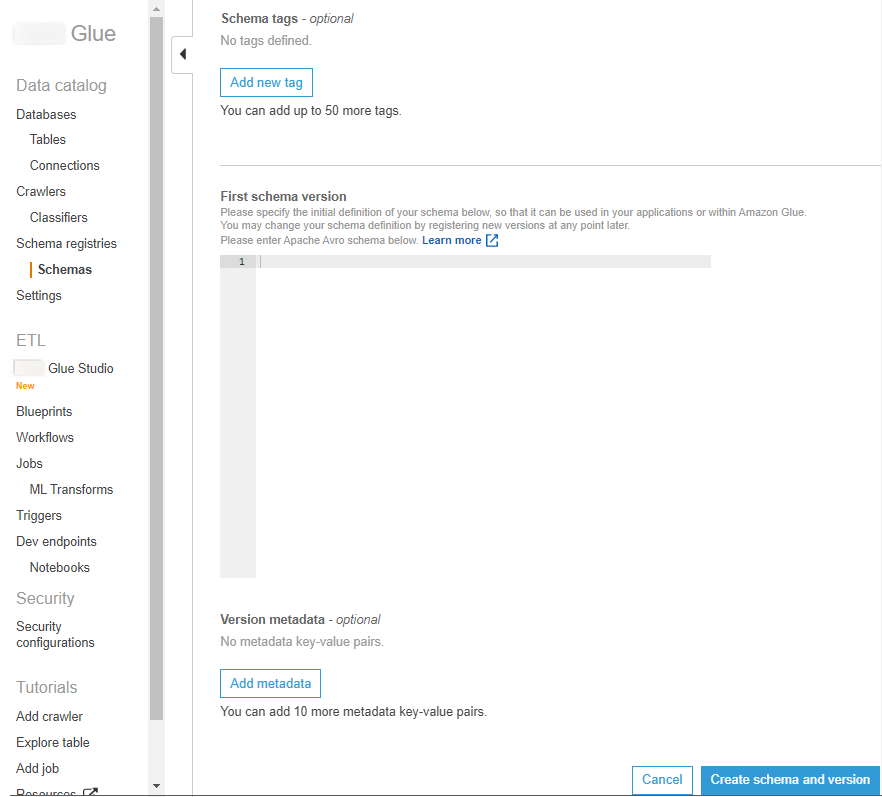
Optionally, apply one or more tags to your schema. Choose Add new tag and specify a Tag key and optionally a Tag value.
In the First schema version box, enter or paste your initial schema. .
For Avro format, see Working with Avro data format
For JSON format, see Working with JSON data format
Optionally, choose Add metadata to add version metadata to annotate or classify your schema version.
Choose Create schema and version.

The schema is created and appears in the list under Schemas.
Working with Avro data format
Avro provides data serialization and data exchange services. Avro stores the data definition in JSON format making it easy to read and interpret. The data itself is stored in binary format.
For information on defining an Apache Avro schema, see the Apache Avro specification
Working with JSON data format
Data can be serialized with JSON format. JSON Schema format