Setting up networking for development for Amazon Glue
To run your extract, transform, and load (ETL) scripts with Amazon Glue, you can develop and test your scripts using a development endpoint. Development endpoints are not supported for use with Amazon Glue version 2.0 jobs. For versions 2.0 and later, the preferred development method is using Jupyter Notebook with one of the Amazon Glue kernels. For more information, see Getting started with Amazon Glue interactive sessions.
Setting up your network for a development endpoint
When you set up a development endpoint, you specify a virtual private cloud (VPC), subnet, and security groups.
Note
Make sure you set up your DNS environment for Amazon Glue. For more information, see Setting up DNS in your VPC.
To enable Amazon Glue to access required resources, add a row in your subnet route table to associate a prefix list for Amazon S3 to the VPC endpoint. A prefix list ID is required for creating an outbound security group rule that allows traffic from a VPC to access an Amazon service through a VPC endpoint. To ease connecting to a notebook server that is associated with this development endpoint, from your local machine, add a row to the route table to add an internet gateway ID. For more information, see VPC Endpoints. Update the subnet routes table to be similar to the following table:
| Destination | Target |
|---|---|
10.0.0.0/16 |
local |
pl-id for Amazon S3 |
vpce-id |
0.0.0.0/0 |
igw-xxxx |
To enable Amazon Glue to communicate between its components, specify a security group with a self-referencing inbound rule for all TCP ports. By creating a self-referencing rule, you can restrict the source to the same security group in the VPC, and it's not open to all networks. The default security group for your VPC might already have a self-referencing inbound rule for ALL Traffic.
To set up a security group
Sign in to the Amazon Web Services Management Console and open the Amazon EC2 console at https://console.amazonaws.cn/ec2/
. -
In the left navigation pane, choose Security Groups.
-
Either choose an existing security group from the list, or Create Security Group to use with the development endpoint.
-
In the security group pane, navigate to the Inbound tab.
-
Add a self-referencing rule to allow Amazon Glue components to communicate. Specifically, add or confirm that there is a rule of Type
All TCP, Protocol isTCP, Port Range includes all ports, and whose Source is the same security group name as the Group ID.The inbound rule looks similar to this:
Type Protocol Port range Source All TCP
TCP
0–65535
security-groupThe following shows an example of a self-referencing inbound rule:

-
Add a rule to for outbound traffic also. Either open outbound traffic to all ports, or create a self-referencing rule of Type
All TCP, Protocol isTCP, Port Range includes all ports, and whose Source is the same security group name as the Group ID.The outbound rule looks similar to one of these rules:
Type Protocol Port range Destination All TCP
TCP
0–65535
security-groupAll Traffic
ALL
ALL
0.0.0.0/0
Setting up Amazon EC2 for a notebook server
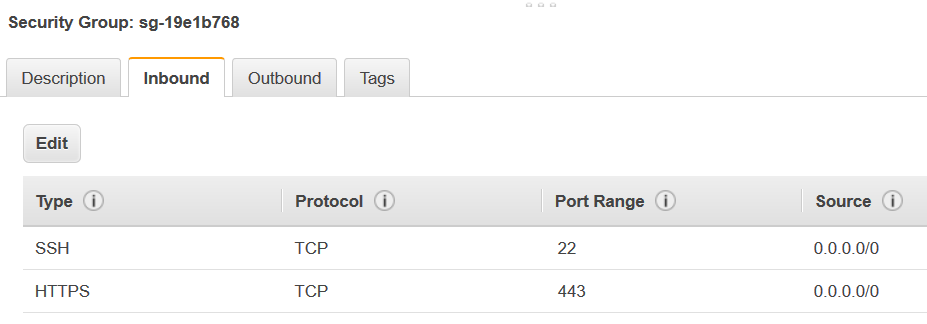
With a development endpoint, you can create a notebook server to test your ETL scripts with Jupyter notebooks. To enable communication to your notebook, specify a security group with inbound rules for both HTTPS (port 443) and SSH (port 22). Ensure that the rule's source is either 0.0.0.0/0 or the IP address of the machine that is connecting to the notebook.
To set up a security group
Sign in to the Amazon Web Services Management Console and open the Amazon EC2 console at https://console.amazonaws.cn/ec2/
. -
In the left navigation pane, choose Security Groups.
-
Either choose an existing security group from the list, or Create Security Group to use with your notebook server. The security group that is associated with your development endpoint is also used to create your notebook server.
-
In the security group pane, navigate to the Inbound tab.
-
Add inbound rules similar to this:
Type Protocol Port range Source SSH
TCP
22
0.0.0.0/0
HTTPS
TCP
443
0.0.0.0/0
The following shows an example of the inbound rules for the security group:
