Evaluating data quality for ETL jobs in Amazon Glue Studio
In this tutorial, you get started with Amazon Glue Data Quality in Amazon Glue Studio. You will learn how to:
-
Create rules using the Data Quality Definition Language (DQDL) rule builder.
-
Specify data quality actions, data to output, and the output location of the data quality results.
-
Review data quality results.
To
practice with an example, review
the blog post
Getting
started with Amazon Glue Data Quality for ETL
pipelines
Step 1: Add the Evaluate Data Quality transform node to the visual job
In this step, you add the Evaluate Data Quality node to the visual job editor.
To add the data quality node
-
In the Amazon Glue Studio console, choose Visual with a source and target from the Create job section, and then choose Create.
-
Choose a node that you want to apply the data quality transform to. Typically, this will be a transform node or a data source.
-
Open the resource panel on the left by choosing the "+" icon. Then search for Evaluate Data Quality in the search bar and choose Evaluate Data Quality from the search results.
-
The visual job editor showsthe Evaluate Data Quality transform node branching from the node you selected. On the right side of the console, the Transform tab is automatically opened. If you need to change the parent node, choose the Node properties tab, and then choose the node parent from the dropdown menu.
When you choose a new node parent, a new connection is made between the parent node and the Evaluate Data Quality node. Remove any unwanted parent nodes. Only one parent node can be connected to one Evaluate Data Quality node.
-
The Evaluate Data Quality transform supports multiple parents so you can validate data quality rules across multiple datasets. Rules that support multiple datasets include ReferentialIntegrity, DatasetMatch, SchemaMatch, RowCountMatch, and AggregateMatch.
When you add multiple inputs to the Evaluate Data Quality transform, you need to select your “primary” input. Your primary input is the dataset that you want to validate data quality for. All other nodes or inputs are treated as references.
You can use the Evaluate Data Quality transform to identify specific records that failed data quality checks. We recommend that you choose your primary dataset because new columns that flag bad records are added to the primary dataset.
-
You can specify aliases for input data sources. Aliases provide another way to reference the input source when you're using the ReferentialIntegrity rule. Becauseonly one data source can be designated as the primary source, each additional data source that you add will require an alias.
In the following example, the ReferentialIntegrity rule specifies the input data source by the alias name and performs a one-to-one comparison to the primary data source.
Rules = [
	ReferentialIntegrity “Aliasname.name” = 1
]
Step 2: Create a rule using DQDL
In this step, you create a rule using DQDL. For this tutorial, you create a single rule using the Completeness rule type. This rule type checks the percentage of complete (non-null) values in a column against a given expression. For more information about using DQDL, see DQDL.
-
On the Transform tab, add a Rule type by choosing the Insert button. This adds the rule type to the rule editor, where you can enter the parameters for the rule.
Note
When you're editing rules, ensure that the rules are within the brackets and that the rules are separated by commas. For example, a complete rule expression will look like the following:
Rules= [
    Completeness "year">0.8, Completeness "month">0.8
]
This example specifies the parameter for completeness for the columns named 'year' and 'month'. For the rule to pass, these columns must be greater than 80% 'complete', or must have data in over 80% of instances for each respective column.
In this example, search for and insert the Completeness rule type. This adds the rule type to the rule editor. This rule type has the following syntax:
Completeness <COL_NAME> <EXPRESSION>.Most rule types require that you provide an expression as a parameter in order to create a Boolean response. For more information on supported DQDL expressions, see DQDL expressions. Next, you'll add the column name.
-
In the DQDL rule builder, choose the Schema tab. Use the search bar to locate the column name in the input schema. The input schema displays the column name and data type.
-
In the rule editor, click to the right of the rule type to insert the cursor where the column will be inserted. Alternately, you can enter in the name of the column in the rule.
For example, from the list of columns in the input schema list, choose the Insert button next to the column (in this example, year). This adds the column to the rule.
-
Then, in the rule editor, add an expression to evaluate the rule. Because the Completeness rule type checks the percentage of complete (non-null) values in a column against a given expression, enter an expression such as
> 0.8. This rule checks the column if it's greater than 80% complete (non-null) values.
Step 3: Configure data quality outputs
After creating data quality rules, you can select additional options to specify data quality node output.
-
In Data quality transform output, choose from the following options:
-
Original data – Choose to output original input data. When you choose this option, a new child node “rowLevelOutcomes” is added to the job. The schema matches the schema of the primary dataset that was passed as input to the transform. This option is useful if you just want to pass the data through and fail the job when quality issues occur.
Another use case is when you want to detect bad records that failed data quality checks. To detect bad records, choose the option Add new columns to indicate data quality errors. This action adds four new columns to the schema of the “rowLevelOutcomes” transform.
-
DataQualityRulesPass (string array) – Provides an array of rules that passed data quality checks.
-
DataQualityRulesFail (string array) – Provides an array of rules that failed data quality checks.
-
DataQualityRulesSkip (string array) – Provides an array of rules that were skipped. The following rules cannot identify error records because they're applied at the dataset level.
-
AggregateMatch
-
ColumnCount
-
ColumnExists
-
ColumnNamesMatchPattern
-
CustomSql
-
RowCount
-
RowCountMatch
-
StandardDeviation
-
Mean
-
ColumnCorrelation
-
-
DataQualityEvaluationResult – Provides “Passed” or “Failed” status at the row level. Note that your overall results can be FAIL, but a certain record might pass. For example, the RowCount rule might have failed, but all other rules might have been successful. In such instances, this field status is 'Passed'.
-
-
-
Data quality results – Choose to output configured rules and their pass or fail status. This option is useful if you want to write your results to Amazon S3 or other databases.
-
Data quality output settings (Optional) – Choose Data quality output settings to reveal the Data quality result location field. Then, choose Browse to search for an Amazon S3 location to set as the data quality output target.
Step 4. Configure data quality actions
You can use actions to publish metrics to CloudWatch or to stop jobs based on specific criteria. Actions are only available after you create a rule. When you choose this option, the same metrics are also published to Amazon EventBridge. You can use these options to create alerts for notification.
-
On ruleset failure – You can choose what to do if a ruleset fails while the job is running. If you want the job to fail if data quality fails, choose when the job should fail by selecting one of the following options. By default, this action is not selected, and the job completes its run even if data quality rules fail.
-
None – If you choose None (default), the job does not fail and continues to run despite ruleset failures.
-
Fail job after loading data to target – The job fails and no data is saved. In order to save the results, choose an Amazon S3 location where the data quality results will be saved.
-
Fail job without loading to target data – This option fails the job immediately when a data quality error occurs. It does not load any data targets, including the results from the data quality transform.
-
Step 5: View data quality results
After running the job, view the data quality results by choosing the Data quality tab.
-
For each job run, view the data quality results. Each node displays a data quality status and status detail. Choose a node to view all rules and the status of each rule.
-
Choose Download results to download a CSV file that contains information about the job run and data quality results.
-
If you have more than one job run with data quality results, you can filter the results by date and time range. Choose Filter by a date and time range to expand the filter window.
-
Choose a relative range or absolute range. For absolute ranges, use the calendar to select a date, and enter values for start time and end time. When you're done, choose Apply.
Automatic Data Quality
When you create a Amazon Glue ETL job with Amazon S3 as the target, Amazon Glue ETL automatically enables a Data Quality rule that checks if the data being loaded has at least one column. This rule is designed to ensure that the data being loaded is not empty or corrupted. However, if this rule fails, the job will not fail; instead, you will notice a reduction in your data quality score. Additionally, Anomaly Detection is enabled by default, which monitors the number of columns in the data. If there are any variations or abnormalities in the column count, Amazon Glue ETL will inform you about these anomalies. This feature helps you identify potential issues with the data and take appropriate actions. To view the Data Quality rule and its configuration, you can click on the Amazon S3 target in your Amazon Glue ETL job. The rule's configuration will be displayed, as shown in the provided screenshot.
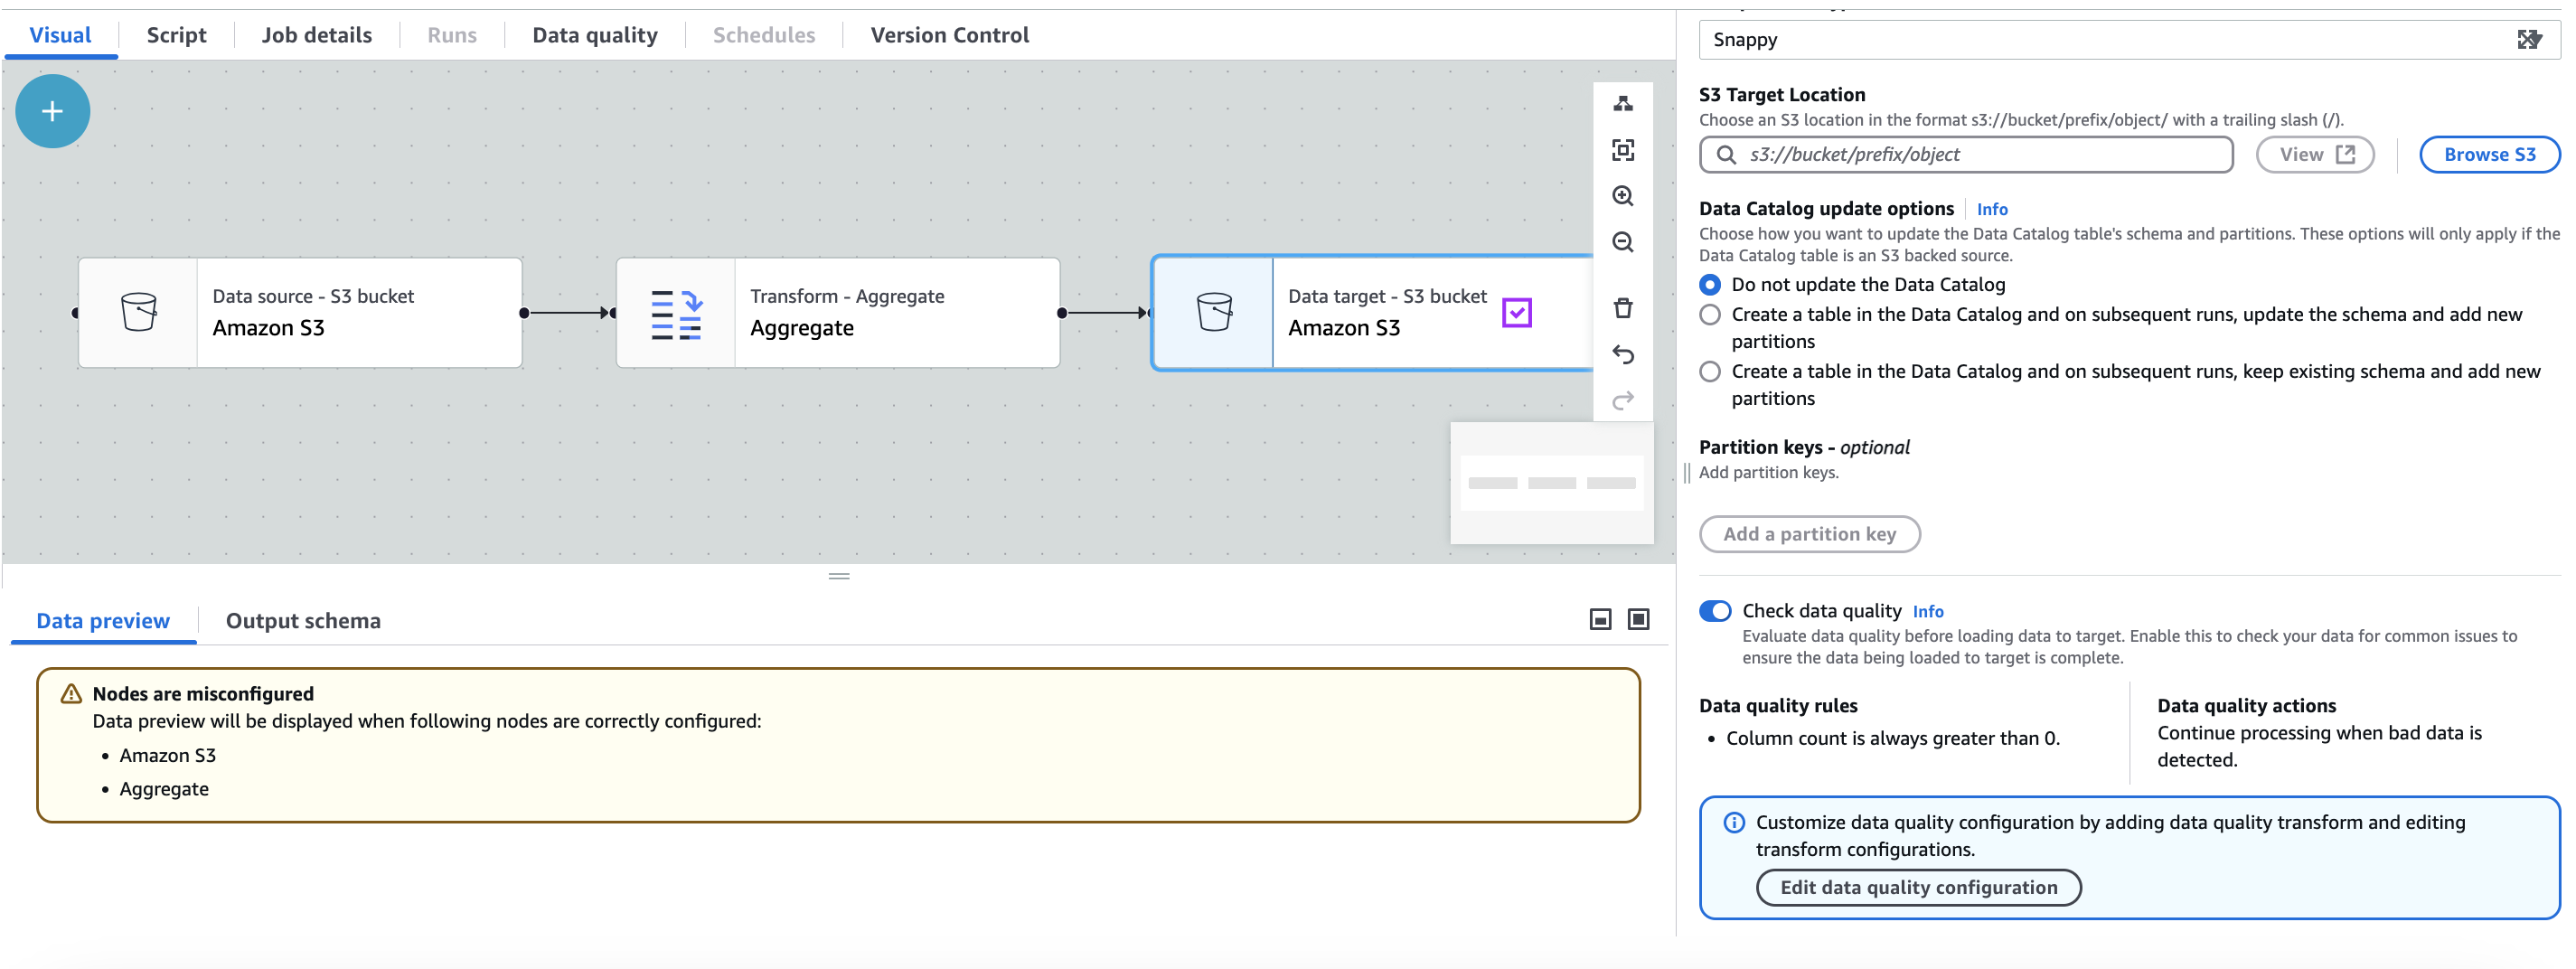
You can add additional data quality rules by selecting Edit data quality configuration.
Aggregated Metrics
You may require aggregated metrics such as number of records that passed, failed, skipped at a rule level or at the ruleset level to build dashboards. In order to get the Aggregated Metrics and Rule Metrics for each rule, first, enable Aggregated Metrics by adding the publishAggregatedMetrics option to your EvaluateDataQuality function.
The possible options for additional_options publishAggregatedMetrics are ENABLED and DISABLED. As an example:
EvaluateDataQualityMultiframe = EvaluateDataQuality().process_rows(
    frame=medicare_dyf,
    ruleset=EvaluateDataQuality_ruleset,
    publishing_options={
        "dataQualityEvaluationContext": "EvaluateDataQualityMultiframe",
        "enableDataQualityCloudWatchMetrics": False,
        "enableDataQualityResultsPublishing": False,
    },
    additional_options={"publishAggregatedMetrics.status": "ENABLED"},
)
If not specified, the publishAggregatedMetrics.status is DISABLED by default and the ruleMetrics and aggregated metrics would now be computed. This feature is currently supported in Amazon Glue Interactive Sessions and in Glue ETL jobs. This is not supported in Glue Catalog Data Quality APIs.
Retrieving aggregated metrics results
When additionalOptions "publishAggregatedMetrics.status": "ENABLED", you can get the results in two places:
-
AggregatedMetricsandRuleMetricsare returned through theGetDataQualityResult()when providing theresultIdwhereAggregatedMetricsandRuleMetricsinclude:Aggregated Metrics:
Total rows processed
Total rows passed
Total rows failed
Total Rules Processed
Total Rules Passed
Total Rules Failed
Also, at a rule level, the following metrics are provided:
Rule Metrics:
Rows Passed
Rows Failed
Row Skipped
Total Rows Processed
-
AggregatedMetricsis returned as an additional data frame andRuleOutcomesdata frame is augmented to includeRuleMetrics.
Example implementation
The following example shows how to implement aggregated metrics in Scala:
// Script generated for node Evaluate Data Quality
val EvaluateDataQuality_node1741974822533_ruleset = """
  # Example rules: Completeness "colA" between 0.4 and 0.8, ColumnCount > 10
  Rules = [
      IsUnique "customer_identifier",
      RowCount > 10,
      Completeness "customer_identifier" > 0.5
  ]
"""

val EvaluateDataQuality_node1741974822533 = EvaluateDataQuality.processRows(frame=ChangeSchema_node1742850392012, ruleset=EvaluateDataQuality_node1741974822533_ruleset, publishingOptions=JsonOptions("""{"dataQualityEvaluationContext": "EvaluateDataQuality_node1741974822533", "enableDataQualityCloudWatchMetrics": "true", "enableDataQualityResultsPublishing": "true"}"""), additionalOptions=JsonOptions("""{"compositeRuleEvaluation.method":"ROW","observations.scope":"ALL","performanceTuning.caching":"CACHE_NOTHING", "publishAggregatedMetrics.status": "ENABLED"}"""))

println("--------------------------------ROW LEVEL OUTCOMES--------------------------------")
val rowLevelOutcomes_node = EvaluateDataQuality_node1741974822533("rowLevelOutcomes")

rowLevelOutcomes_node.show(10)

 println("--------------------------------RULE LEVEL OUTCOMES--------------------------------")

val ruleOutcomes_node = EvaluateDataQuality_node1741974822533("ruleOutcomes")

ruleOutcomes_node.show()

 println("--------------------------------AGGREGATED METRICS--------------------------------")

val aggregatedMetrics_node = EvaluateDataQuality_node1741974822533("aggregatedMetrics")

aggregatedMetrics_node.show()
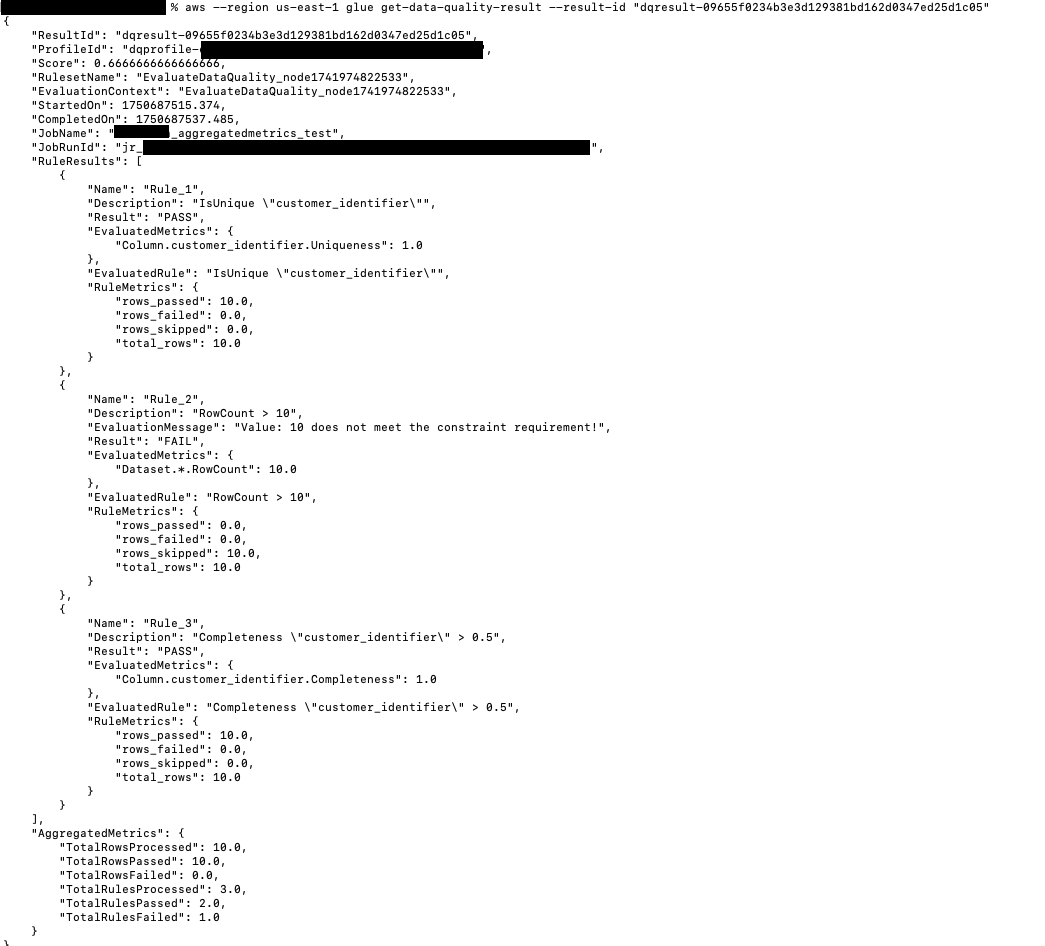
Sample results
Results are returned as follows:
{
    "Rule": "IsUnique \"customer_identifier\"",
    "Outcome": "Passed",
    "FailureReason": null,
    "EvaluatedMetrics": {
        "Column.customer_identifier.Uniqueness": 1
    },
    "EvaluatedRule": "IsUnique \"customer_identifier\"",
    "PassedCount": 10,
    "FailedCount": 0,
    "SkippedCount": 0,
    "TotalCount": 10
}
{
    "Rule": "RowCount > 10",
    "Outcome": "Failed",
    "FailureReason": "Value: 10 does not meet the constraint requirement!",
    "EvaluatedMetrics": {
        "Dataset.*.RowCount": 10
    },
    "EvaluatedRule": "RowCount > 10",
    "PassedCount": 0,
    "FailedCount": 0,
    "SkippedCount": 10,
    "TotalCount": 10
}
{
    "Rule": "Completeness \"customer_identifier\" > 0.5",
    "Outcome": "Passed",
    "FailureReason": null,
    "EvaluatedMetrics": {
        "Column.customer_identifier.Completeness": 1
    },
    "EvaluatedRule": "Completeness \"customer_identifier\" > 0.5",
    "PassedCount": 10,
    "FailedCount": 0,
    "SkippedCount": 0,
    "TotalCount": 10
}
Aggregated Metrics are as follows:
{ "TotalRowsProcessed": 10, "PassedRows": 10, "FailedRows": 0, "TotalRulesProcessed": 3, "RulesPassed": 2, "RulesFailed": 1 }