Setting up permissions for open table storage formats in Lake Formation
Amazon Lake Formation supports managing access permissions for Open Table Formats (OTFs) such as Apache Iceberg
Note
Amazon analytics services don't support all transactional table formats. For more information, see Working with other Amazon services. This tutorial manually covers creating a new database and a table in the Data Catalog using Amazon Glue jobs only.
This tutorial includes an Amazon CloudFormation template for quick setup. You can review and customize it to suit your needs.
Topics
Intended audience
This tutorial is intended for IAM administrators, data lake administrators, and business analysts. The following table lists the roles used in this tutorial for creating a governed table using Lake Formation.
| Role | Description |
|---|---|
| IAM Administrator | A user who can create IAM users and roles and Amazon S3
buckets. Has the AdministratorAccess Amazon managed policy. |
| Data lake administrator | A user who can access the Data Catalog, create databases, and grant Lake Formation permissions to other users. Has fewer IAM permissions than the IAM administrator, but enough to administer the data lake. |
| Business analyst | A user who can run queries against the data lake. Has permissions to run queries. |
Prerequisites
Before you start this tutorial, you must have an Amazon Web Services account that you can sign in as a user with the correct permissions. For more information, see Sign up for an Amazon Web Services account and .
The tutorial assumes that you are familiar with IAM roles and policies. For information about IAM, see the IAM User Guide
You need to set up the following Amazon resources to complete this tutorial:
Data lake administrator user
Lake Formation data lake settings
Amazon Athena engine version 3
To create a data lake administrator
-
Sign in to the Lake Formation console at https://console.amazonaws.cn/lakeformation/
as an administrator user. You will create resources in the US East (N. Virginia) Region for this tutorial. -
On the Lake Formation console, in the navigation pane, under Permissions, choose Administrative roles and tasks.
-
Select Choose Administrators under Data lake administrators.
-
In the pop-up window, Manage data lake administrators, under IAM users and roles, choose IAM admin user.
-
Choose Save.
To enable data lake settings
-
Open the Lake Formation console at https://console.amazonaws.cn/lakeformation/
. In the navigation pane, under Data catalog, choose Settings. Uncheck the following: Use only IAM access control for new databases.
-
Use only IAM access control for new tables in new databases.
-
Under Cross account version settings, choose Version 3 as the cross account version.
-
Choose Save.
To upgrade Amazon Athena engine to version 3
-
Open Athena console at https://console.amazonaws.cn/athena/
. -
Select the Workgroup and select primary workgroup.
-
Ensure that the workgroup is at a minimum version of 3. If it is not, edit the workgroup, choose Manual for Upgrade query engine, and select version 3.
Choose Save changes.
Step 1: Provision your resources
This section shows you how to set up the Amazon resources using an Amazon CloudFormation template.
To create your resources using Amazon CloudFormation template
Sign into the Amazon CloudFormation console at https://console.amazonaws.cn/cloudformation
as an IAM administrator in the US East (N. Virginia) Region. Choose Launch Stack
. Choose Next on the Create stack screen.
Enter a Stack name.
Choose Next.
On the next page, choose Next.
Review the details on the final page and select I acknowledge that Amazon CloudFormation might create IAM resources.
Choose Create.
The stack creation can take up to two minutes.
Launching the cloud formation stack creates the following resources:
-
lf-otf-datalake-123456789012 – Amazon S3 bucket to store data
Note
The account id appended to the Amazon S3 bucket name is replaced with your account id.
-
lf-otf-tutorial-123456789012 – Amazon S3 bucket to store query results and Amazon Glue job scripts
lficebergdb – Amazon Glue Iceberg database
lfhudidb – Amazon Glue Hudi database
-
lfdeltadb – Amazon Glue Delta database
native-iceberg-create – Amazon Glue job that creates an Iceberg table in the Data Catalog
native-hudi-create – Amazon Glue job that creates a Hudi table in the Data Catalog
-
native-delta-create – Amazon Glue job that creates a Delta table in the Data Catalog
LF-OTF-GlueServiceRole – IAM role that you pass to Amazon Glue to run the jobs. This role has the required policies attached to access the resources like Data Catalog, Amazon S3 bucket etc.
LF-OTF-RegisterRole – IAM role to register the Amazon S3 location with Lake Formation. This role has
LF-Data-Lake-Storage-Policyattached to the role.lf-consumer-analystuser – IAM user to query the data using Athena
-
lf-consumer-analystuser-credentials – Password for the data analyst user stored in Amazon Secrets Manager
After the stack creations is complete, navigate to the output tab and note down the values for:
AthenaQueryResultLocation – Amazon S3 location for Athena query output
BusinessAnalystUserCredentials – Password for the data analyst user
To retrieve the password value:
Choose the
lf-consumer-analystuser-credentialsvalue by navigating to the Secrets Manager console.In the Secret value section, choose Retrieve secret value.
Note down the secret value for the password.
Step 2: Set up permissions for an Iceberg table
In this section, you'll learn how to create an Iceberg table in the Amazon Glue Data Catalog, set up data permissions in Amazon Lake Formation, and query data using Amazon Athena.
To create an Iceberg table
In this step, you’ll run an Amazon Glue job that creates an Iceberg transactional table in the Data Catalog.
-
Open the Amazon Glue console at https://console.amazonaws.cn/glue/
in the US East (N. Virginia) Region as the data lake administrator user. -
Choose jobs from the left navigation pane.
-
Select
native-iceberg-create.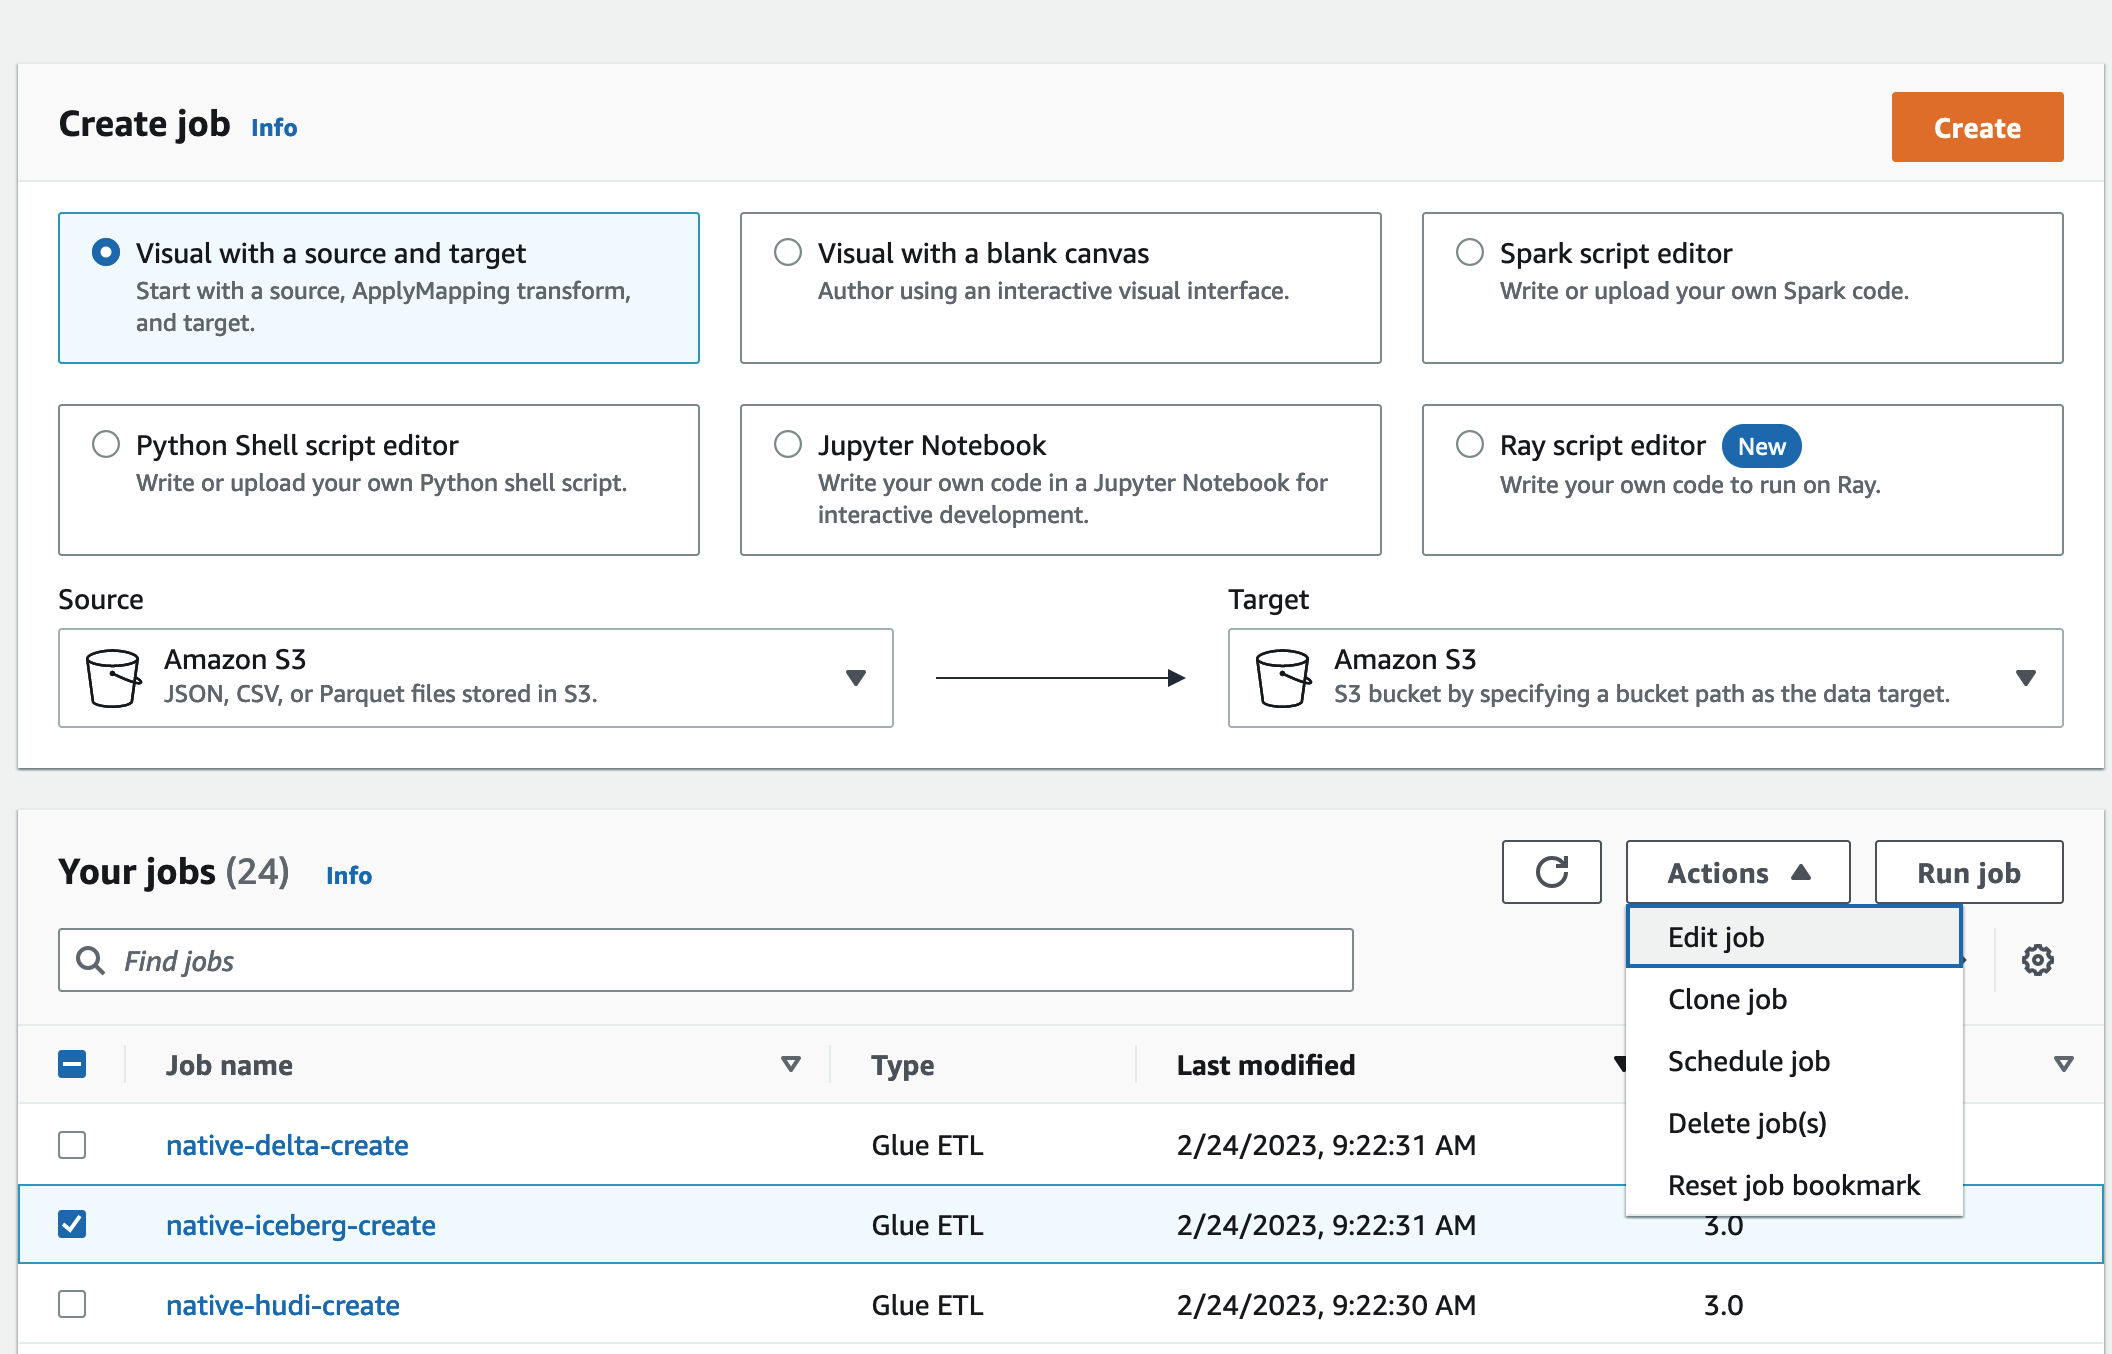
-
Under Actions, choose Edit job.
-
Under Job details, expand Advanced properties, and check the box next to Use Amazon Glue Data Catalog as the Hive metastore to add the table metadata in the Amazon Glue Data Catalog. This specifies Amazon Glue Data Catalog as the metastore for the Data Catalog resources used in the job and enables Lake Formation permissions to be applied later on the catalog resources.
Choose Save.
-
Choose Run. You can view the status of the job while it is running.
For more information on Amazon Glue jobs, see Working with jobs on the Amazon Glue console in the Amazon Glue Developer Guide.
This job creates an Iceberg table named
productin thelficebergdbdatabase. Verify the product table in the Lake Formation console.
To register the data location with Lake Formation
Next, register the Amazon S3 path as the location of your data lake.
-
Open the Lake Formation console at https://console.amazonaws.cn/lakeformation/
as the data lake administrator user. In the navigation pane, under Register and ingest, choose Data location.
On the upper right of the console, choose Register location.
On the Register location page, enter the following:
-
Amazon S3 path – Choose Browse and select
lf-otf-datalake-123456789012. Click on the right arrow (>) next to the Amazon S3 root location to navigate to thes3/buckets/lf-otf-datalake-123456789012/transactionaldata/native-iceberglocation. -
IAM role – Choose
LF-OTF-RegisterRoleas the IAM role. Choose Register location.
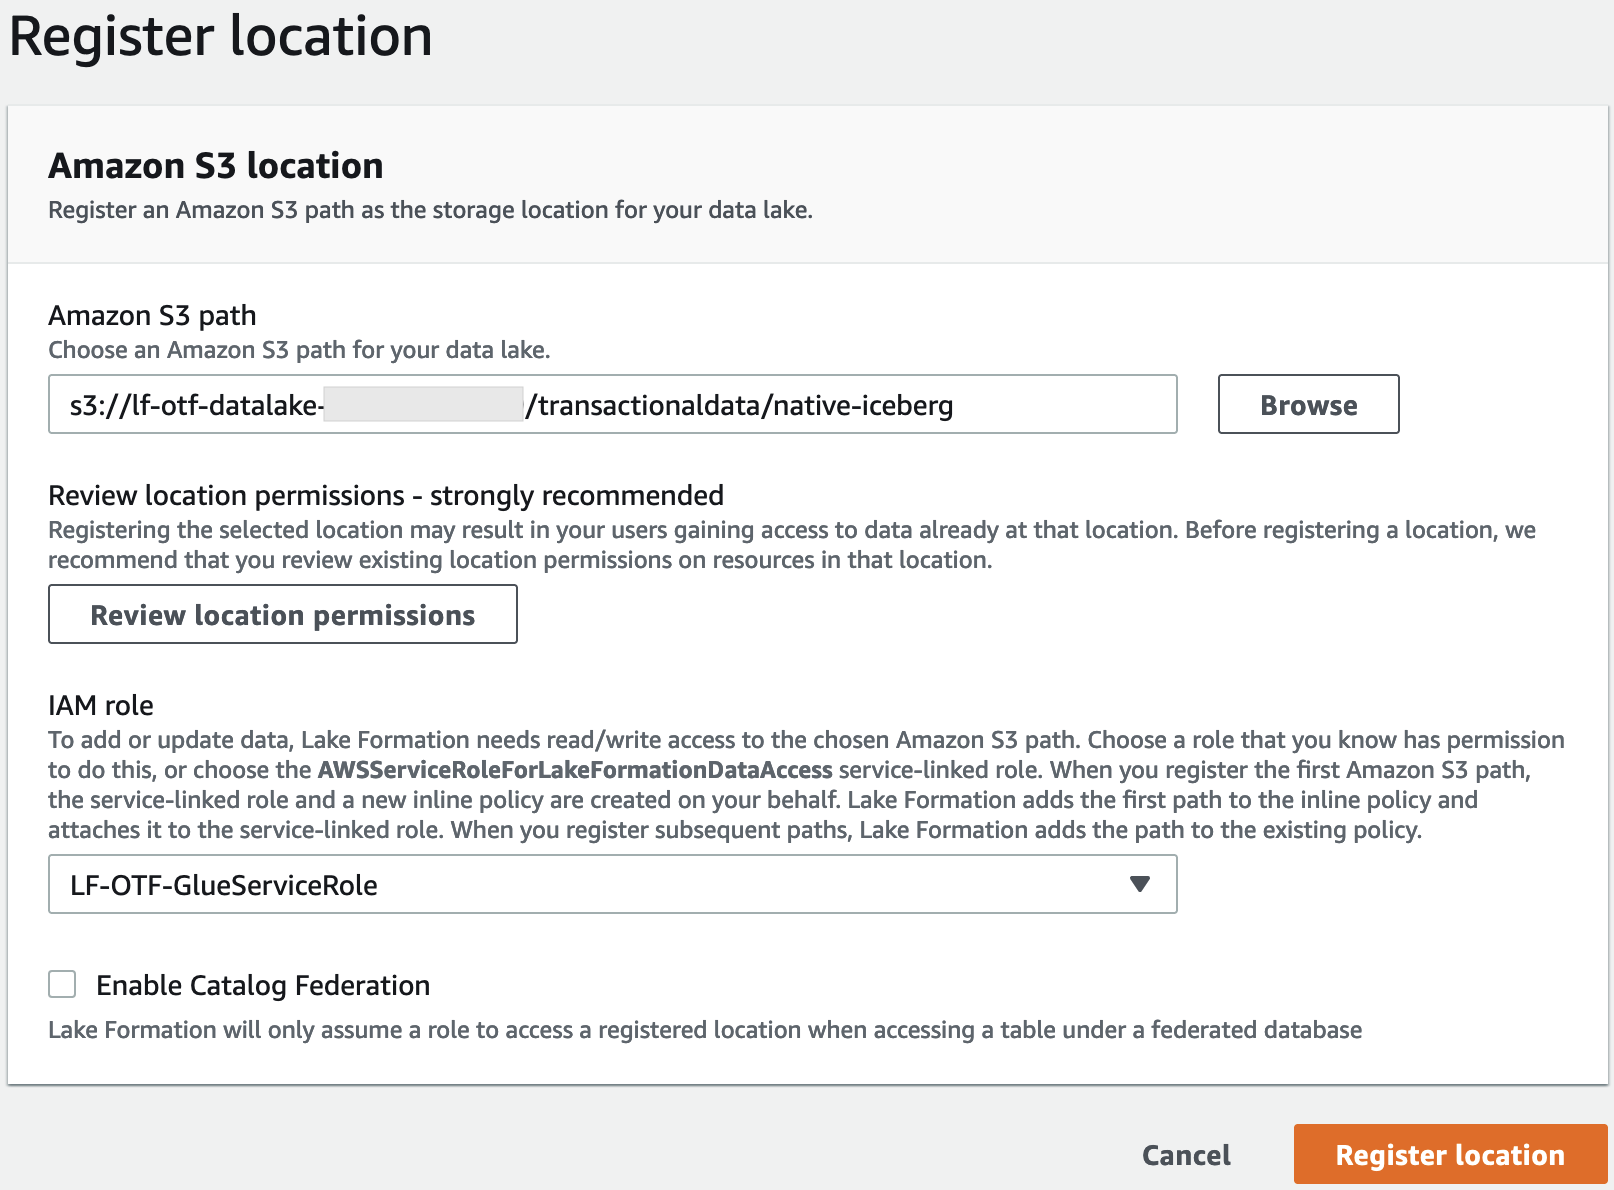
For more information on registering a data location with Lake Formation, see Adding an Amazon S3 location to your data lake.
-
To grant Lake Formation permissions on the Iceberg table
In this step, we'll grant data lake permissions to the business analyst user.
Under Data lake permissions, choose Grant.
On the Grant data permissions screen, choose, IAM users and roles.
-
Choose
lf-consumer-analystuserfrom the drop down.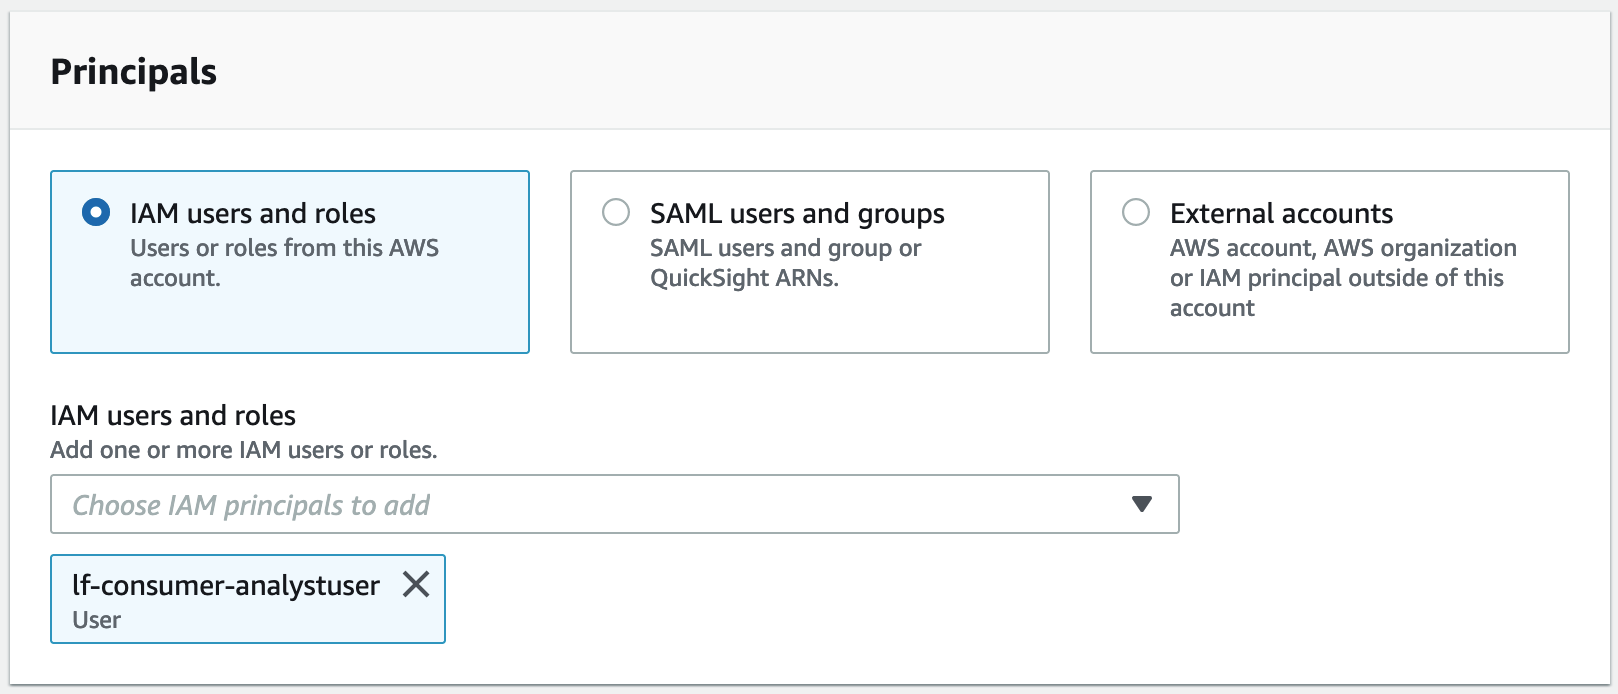
Choose Named data catalog resource.
For Databases choose
lficebergdb.For Tables, choose
product.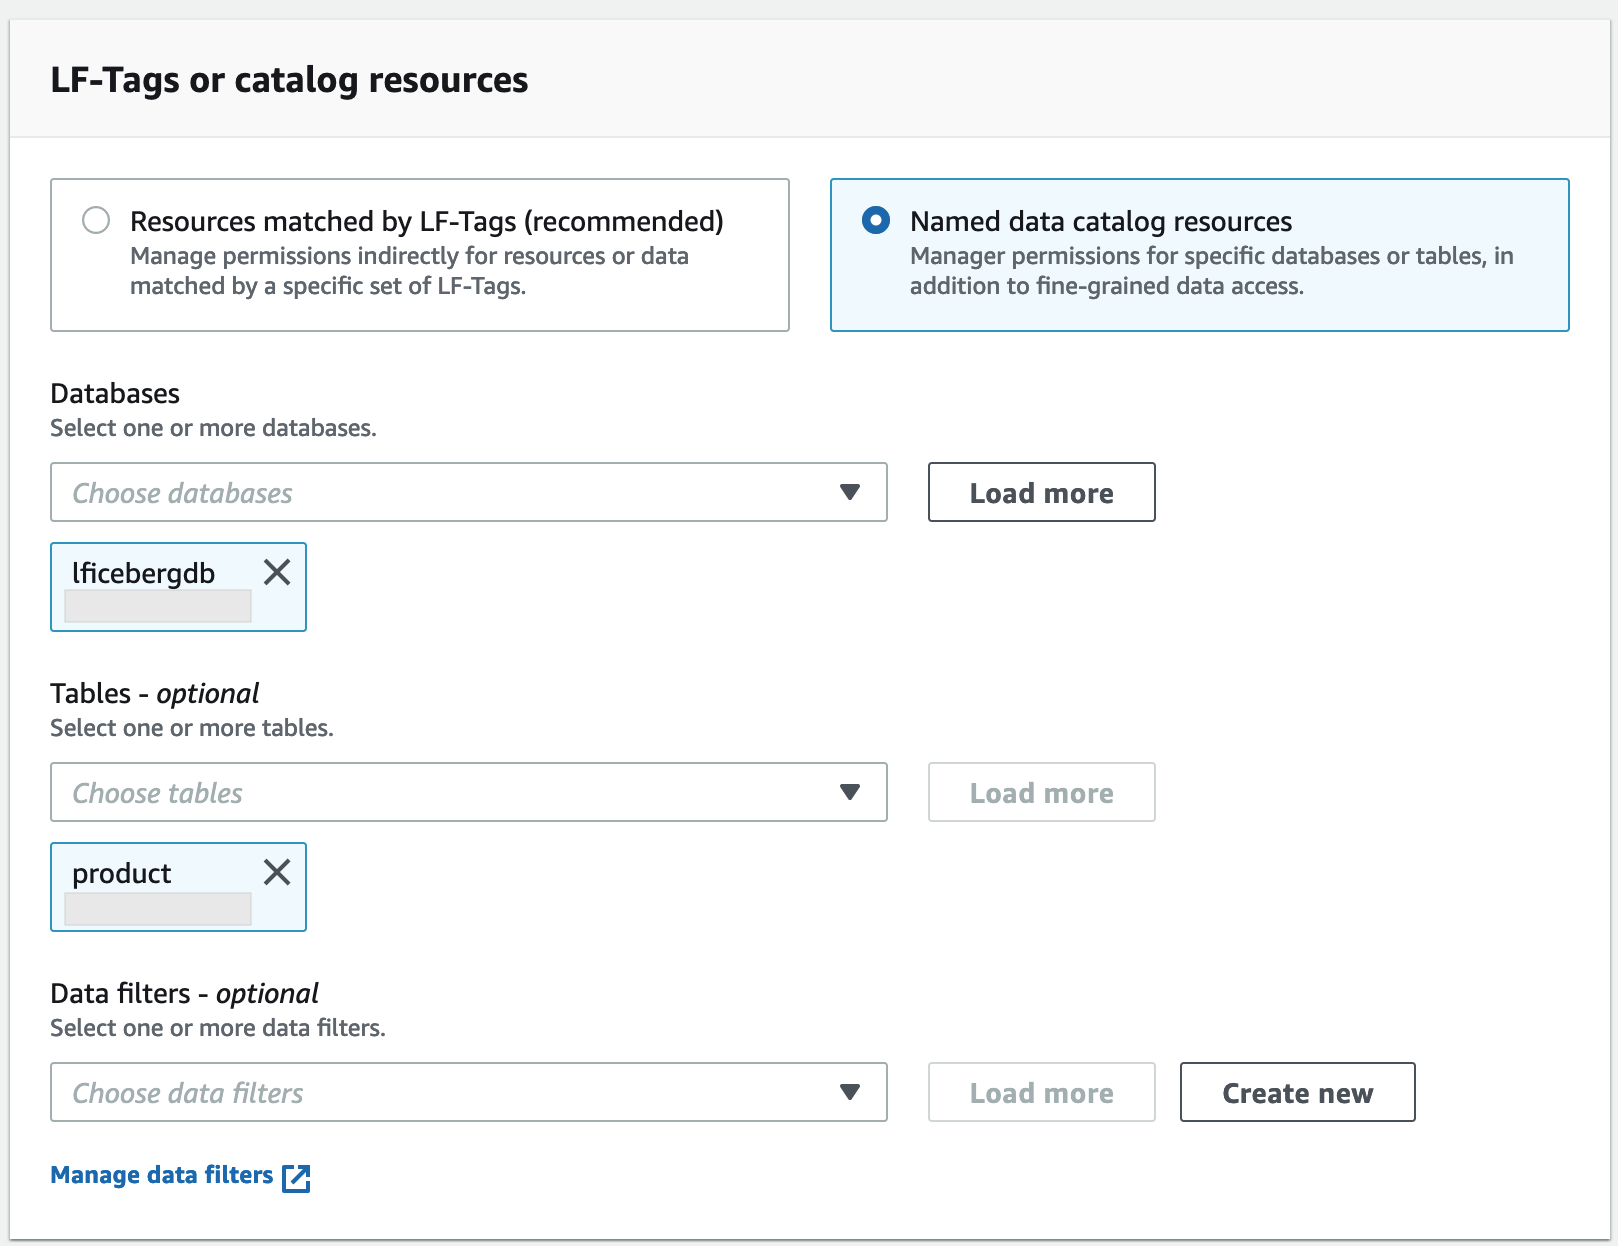
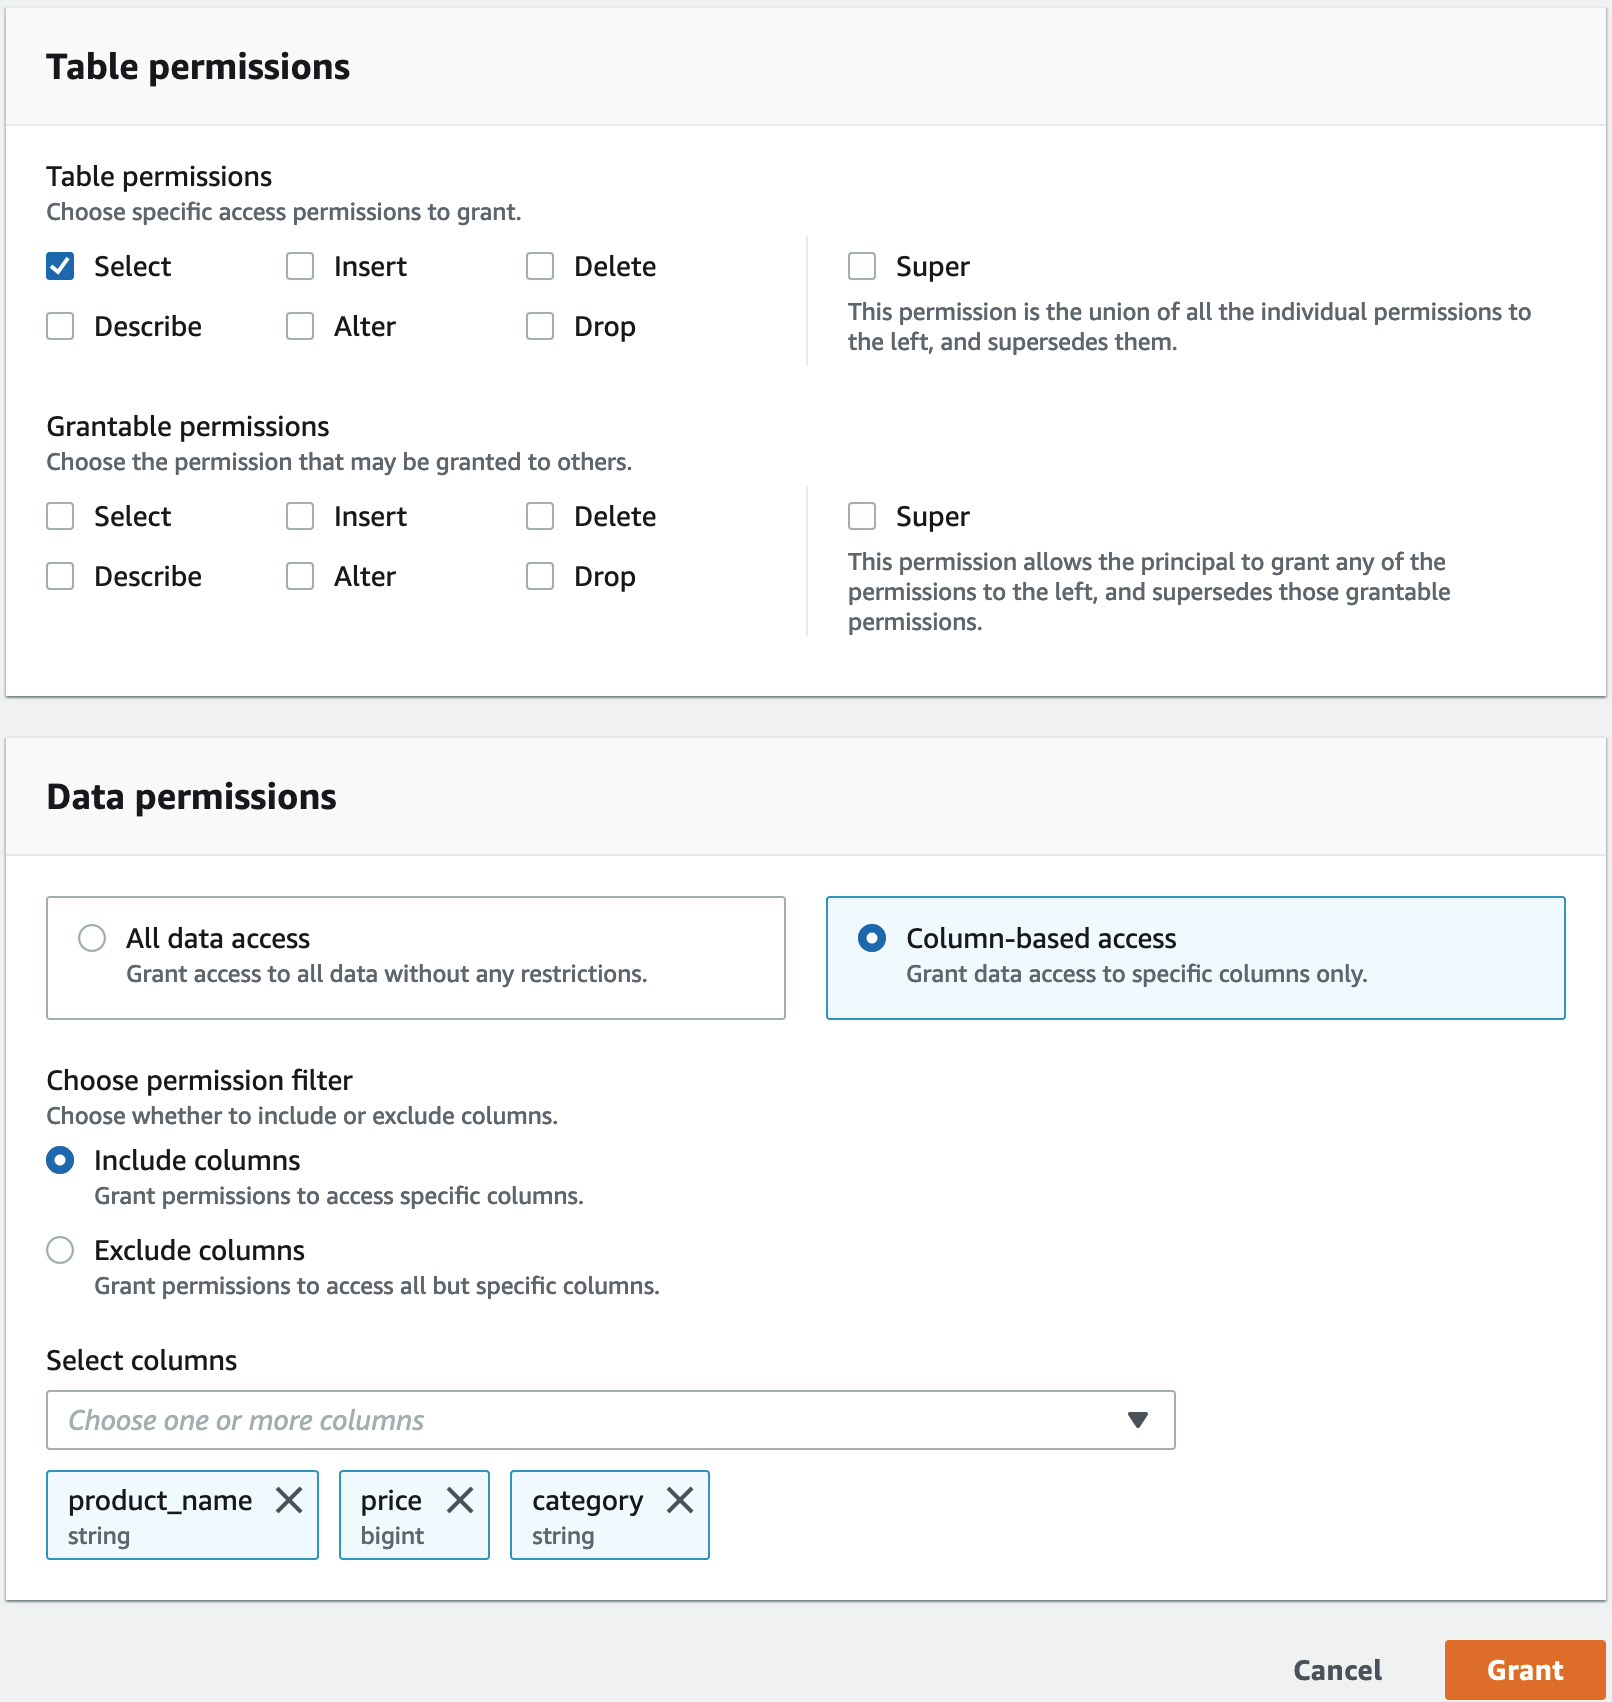
Next, you can grant column-based access by specifying columns.
Under Table permissions, choose Select.
Under Data permissions, choose Column-based access, choose Include columns.
Choose
product_name,price, andcategorycolumns.Choose Grant.
To query the Iceberg table using Athena
Now you can start querying the Iceberg table you created using Athena. If it is your first time running queries in Athena, you need to configure a query result location. For more information, see Specifying a query result location.
Sign out as the data lake administrator user and sign in as
lf-consumer-analystuserin US East (N. Virginia) Region using the password noted earlier from the Amazon CloudFormation output.Open the Athena console at https://console.amazonaws.cn/athena/
. Choose Settings and select Manage.
In the Location of query result box, enter the path to the bucket that you created in Amazon CloudFormation outputs. Copy the value of
AthenaQueryResultLocation(s3://lf-otf-tutorial-123456789012/athena-results/) and choose Save.Run the following query to preview 10 records stored in the Iceberg table:
select * from lficebergdb.product limit 10;For more information on querying Iceberg tables using Athena, see Querying Iceberg tables in the Amazon Athena User Guide.
Step 3: Set up permissions for a Hudi table
In this section, you'll learn how to create a Hudi table in the Amazon Glue Data Catalog, set up data permissions in Amazon Lake Formation, and query data using Amazon Athena.
To create a Hudi table
In this step, you’ll run an Amazon Glue job that creates an Hudi transactional table in the Data Catalog.
-
Sign in to the Amazon Glue console at https://console.amazonaws.cn/glue/
in the US East (N. Virginia) Region as the data lake administrator user.
-
Choose jobs from the left navigation pane.
-
Select
native-hudi-create. -
Under Actions, choose Edit job.
-
Under Job details, expand Advanced properties, and check the box next to Use Amazon Glue Data Catalog as the Hive metastore to add the table metadata in the Amazon Glue Data Catalog. This specifies Amazon Glue Data Catalog as the metastore for the Data Catalog resources used in the job and enables Lake Formation permissions to be applied later on the catalog resources.
Choose Save.
-
Choose Run. You can view the status of the job while it is running.
For more information on Amazon Glue jobs, see Working with jobs on the Amazon Glue console in the Amazon Glue Developer Guide.
This job creates a Hudi(cow) table in the database:lfhudidb. Verify the
producttable in the Lake Formation console.
To register the data location with Lake Formation
Next, register an Amazon S3 path as the root location of your data lake.
-
Sign in to the Lake Formation console at https://console.amazonaws.cn/lakeformation/
as the data lake administrator user. In the navigation pane, under Register and ingest, choose Data location.
On the upper right of the console, choose Register location.
On the Register location page, enter the following:
-
Amazon S3 path – Choose Browse and select
lf-otf-datalake-123456789012. Click on the right arrow (>) next to the Amazon S3 root location to navigate to thes3/buckets/lf-otf-datalake-123456789012/transactionaldata/native-hudilocation. -
IAM role – Choose
LF-OTF-RegisterRoleas the IAM role. Choose Register location.
-
To grant data lake permissions on the Hudi table
In this step, we'll grant data lake permissions to the business analyst user.
Under Data lake permissions, choose Grant.
On the Grant data permissions screen, choose, IAM users and roles.
-
lf-consumer-analystuserfrom the drop down. Choose Named data catalog resource.
For Databases choose
lfhudidb.For Tables, choose
product.Next, you can grant column-based access by specifying columns.
Under Table permissions, choose Select.
Under Data permissions, choose Column-based access, choose Include columns.
Choose
product_name,price, andcategorycolumns.Choose Grant.
To query the Hudi table using Athena
Now start querying the Hudi table you created using Athena. If it is your first time running queries in Athena, you need to configure a query result location. For more information, see Specifying a query result location.
Sign out as the data lake administrator user and sign in as
lf-consumer-analystuserin US East (N. Virginia) Region using the password noted earlier from the Amazon CloudFormation output.Open the Athena console at https://console.amazonaws.cn/athena/
. Choose Settings and select Manage.
In the Location of query result box, enter the path to the bucket that you created in Amazon CloudFormation outputs. Copy the value of
AthenaQueryResultLocation(s3://lf-otf-tutorial-123456789012/athena-results/) and Save.Run the following query to preview 10 records stored in the Hudi table:
select * from lfhudidb.product limit 10;For more information on querying Hudi tables, see the Querying Hudi tables section in the Amazon Athena User Guide.
Step 4: Set up permissions for a Delta Lake table
In this section, you'll learn how to create a Delta Lake table with symlink manifest file in the Amazon Glue Data Catalog, set up data permissions in Amazon Lake Formation and query data using Amazon Athena.
To create a Delta Lake table
In this step, you’ll run an Amazon Glue job that creates a Delta Lake transactional table in the Data Catalog.
-
Sign in to the Amazon Glue console at https://console.amazonaws.cn/glue/
in the US East (N. Virginia) Region as the data lake administrator user.
-
Choose jobs from the left navigation pane.
-
Select
native-delta-create. -
Under Actions, choose Edit job.
-
Under Job details, expand Advanced properties, and check the box next to Use Amazon Glue Data Catalog as the Hive metastore to add the table metadata in the Amazon Glue Data Catalog. This specifies Amazon Glue Data Catalog as the metastore for the Data Catalog resources used in the job and enables Lake Formation permissions to be applied later on the catalog resources.
Choose Save.
-
Choose Run under Actions.
This job creates a Delta Lake table named
productin thelfdeltadbdatabase. Verify theproducttable in the Lake Formation console.
To register the data location with Lake Formation
Next, register the Amazon S3 path as the root location of your data lake.
-
Open the Lake Formation console at https://console.amazonaws.cn/lakeformation/
the data lake administrator user. In the navigation pane, under Register and ingest, choose Data location.
On the upper right of the console, choose Register location.
On the Register location page, enter the following:
-
Amazon S3 path – Choose Browse and select
lf-otf-datalake-123456789012. Click on the right arrow (>) next to the Amazon S3 root location to navigate to thes3/buckets/lf-otf-datalake-123456789012/transactionaldata/native-deltalocation. -
IAM role – Choose
LF-OTF-RegisterRoleas the IAM role. Choose Register location.
-
To grant data lake permissions on the Delta Lake table
In this step, we'll grant data lake permissions to the business analyst user.
Under Data lake permissions, choose Grant.
On the Grant data permissions screen, choose, IAM users and roles.
-
lf-consumer-analystuserfrom the drop down. Choose Named data catalog resource.
For Databases choose
lfdeltadb.For Tables, choose
product.Next, you can grant column-based access by specifying columns.
Under Table permissions, choose Select.
Under Data permissions, choose Column-based access, choose Include columns.
Choose
product_name,price, andcategorycolumns.Choose Grant.
To query the Delta Lake table using Athena
Now start querying the Delta Lake table you created using Athena. If it is your first time running queries in Athena, you need to configure a query result location. For more information, see Specifying a query result location.
Log out as the data lake administrator user and login as
BusinessAnalystUserin US East (N. Virginia) Region using the password noted earlier from the Amazon CloudFormation output.Open the Athena console at https://console.amazonaws.cn/athena/
. Choose Settings and select Manage.
In the Location of query result box, enter the path to the bucket that you created in Amazon CloudFormation outputs. Copy the value of
AthenaQueryResultLocation(s3://lf-otf-tutorial-123456789012/athena-results/) and Save.Run the following query to preview 10 records stored in the Delta Lake table:
select * from lfdeltadb.product limit 10;For more information on querying Delta Lake tables, see the Querying Delta Lake tables section in the Amazon Athena User Guide.
Step 5: Clean up Amazon resources
To clean up resources
To prevent unwanted charges to your Amazon Web Services account, delete the Amazon resources that you used for this tutorial.
-
Sign in to the Amazon CloudFormation console at https://console.amazonaws.cn/cloudformation
as the IAM administrator. -
Delete the cloud formation stack
. The tables you created are automatically deleted with the stack.