Setting up audio tracks and audio selectors
You use audio selectors to associate input audio with output audio. You can set up a single audio selector to represent one or more tracks from the input. After that, you create audio tracks in the output and associate a single audio selector with each output track.
Associations between input audio tracks, audio selectors, and output audio tracks follow these rules:
-
Each input track can be associated with one or more audio selectors
-
Each audio selector has one or more input tracks
-
Each output track has one audio selector
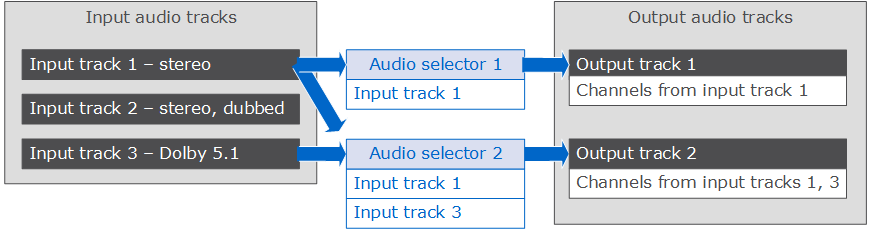
The following illustration shows these relationships. In the illustration, the input file contains three audio tracks. Audio selector 1 selects input track 1. Audio selector 1 is associated with output audio track 1, so track 1 of the output has the same content as track 1 of the input. The second input audio track is not selected by an audio selector, so it isn't used in the output. Audio selector 2 selects input tracks 1 and 3. Audio selector 2 is associated with output audio track 2, so output track 2 contains the channels from input tracks 1 and 3.
For workflows that require channel-level control, use the audio channel remix feature, which supports the following workflows:
-
Changing the order of channels in an audio track
-
Moving audio channels from one or more input tracks to different output tracks
-
Combining the audio from multiple channels into a single channel
-
Splitting the audio from a single channel into multiple channels
-
Adjusting the loudness level of audio channels