Services or capabilities described in Amazon Web Services documentation might vary by Region. To see the differences applicable to the China Regions,
see Getting Started with Amazon Web Services in China
(PDF).
Tutorial: Creating and configuring an organization
In this tutorial, you create your organization and configure it with two Amazon member
accounts. You create one of the member accounts in your organization, and you invite the
other account to join your organization. Next, you use the
allow list technique to specify that account
administrators can delegate only explicitly listed services and actions. This allows
administrators to validate any new service that Amazon introduces before they permit its
use by anyone else in your company. That way, if Amazon introduces a new service, it
remains prohibited until an administrator adds the service to the allow list in the
appropriate policy. The tutorial also shows you how to use a deny list to ensure that no users in a member account can change the
configuration for the auditing logs that Amazon CloudTrail creates.
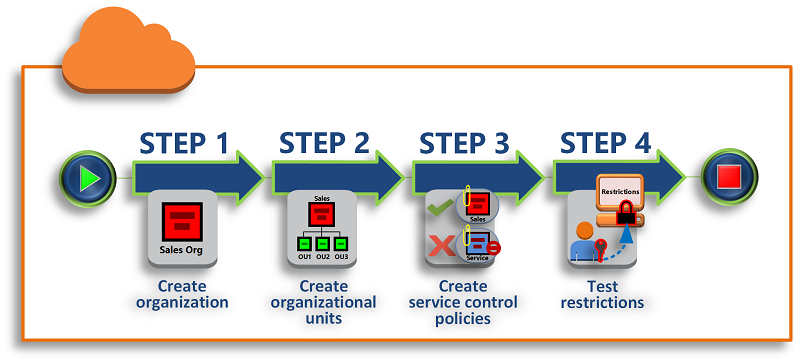
The following illustration shows the main steps of the tutorial.
None of the steps in this tutorial incurs costs to your Amazon bill. Amazon Organizations is a free
service.
Prerequisites
This tutorial assumes that you have access to two existing Amazon Web Services accounts (you create
a third as part of this tutorial) and that you can sign in to each as an
administrator.
The tutorial refers to the accounts as the following:
-
111111111111 – The account that you use to
create the organization. This account becomes the management account. The owner
of this account has an email address of
OrgAccount111@example.com.
-
222222222222 – An account that you invite to
join the organization as a member account. The owner of this account has an
email address of member222@example.com.
-
333333333333 – An account that you create as a
member of the organization. The owner of this account has an email address of
member333@example.com.
Substitute the values above with the values that are associated with your test
accounts. We recommend that you don't use production accounts for this tutorial.
Step 1: Create your organization
In this step, you sign in to account 111111111111 as an administrator,
create an organization with that account as the management account, and invite an
existing account, 222222222222, to join as a member account.
- Amazon Web Services Management Console
-
-
Sign in to Amazon as an administrator of account
111111111111 and open the Amazon Organizations console.
-
On the introduction page, choose Create an
organization.
-
In the confirmation dialog box, choose Create an
organization.
By default, the organization is created with all features
enabled. You can also create the organization with only
consolidated billing
features enabled.
Amazon creates the organization and shows you the Amazon Web Services accounts page.
If you're on a different page then choose
Amazon Web Services accounts in the navigation pane on
the left.
If the account you use has never had its email address verified by
Amazon, a verification email is automatically sent to the address
that is associated with your management account. There might be a
delay before you receive the verification email.
-
Verify your email address within 24 hours. For more information,
see Email address verification with Amazon Organizations.
You now have an organization with your account as its only member. This is the
management account of the organization.
Invite an existing account to join your organization
Now that you have an organization, you can begin to populate it with accounts. In
the steps in this section, you invite an existing account to join as a member of
your organization.
- Amazon Web Services Management Console
-
To invite an existing account to join
-
Navigate to the Amazon Web Services accounts page, and choose Add an
Amazon Web Services account.
-
On the Add an Amazon Web Services account page, choose Invite an
existing Amazon Web Services account.
-
In the box Email address or account ID of an
Amazon Web Services account to invite box, enter the email
address of the owner of the account that you want to invite,
similar to the following:
member222@example.com. Alternatively,
if you know the Amazon Web Services account ID number, then you can enter it
instead.
-
Type any text that you want into the Message to
include in the invitation email message box. This
text is included in the email that is sent to the owner of the
account.
-
Choose Send invitation. Amazon Organizations sends
the invitation to the account owner.
Expand the error message if indicated. If the error indicates that you exceeded your
account limits for the organization or that you can't add an
account because your organization is still initializing,
wait until one hour after you created the organization and
try again. If the error persists, contact Amazon
Support.
-
For the purposes of this tutorial, you now need to accept your
own invitation. Do one of the following to get to the
Invitations page in the console:
-
Open the email that Amazon sent from the management
account and choose the link to accept the invitation.
When prompted to sign in, do so as an administrator in
the invited member account.
-
Open the Amazon Organizations console and navigate to the
Invitations page.
-
On the Amazon Web Services accounts page, choose Accept and
then choose Confirm.
The invitation receipt could be delayed and you might need to wait before you can accept the invitation.
-
Sign out of your member account and sign in again as an
administrator in your management account.
Create a member account
In the steps in this section, you create an Amazon Web Services account that is automatically a
member of the organization. We refer to this account in the tutorial as
333333333333.
- Amazon Web Services Management Console
-
To create a member account
-
On the Amazon Organizations console, on the Amazon Web Services accounts page, choose
Add Amazon Web Services account.
-
On the Add an Amazon Web Services account page, choose Create an
Amazon Web Services account.
-
For Amazon Web Services account name, enter a name for
the account, such as MainApp
Account.
-
For Email address of the account's root
user, enter the email address of the individual
who is to receive communications on behalf of the account. This
value must be globally unique. No two accounts can have the same
email address. For example, you might use something like
mainapp@example.com.
-
For IAM role name, you can leave this
blank to automatically use the default role name of
OrganizationAccountAccessRole, or you can
supply your own name. This role enables you to access the new
member account when signed in as an IAM user in the management
account. For this tutorial, leave it blank to instruct Amazon Organizations
to create the role with the default name.
-
Choose Create Amazon Web Services account. You might
need to wait a short while and refresh the page to see the new
account appear on the Amazon Web Services accounts page.
If you get an error that indicates that you exceeded your
account limits for the organization or that you can't add an
account because your organization is still initializing,
wait until one hour after you created the organization and
try again. If the error persists, contact Amazon
Support.
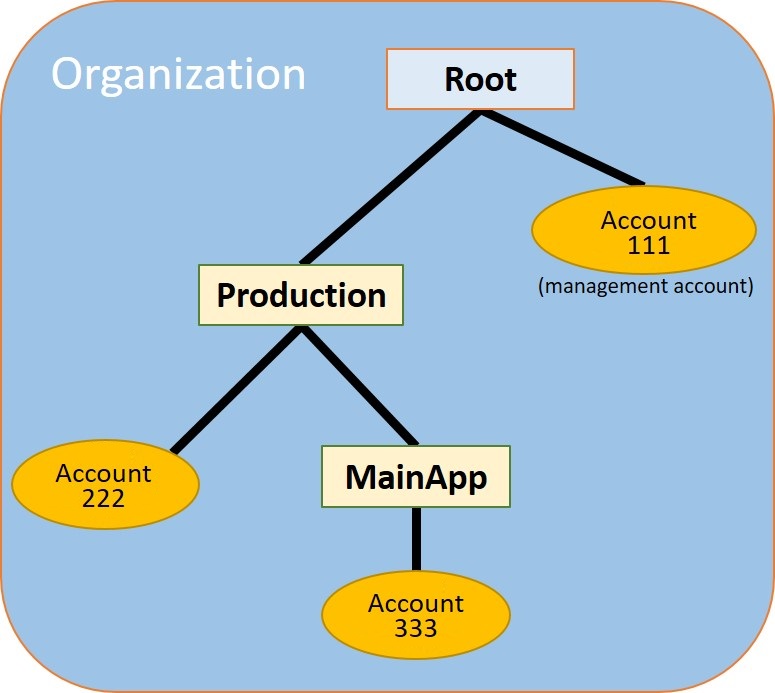
Step 2: Create the organizational units
In the steps in this section, you create organizational units (OUs) and place your
member accounts in them. When you're done, your hierarchy looks like the following
illustration. The management account remains in the root. One member account is moved to
the Production OU, and the other member account is moved to the MainApp OU, which is a
child of Production.
- Amazon Web Services Management Console
-
To create and populate the OUs
In the steps that follow, you interact with objects for which you
can choose either the name of the object itself, or the radio button
next to the object.
-
If you choose the name of the object, you open a new page
that displays the objects details.
-
If you choose the radio button next to the object, you are
identifying that object to be acted upon by another action,
such as choosing a menu option.
The steps that follow have you choose the radio button so that you
can then act on the associated object by making menu choices.
-
On the Amazon Organizations console navigate to the Amazon Web Services accounts page.
-
Choose the check box
 next to the Root
container.
next to the Root
container.
-
Choose the Actions dropdown, and then under
Organizational unit, choose
Create new.
-
On the Create organizational unit in Root
page, for the Organizational unit name, enter
Production and then choose
Create organizational unit.
-
Choose the check box
next to your new
Production OU.
-
Choose Actions, and then under
Organizational unit, choose
Create new.
-
On the Create organizational unit in
Production page, for the name of the second OU, enter
MainApp and then choose Create
organizational unit.
Now you can move your member accounts into these OUs.
-
Return to the Amazon Web Services accounts page, and then expand the tree under your
Production OU by choosing the triangle
 next to it. This displays the
MainApp OU as a child of
Production.
next to it. This displays the
MainApp OU as a child of
Production.
-
Next to 333333333333, choose the check box
(not its name), choose
Actions, and then under Amazon Web Services account, choose
Move.
-
On the Move Amazon Web Services account '333333333333'
page, choose the triangle next to Production to
expand it. Next to MainApp, choose the radio
button
 (not its name), and then choose Move
Amazon Web Services account.
(not its name), and then choose Move
Amazon Web Services account.
-
Next to 222222222222, choose the check box
(not its name), choose
Actions, and then under
Amazon Web Services account, choose
Move.
-
On the Move Amazon Web Services account '222222222222'
page, next to Production, choose the radio
button (not its name), and then choose Move
Amazon Web Services account.
Step 3: Create the service control policies
In the steps in this section, you create three service control policies (SCPs) and
attach them to the root and to the OUs to restrict what users in the organization's
accounts can do. The first SCP prevents anyone in any of the member accounts from
creating or modifying any Amazon CloudTrail logs that you configure. The management account isn't
affected by any SCP, so after you apply the CloudTrail SCP, you must create any logs from the
management account.
Enable the service control policy type for the organization
Before you can attach a policy of any type to a root or to any OU within a root,
you must enable the policy type for the organization. Policy types aren't enabled by
default. The steps in this section show you how to enable the service control policy
(SCP) type for your organization.
- Amazon Web Services Management Console
-
To enable SCPs for your organization
-
Navigate to the Policies page, and then choose
Service control policies.
-
On the Service control policies page, choose Enable service
control policies.
A green banner appears to inform you that you can now create
SCPs in your organization.
Create your SCPs
Now that service control policies are enabled in your organization, you can create
the three policies that you need for this tutorial.
- Amazon Web Services Management Console
-
To create the first SCP that blocks CloudTrail configuration actions
-
Navigate to the Policies page, and then choose
Service control policies.
-
On the Service control policies page, choose Create
policy.
-
For Policy name, enter Block
CloudTrail Configuration Actions.
-
In the Policy section, in the list of
services on the right, select CloudTrail for the service. Then choose
the following actions: AddTags,
CreateTrail,
DeleteTrail,
RemoveTags,
StartLogging,
StopLogging, and
UpdateTrail.
-
Still in the right pane, choose Add
resource and specify CloudTrail
and All Resources. Then choose
Add resource.
The policy statement on the left should look similar to the
following.
JSON
- JSON
-
{
    "Version":"2012-10-17",
    "Statement": [
        {
            "Sid": "Stmt1234567890123",
            "Effect": "Deny",
            "Action": [
                "cloudtrail:AddTags",
                "cloudtrail:CreateTrail",
                "cloudtrail:DeleteTrail",
                "cloudtrail:RemoveTags",
                "cloudtrail:StartLogging",
                "cloudtrail:StopLogging",
                "cloudtrail:UpdateTrail"
            ],
            "Resource": [
                "*"
            ]
        }
    ]
}
-
Choose Create policy.
The second policy defines an allow list of all
the services and actions that you want to enable for users and roles in the
Production OU. When you're done, users in the Production OU can access only the listed
services and actions.
- Amazon Web Services Management Console
-
To create the second policy that allows approved services for the production OU
-
From the Service control policies page, choose Create
policy.
-
For Policy name, enter Allow
List for All Approved Services.
-
Position your cursor in the right pane of the
Policy section and paste in a policy
like the following.
JSON
- JSON
-
{
    "Version":"2012-10-17",
    "Statement": [
        {
            "Sid": "Stmt1111111111111",
            "Effect": "Allow",
            "Action": [
                "ec2:*",
                "elasticloadbalancing:*",
                "codecommit:*",
                "cloudtrail:*",
                "codedeploy:*"
              ],
            "Resource": [ "*" ]
        }
    ]
}
-
Choose Create policy.
The final policy provides a deny list of services
that are blocked from use in the MainApp OU. For this tutorial, you block access to
Amazon DynamoDB in any accounts that are in the MainApp OU.
- Amazon Web Services Management Console
-
To create the third policy that denies access to services that can't be used in the MainApp OU
-
From the Service control policies page, choose Create
policy.
-
For Policy name, enter Deny
List for MainApp Prohibited Services.
-
In the Policy section on the left, select
Amazon DynamoDB for the service. For the
action, choose All actions.
-
Still in the left pane, choose Add
resource and specify DynamoDB
and All Resources. Then choose
Add resource.
The policy statement on the right updates to look similar to
the following.
JSON
- JSON
-
{
  "Version":"2012-10-17",
  "Statement": [
    {
      "Effect": "Deny",
      "Action": [ "dynamodb:*" ],
      "Resource": [ "*" ]
    }
  ]
}
-
Choose Create policy to save the
SCP.
Attach the SCPs to your OUs
Now that the SCPs exist and are enabled for your root, you can attach them to the
root and OUs.
- Amazon Web Services Management Console
-
To attach the policies to the root and the OUs
-
Navigate to the Amazon Web Services accounts page.
-
On the Amazon Web Services accounts page, choose Root (its
name, not the radio button) to navigate to its details
page.
-
On the Root details page, choose the
Policies tab, and then under
Service Control Policies, choose
Attach.
-
On the Attach a service control policy
page, choose the radio button next to the SCP named Block
CloudTrail Configuration Actions, and then choose
Attach. In this tutorial, you attach it
to the root so that it affects all member accounts to prevent
anyone from altering the way that you configured CloudTrail.
The Root details page,
Policies tab now shows that two SCPs
are attached to the root: the one you just attached and the
default FullAWSAccess SCP.
-
Navigate back to the Amazon Web Services accounts page, and choose the
Production OU (it's name, not the radio
button) to navigate to its details page.
-
On the Production OU's details page,
choose the Policies tab.
-
Under Service Control Policies, choose
Attach.
-
On the Attach a service control policy
page, choose the radio button next to Allow List for All
Approved Services, and then choose
Attach. This enables users or roles in
member accounts in the Production OU to
access the approved services.
-
Choose the Policies tab again to see that
two SCPs are attached to the OU: the one that you just attached
and the default FullAWSAccess SCP. However, because
the FullAWSAccess SCP is also an allow list that
allows all services and actions, you must now detach this SCP to
ensure that only your approved services are allowed.
-
To remove the default policy from the
Production OU, choose the radio button
to FullAWSAccess, choose
Detach, and then on the confirmation
dialog box, choose Detach policy.
After you remove this default policy, all member accounts
under the Production OU immediately lose
access to all actions and services that are not on the allow
list SCP that you attached in the preceding steps. Any requests
to use actions that aren't included in the Allow List
for All Approved Services SCP are denied. This is
true even if an administrator in an account grants access to
another service by attaching an IAM permissions policy to a
user in one of the member accounts.
-
Now you can attach the SCP named Deny List for MainApp
Prohibited services to prevent anyone in the accounts
in the MainApp OU from using any of the restricted
services.
To do this, navigate to the Amazon Web Services accounts page, choose the
triangle icon to expand the Production OU's
branch, and then choose the MainApp OU
(it's name, not the radio button) to navigate to its
contents.
-
On the MainApp details page, choose the
Policies tab.
-
Under Service Control Policies, choose
Attach, and then in the list of available policies, choose the
radio button next to Deny List for MainApp Prohibited
Services, and then choose Attach
policy.
Step 4: Testing your organization's policies
You now can sign in as a user in any of the member accounts and try to perform various
Amazon actions:
-
If you sign in as a user in the management account, you can perform any
operation that is allowed by your IAM permissions policies. The SCPs don't
affect any user or role in the management account, no matter which root or OU
the account is located in.
-
If you sign in as a user in account
222222222222, you can perform any actions that are allowed by the
allow list. Amazon Organizations denies any attempt to perform an action in any service that
isn't in the allow list. Also, Amazon Organizations denies any attempt to perform one of the
CloudTrail configuration actions.
-
If you sign in as a user in account 333333333333, you can perform
any actions that are allowed by the allow list and not blocked by the deny list.
Amazon Organizations denies any attempt to perform an action that isn't in the allow list
policy and any action that is in the deny list policy. Also, Amazon Organizations denies any
attempt to perform one of the CloudTrail configuration actions.