Creating a cluster with Amazon CloudFormation
Learn how to create a cluster with an Amazon ParallelCluster CloudFormation custom resource. For more information, see Amazon CloudFormation custom resource.
When using Amazon ParallelCluster, you only pay for the Amazon resources that are created when you create or update Amazon ParallelCluster images and clusters. For more information, see Amazon services used by Amazon ParallelCluster.
Prerequisites:
-
The Amazon CLI is installed and configured.
-
An IAM role with the permissions that are required to run the pcluster CLI.
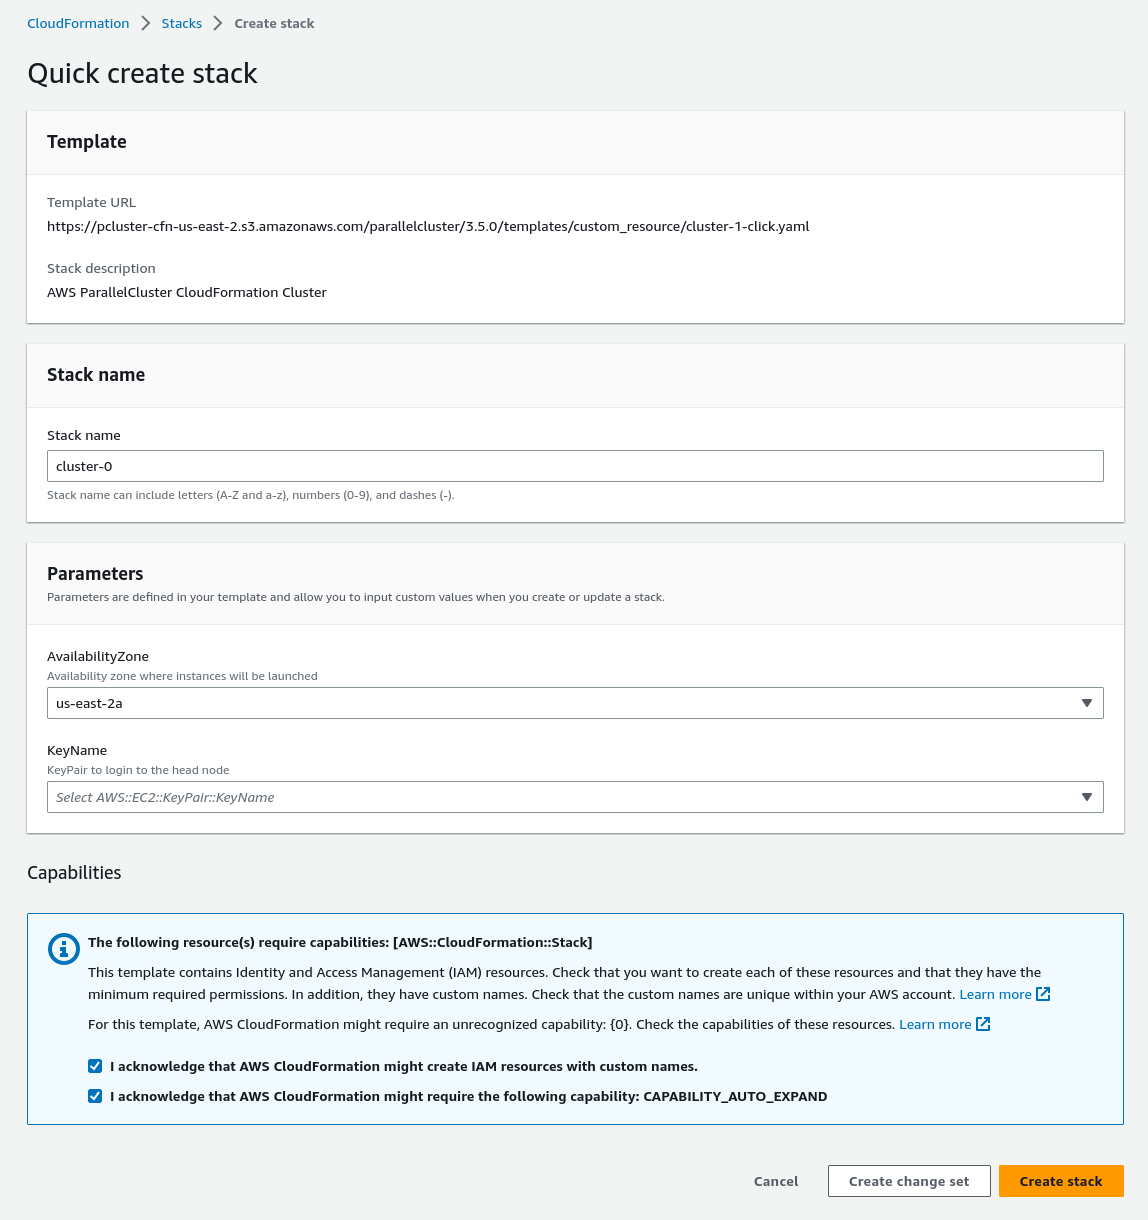
Cluster creation with a CloudFormation quick-create stack
In this tutorial, you use a quick-create stack to deploy a CloudFormation template that creates a cluster and the following Amazon resources:
-
A root CloudFormation stack created by using a CloudFormation quick-create stack.
-
Nested CloudFormation stacks that include default policies, default VPC set up, and a custom resource provider.
-
An example Amazon ParallelCluster cluster stack and a cluster that you can log in to and run jobs.
Create a cluster with Amazon CloudFormation
-
Sign in to the Amazon Web Services Management Console.
-
Open the CloudFormation quick-create link
to create the following resources in the CloudFormation console: -
A nested CloudFormation stack with a VPC with a public and private subnet for running the cluster head node and compute nodes, respectively.
-
A nested CloudFormation stack with an Amazon ParallelCluster custom resource for managing the cluster.
-
A nested CloudFormation stack with the default policies for managing the cluster.
-
A root CloudFormation stack for the nested stacks.
-
An Amazon ParallelCluster cluster with the Slurm scheduler and a defined number of compute nodes.
-
-
In the Quick create stack Parameters section, enter values for the following parameters:
-
For KeyName, enter the name of your Amazon EC2 key pair.
-
For AvailabilityZone, choose an AZ for your cluster nodes, for example,
us-east-1a.
-
-
Check the boxes to acknowledge each of the access capabilities at the bottom of the page.
-
Choose Create stack.
-
Wait for the CloudFormation stack to reach the
CREATE_COMPLETEstate.
Cluster creation with the Amazon CloudFormation Command Line Interface (CLI)
In this tutorial, you use the Amazon Command Line Interface (CLI) for CloudFormation to deploy a CloudFormation template that creates a cluster.
Create the following Amazon resources:
-
A root CloudFormation stack created by using a CloudFormation quick-create stack.
-
Nested CloudFormation stacks that include default policies, default VPC setup, and a custom resource provider.
-
An example Amazon ParallelCluster cluster stack and a cluster that you can log in to and run jobs.
Replace inputs highlighted in red, such as keypair, with your own values.
Create a cluster with Amazon CloudFormation
-
Create a CloudFormation template named
cluster_template.yamlwith the following content:AWSTemplateFormatVersion: '2010-09-09' Description: > AmazonParallelCluster CloudFormation Template Parameters: KeyName: Description: KeyPair to login to the head node Type: AWS::EC2::KeyPair::KeyName AvailabilityZone: Description: Availability zone where instances will be launched Type: AWS::EC2::AvailabilityZone::Name Default: us-east-2a Mappings: ParallelCluster: Constants: Version: 3.15.1 Resources: PclusterClusterProvider: Type: AWS::CloudFormation::Stack Properties: TemplateURL: !Sub - https://${AWS::Region}-aws-parallelcluster.s3.${AWS::Region}.${AWS::URLSuffix}/parallelcluster/${Version}/templates/custom_resource/cluster.yaml - { Version: !FindInMap [ParallelCluster, Constants, Version] } PclusterVpc: Type: AWS::CloudFormation::Stack Properties: Parameters: PublicCIDR: 10.0.0.0/24 PrivateCIDR: 10.0.16.0/20 AvailabilityZone: !Ref AvailabilityZone TemplateURL: !Sub - https://${AWS::Region}-aws-parallelcluster.s3.${AWS::Region}.${AWS::URLSuffix}/parallelcluster/${Version}/templates/networking/public-private-${Version}.cfn.json - { Version: !FindInMap [ParallelCluster, Constants, Version ] } PclusterCluster: Type: Custom::PclusterCluster Properties: ServiceToken: !GetAtt [ PclusterClusterProvider , Outputs.ServiceToken ] ClusterName: !Sub 'c-${AWS::StackName}' ClusterConfiguration: Image: Os: alinux2 HeadNode: InstanceType: t2.medium Networking: SubnetId: !GetAtt [ PclusterVpc , Outputs.PublicSubnetId ] Ssh: KeyName: !Ref KeyName Scheduling: Scheduler: slurm SlurmQueues: - Name: queue0 ComputeResources: - Name: queue0-cr0 InstanceType: t2.micro Networking: SubnetIds: - !GetAtt [ PclusterVpc , Outputs.PrivateSubnetId ] Outputs: HeadNodeIp: Description: The Public IP address of the HeadNode Value: !GetAtt [ PclusterCluster, headNode.publicIpAddress ] -
Run the following Amazon CLI command to deploy the CloudFormation stack for cluster creation and management.
$aws cloudformation deploy --template-file./cluster_template.yaml\ --stack-namemycluster\ --parameter-overrides KeyName=keypair\ AvailabilityZone=us-east-2b\ --capabilities CAPABILITY_NAMED_IAM CAPABILITY_AUTO_EXPAND
View CloudFormation cluster output
View the CloudFormation cluster output to obtain useful cluster details. The added ValidationMessages property
provides access to validation messages from cluster create and update operations.
-
Navigate to the CloudFormation console
and select the stack that includes your Amazon ParallelCluster custom resource. -
Choose Stack details, and select the Outputs tab.
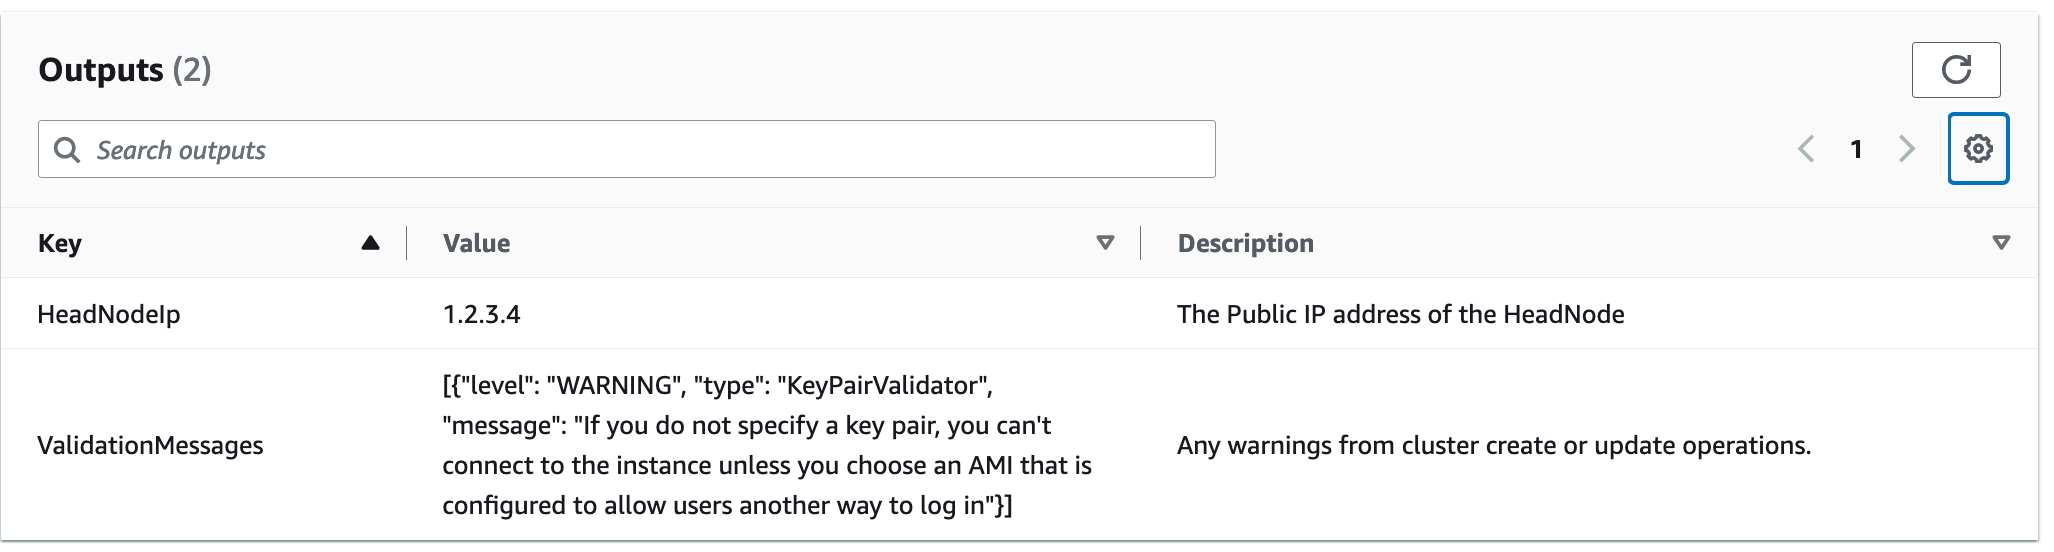
Validation messages might be truncated. For more information about how to retrieve logs, see Amazon ParallelCluster troubleshooting.
Access your cluster
Access the cluster.
ssh into the cluster head node
-
After the CloudFormation stack deployment is complete, obtain the IP address of the head node with the following command:
$HEAD_NODE_IP=$(aws cloudformation describe-stacks --stack-name=mycluster--query "Stacks|[0].Outputs[?OutputKey=='HeadNodeIp']|[0].OutputValue" --output=text)You can also retrieve the head node IP address from HeadNodeIp parameter in the cluster stack Outputs tab in the CloudFormation console.
You can find the head node IP address here because it was added in the
Outputssection of the cluster CloudFormation template, specifically for this example cluster. -
Connect to the cluster head node by running the following command:
$ssh -ikeyname.pemec2-user@$HEAD_NODE_IP
Clean up
Delete the cluster.
-
Run the following Amazon CLI command to delete the CloudFormation stack and cluster.
$aws cloudformation delete-stack --stack-name=mycluster -
Check the stack delete status by running the following command.
$aws cloudformation describe-stacks --stack-name=mycluster