Define a pipeline
To orchestrate your workflows with Amazon SageMaker Pipelines, you must generate a directed acyclic graph (DAG) in the form of a JSON pipeline definition. The DAG specifies the different steps involved in your ML process, such as data preprocessing, model training, model evaluation, and model deployment, as well as the dependencies and flow of data between these steps. The following topic shows you how to generate a pipeline definition.
You can generate your JSON pipeline definition using either the SageMaker Python SDK or the visual drag-and-drop Pipeline Designer feature in Amazon SageMaker Studio. The following image is a representation of the pipeline DAG that you create in this tutorial:
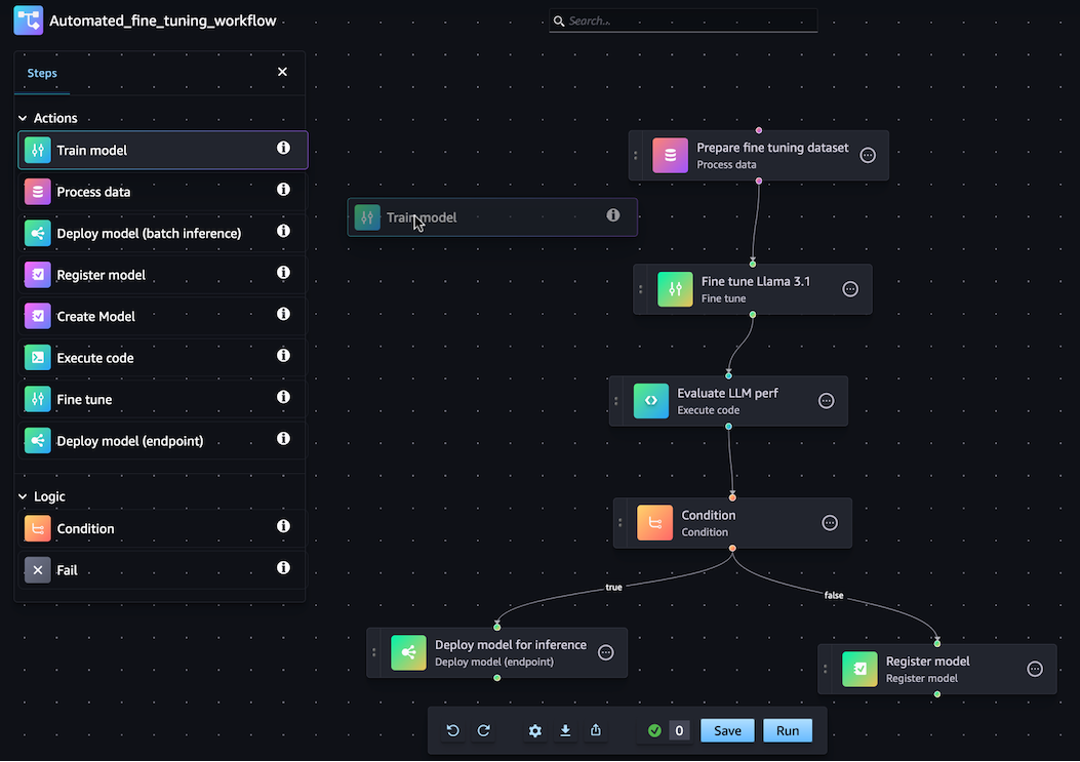
The pipeline that you define in the following sections solves a regression
problem to determine the age of an abalone based on its physical measurements. For a runnable
Jupyter notebook that includes the content in this tutorial, see Orchestrating Jobs with Amazon SageMaker Model Building Pipelines
Note
You can reference the model location as a property of the training step, as shown in the
end-to-end example CustomerChurn pipeline
Topics
The following walkthrough guides you through the steps to create a barebones pipeline using the drag-and-drop Pipeline Designer. If you need to pause or end your Pipeline editing session in the visual designer at any time, click on the Export option. This allows you to download the current definition of your Pipeline to your local environment. Later, when you want to resume the Pipeline editing process, you can import the same JSON definition file into the visual designer.
Create a Processing step
To create a data processing job step, do the following:
-
Open the Studio console by following the instructions in Launch Amazon SageMaker Studio.
-
In the left navigation pane, select Pipelines.
-
Choose Create.
-
Choose Blank.
-
In the left sidebar, choose Process data and drag it to the canvas.
-
In the canvas, choose the Process data step you added.
-
To add an input dataset, choose Add under Data (input) in the right sidebar and select a dataset.
-
To add a location to save output datasets, choose Add under Data (output) in the right sidebar and navigate to the destination.
-
Complete the remaining fields in the right sidebar. For information about the fields in these tabs, see sagemaker.workflow.steps.ProcessingStep
.
Create a Training step
To set up a model training step, do the following:
-
In the left sidebar, choose Train model and drag it to the canvas.
-
In the canvas, choose the Train model step you added.
-
To add an input dataset, choose Add under Data (input) in the right sidebar and select a dataset.
-
To choose a location to save your model artifacts, enter an Amazon S3 URI in the Location (S3 URI) field, or choose Browse S3 to navigate to the destination location.
-
Complete the remaining fields in the right sidebar. For information about the fields in these tabs, see sagemaker.workflow.steps.TrainingStep
. -
Click and drag the cursor from the Process data step you added in the previous section to the Train model step to create an edge connecting the two steps.
Create a model package with a Register model step
To create a model package with a model registration step, do the following:
-
In the left sidebar, choose Register model and drag it to the canvas.
-
In the canvas, choose the Register model step you added.
-
To select a model to register, choose Add under Model (input).
-
Choose Create a model group to add your model to a new model group.
-
Complete the remaining fields in the right sidebar. For information about the fields in these tabs, see sagemaker.workflow.step_collections.RegisterModel
. -
Click and drag the cursor from the Train model step you added in the previous section to the Register model step to create an edge connecting the two steps.
Deploy the model to an endpoint with a Deploy model (endpoint) step
To deploy your model using a model deployment step, do the following:
-
In the left sidebar, choose Deploy model (endpoint) and drag it to the canvas.
-
In the canvas, choose the Deploy model (endpoint) step you added.
-
To choose a model to deploy, choose Add under Model (input).
-
Choose the Create endpoint radio button to create a new endpoint.
-
Enter a Name and Description for your endpoint.
-
Click and drag the cursor from the Register model step you added in the previous section to the Deploy model (endpoint) step to create an edge connecting the two steps.
-
Complete the remaining fields in the right sidebar.
Define the Pipeline parameters
You can configure a set of Pipeline parameters whose values can be updated for every execution. To define the pipeline parameters and set the default values, click on the gear icon at the bottom of the visual designer.
Save Pipeline
After you have entered all the required information to create your pipeline, click on Save at the bottom of the visual designer. This validates your pipeline for any potential errors at runtime and notifies you. The Save operation won't succeed until you address all errors flagged by the automated validations checks. If you want to resume editing at a later point, you can save your in-progress pipeline as a JSON definition in your local environment. You can export your Pipeline as a JSON definition file by clicking on the Export button at the bottom of the visual designer. Later, to resume updating your Pipeline, upload that JSON definition file by clicking on the Import button.
Prerequisites
To run the following tutorial, complete the following:
-
Set up your notebook instance as outlined in Create a notebook instance
. This gives your role permissions to read and write to Amazon S3, and create training, batch transform, and processing jobs in SageMaker AI. -
Grant your notebook permissions to get and pass its own role as shown in Modifying a role permissions policy
. Add the following JSON snippet to attach this policy to your role. Replace <your-role-arn>with the ARN used to create your notebook instance. -
Trust the SageMaker AI service principal by following the steps in Modifying a role trust policy
. Add the following statement fragment to the trust relationship of your role: { "Sid": "", "Effect": "Allow", "Principal": { "Service": "sagemaker.amazonaws.com" }, "Action": "sts:AssumeRole" }
Set up your environment
Create a new SageMaker AI session using the following code block. This returns the role ARN for the session. This role ARN should be the execution role ARN that you set up as a prerequisite.
import boto3
import sagemaker
from sagemaker.core.workflow.pipeline_context import PipelineSession
from sagemaker.core.helper.session_helper import Session, get_execution_role

region = boto3.Session().region_name
sagemaker_session = Session()
role = get_execution_role()
default_bucket = sagemaker_session.default_bucket()

pipeline_session = PipelineSession()

model_package_group_name = f"AbaloneModelPackageGroupName"
Create a pipeline
Important
Custom IAM policies that allow Amazon SageMaker Studio or Amazon SageMaker Studio Classic to create Amazon SageMaker resources must also grant permissions to add tags to those resources. The permission to add tags to resources is required because Studio and Studio Classic automatically tag any resources they create. If an IAM policy allows Studio and Studio Classic to create resources but does not allow tagging, "AccessDenied" errors can occur when trying to create resources. For more information, see Provide permissions for tagging SageMaker AI resources.
Amazon managed policies for Amazon SageMaker AI that give permissions to create SageMaker resources already include permissions to add tags while creating those resources.
Run the following steps from your SageMaker AI notebook instance to create a pipeline that includes steps for preprocessing, training, evaluation, conditional evaluation, and model registration.
Note
You can use ExecutionVariables
Step 1: Download the dataset
This notebook uses the UCI Machine Learning Abalone Dataset. The dataset contains the following features:
-
length– The longest shell measurement of the abalone. -
diameter– The diameter of the abalone perpendicular to its length. -
height– The height of the abalone with meat in the shell. -
whole_weight– The weight of the whole abalone. -
shucked_weight– The weight of the meat removed from the abalone. -
viscera_weight– The weight of the abalone viscera after bleeding. -
shell_weight– The weight of the abalone shell after meat removal and drying. -
sex– The sex of the abalone. One of 'M', 'F', or 'I', where 'I' is an infant abalone. -
rings– The number of rings in the abalone shell.
The number of rings in the abalone shell is a good approximation for its age using
the formula age=rings + 1.5. However, getting this number is a
time-consuming task. You must cut the shell through the cone, stain the section, and
count the number of rings through a microscope. However, the other physical measurements
are easier to get. This notebook uses the dataset to build a predictive model of the
variable rings using the other physical measurements.
To download the dataset
-
Download the dataset into your account's default Amazon S3 bucket.
!mkdir -p data local_path = "data/abalone-dataset.csv" s3 = boto3.resource("s3") s3.Bucket(f"sagemaker-servicecatalog-seedcode-{region}").download_file( "dataset/abalone-dataset.csv", local_path ) base_uri = f"s3://{default_bucket}/abalone" input_data_uri = sagemaker.s3.S3Uploader.upload( local_path=local_path, desired_s3_uri=base_uri, ) print(input_data_uri) -
Download a second dataset for batch transformation after your model is created.
local_path = "data/abalone-dataset-batch.csv"

s3 = boto3.resource("s3")
s3.Bucket(f"sagemaker-servicecatalog-seedcode-{region}").download_file(
    "dataset/abalone-dataset-batch",
    local_path
)

base_uri = f"s3://{default_bucket}/abalone"
batch_data_uri = sagemaker.s3.S3Uploader.upload(
    local_path=local_path,
    desired_s3_uri=base_uri,
)
print(batch_data_uri)
Step 2: Define pipeline parameters
from sagemaker.core.workflow.parameters import (
    ParameterInteger,
    ParameterString,
)

processing_instance_count = ParameterInteger(name="ProcessingInstanceCount", default_value=1)
model_approval_status = ParameterString(name="ModelApprovalStatus", default_value="PendingManualApproval")
input_data = ParameterString(name="InputData", default_value=input_data_uri)
batch_data = ParameterString(name="BatchData", default_value=batch_data_uri)
Step 3: Define a processing step for feature engineering
This section shows how to create a processing step to prepare the data from the dataset for training.
To create a processing step
-
Create an instance of a processor to pass in to the processing step.
from sagemaker.core.processing import Processor from sagemaker.core import image_uris framework_version = "0.23-1" sklearn_image_uri = image_uris.retrieve( framework="sklearn", region=region, version=framework_version, instance_type="ml.m5.xlarge" ) sklearn_processor = Processor( image_uri=sklearn_image_uri, instance_type="ml.m5.xlarge", instance_count=processing_instance_count, base_job_name="sklearn-abalone-process", sagemaker_session=pipeline_session, role=role, ) -
Create a processing step.
from sagemaker.core.processing import ProcessingInput, ProcessingOutput
from sagemaker.mlops.workflow.steps import ProcessingStep

processor_args = sklearn_processor.run(
    inputs=[
      ProcessingInput(source=input_data, destination="/opt/ml/processing/input"),
    ],
    outputs=[
        ProcessingOutput(output_name="train", source="/opt/ml/processing/train"),
        ProcessingOutput(output_name="validation", source="/opt/ml/processing/validation"),
        ProcessingOutput(output_name="test", source="/opt/ml/processing/test")
    ],
    code="abalone/preprocessing.py",
)

step_process = ProcessingStep(name="AbaloneProcess", step_args=processor_args)
Step 4: Define a training step
This section shows how to use the SageMaker AI XGBoost Algorithm to train a model on the training data output from the processing steps.
To define a training step
-
Specify the model path where you want to save the models from training.
model_path = f"s3://{default_bucket}/AbaloneTrain" -
Configure a training estimator for the XGBoost algorithm and the input dataset.
from sagemaker.train import ModelTrainer from sagemaker.train.configs import Compute, OutputDataConfig from sagemaker.core import image_uris image_uri = image_uris.retrieve( framework="xgboost", region=region, version="1.0-1", py_version="py3", instance_type="ml.m5.xlarge" ) xgb_train = ModelTrainer( training_image=image_uri, compute=Compute(instance_type="ml.m5.xlarge", instance_count=1), output_data_config=OutputDataConfig(s3_output_path=model_path), hyperparameters={ "objective": "reg:linear", "num_round": "50", "max_depth": "5", "eta": "0.2", "gamma": "4", "min_child_weight": "6", "subsample": "0.7", "silent": "0" }, sagemaker_session=pipeline_session, role=role, ) -
Create a
TrainingStepusing the training instance and properties of theProcessingStep.from sagemaker.train.configs import InputData from sagemaker.mlops.workflow.steps import TrainingStep train_args = xgb_train.train( input_data_config=[ InputData( channel_name="train", data_source=step_process.properties.ProcessingOutputConfig.Outputs[ "train" ].S3Output.S3Uri, content_type="text/csv" ), InputData( channel_name="validation", data_source=step_process.properties.ProcessingOutputConfig.Outputs[ "validation" ].S3Output.S3Uri, content_type="text/csv" ) ], ) step_train = TrainingStep(name="AbaloneTrain", step_args=train_args)
Step 5: Define a processing step for model evaluation
This section shows how to create a processing step to evaluate the accuracy of the model.
To define a processing step for model evaluation
-
Create an instance of a
Processorfor evaluation.from sagemaker.core.processing import Processor script_eval = Processor( image_uri=image_uri, command=["python3"], instance_type="ml.m5.xlarge", instance_count=1, base_job_name="script-abalone-eval", sagemaker_session=pipeline_session, role=role, ) -
Create a
ProcessingStepusing the processor instance, the input and output channels, and theevaluation.pyscript.from sagemaker.core.workflow.properties import PropertyFile evaluation_report = PropertyFile( name="EvaluationReport", output_name="evaluation", path="evaluation.json" ) eval_args = script_eval.run( inputs=[ ProcessingInput( source=step_train.properties.ModelArtifacts.S3ModelArtifacts, destination="/opt/ml/processing/model" ), ProcessingInput( source=step_process.properties.ProcessingOutputConfig.Outputs[ "test" ].S3Output.S3Uri, destination="/opt/ml/processing/test" ) ], outputs=[ ProcessingOutput(output_name="evaluation", source="/opt/ml/processing/evaluation"), ], code="abalone/evaluation.py", ) step_eval = ProcessingStep( name="AbaloneEval", step_args=eval_args, property_files=[evaluation_report], )
Step 6: Define a CreateModelStep for batch transformation
This section shows how to create a SageMaker AI model from the output of the training step.
To define a CreateModelStep for batch transformation
-
Create a SageMaker AI model and model step.
from sagemaker.serve import ModelBuilder
from sagemaker.mlops.workflow.model_step import ModelStep

model_builder = ModelBuilder(
    image_uri=image_uri,
    s3_model_data_url=step_train.properties.ModelArtifacts.S3ModelArtifacts,
    role_arn=role,
    sagemaker_session=pipeline_session,
)

step_create_model = ModelStep(
    name="AbaloneCreateModel",
    step_args=model_builder.build(),
)
Step 7: Define a TransformStep to perform batch transformation
This section shows how to create a TransformStep to perform batch transformation on a dataset after the model is trained.
To define a TransformStep to perform batch transformation
-
Create a transformer instance and a
TransformStep.from sagemaker.core.transformer import Transformer from sagemaker.mlops.workflow.steps import TransformStep transformer = Transformer( model_name=step_create_model.properties.ModelName, instance_type="ml.m5.xlarge", instance_count=1, output_path=f"s3://{default_bucket}/AbaloneTransform", sagemaker_session=pipeline_session, ) transform_args = transformer.transform(data=batch_data) step_transform = TransformStep( name="AbaloneTransform", step_args=transform_args, )
Step 8: Define a RegisterModel step to create a model package
This section shows how to register a model. The result is a model package for inference.
To define a model registration step to create a model package
-
Construct a model registration step.
from sagemaker.core.model_metrics import MetricsSource, ModelMetrics
from sagemaker.mlops.workflow.model_step import ModelStep
from sagemaker.serve import ModelBuilder

model_metrics = ModelMetrics(
    model_statistics=MetricsSource(
        s3_uri="{}/evaluation.json".format(
            step_eval.arguments["ProcessingOutputConfig"]["Outputs"][0]["S3Output"]["S3Uri"]
        ),
        content_type="application/json"
    )
)

model_builder = ModelBuilder(
    image_uri=image_uri,
    s3_model_data_url=step_train.properties.ModelArtifacts.S3ModelArtifacts,
    role_arn=role,
    sagemaker_session=pipeline_session,
)

register_args = model_builder.register(
    content_types=["text/csv"],
    response_types=["text/csv"],
    inference_instances=["ml.t2.medium", "ml.m5.xlarge"],
    transform_instances=["ml.m5.xlarge"],
    model_package_group_name=model_package_group_name,
    approval_status=model_approval_status,
    model_metrics=model_metrics
)

step_register = ModelStep(
    name="AbaloneRegisterModel",
    step_args=register_args,
)
Step 9: Define a condition step to verify model accuracy
A ConditionStep allows Pipelines to support conditional running in your pipeline DAG based on the condition of step properties.
To define a condition step to verify model accuracy
-
Define a condition and construct a
ConditionStep.from sagemaker.core.workflow.conditions import ConditionLessThanOrEqualTo from sagemaker.mlops.workflow.condition_step import ConditionStep from sagemaker.core.workflow.functions import JsonGet cond_lte = ConditionLessThanOrEqualTo( left=JsonGet( step_name=step_eval.name, property_file=evaluation_report, json_path="regression_metrics.mse.value" ), right=6.0 ) step_cond = ConditionStep( name="AbaloneMSECond", conditions=[cond_lte], if_steps=[step_register, step_create_model, step_transform], else_steps=[], )
Step 10: Create a pipeline
Now that you've created all of the steps, combine them into a pipeline.
To create a pipeline
-
Define the following for your pipeline:
name,parameters, andsteps.from sagemaker.mlops.workflow.pipeline import Pipeline pipeline_name = f"AbalonePipeline" pipeline = Pipeline( name=pipeline_name, parameters=[ processing_instance_count, model_approval_status, input_data, batch_data, ], steps=[step_process, step_train, step_eval, step_cond], ) -
(Optional) Examine the JSON pipeline definition to ensure that it's well-formed.
import json

json.loads(pipeline.definition())
This pipeline definition is ready to submit to SageMaker AI. In the next tutorial, you submit this pipeline to SageMaker AI and start a run.
You can also use boto3
{'Version': '2020-12-01',
 'Metadata': {},
 'Parameters': [{'Name': 'ProcessingInstanceType',
   'Type': 'String',
   'DefaultValue': 'ml.m5.xlarge'},
  {'Name': 'ProcessingInstanceCount', 'Type': 'Integer', 'DefaultValue': 1},
  {'Name': 'TrainingInstanceType',
   'Type': 'String',
   'DefaultValue': 'ml.m5.xlarge'},
  {'Name': 'ModelApprovalStatus',
   'Type': 'String',
   'DefaultValue': 'PendingManualApproval'},
  {'Name': 'ProcessedData',
   'Type': 'String',
   'DefaultValue': 'S3_URL',
{'Name': 'InputDataUrl',
   'Type': 'String',
   'DefaultValue': 'S3_URL',
 'PipelineExperimentConfig': {'ExperimentName': {'Get': 'Execution.PipelineName'},
  'TrialName': {'Get': 'Execution.PipelineExecutionId'}},
 'Steps': [{'Name': 'ReadTrainDataFromFS',
   'Type': 'Processing',
   'Arguments': {'ProcessingResources': {'ClusterConfig': {'InstanceType': 'ml.m5.4xlarge',
      'InstanceCount': 2,
      'VolumeSizeInGB': 30}},
    'AppSpecification': {'ImageUri': 'IMAGE_URI',
     'ContainerArguments': [....]},
    'RoleArn': 'ROLE',
      'ProcessingInputs': [...],
    'ProcessingOutputConfig': {'Outputs': [.....]},
    'StoppingCondition': {'MaxRuntimeInSeconds': 86400}},
   'CacheConfig': {'Enabled': True, 'ExpireAfter': '30d'}},
   ...
   ...
   ...
  }
Next step: Run a pipeline