View and edit alerts - Amazon SageMaker
Services or capabilities described in Amazon Web Services documentation might vary by Region. To see the differences applicable to the China Regions, see Getting Started with Amazon Web Services in China (PDF).

View and edit alerts

The Model Dashboard displays alerts you configured in Amazon CloudWatch. You can modify the alert criteria within the dashboard itself. The alert criteria depend upon two parameters:

  • Datapoints to alert: Within the evaluation period, how many execution failures raise an alert.

  • Evaluation period: The number of most recent monitoring executions to consider when evaluating alert status.

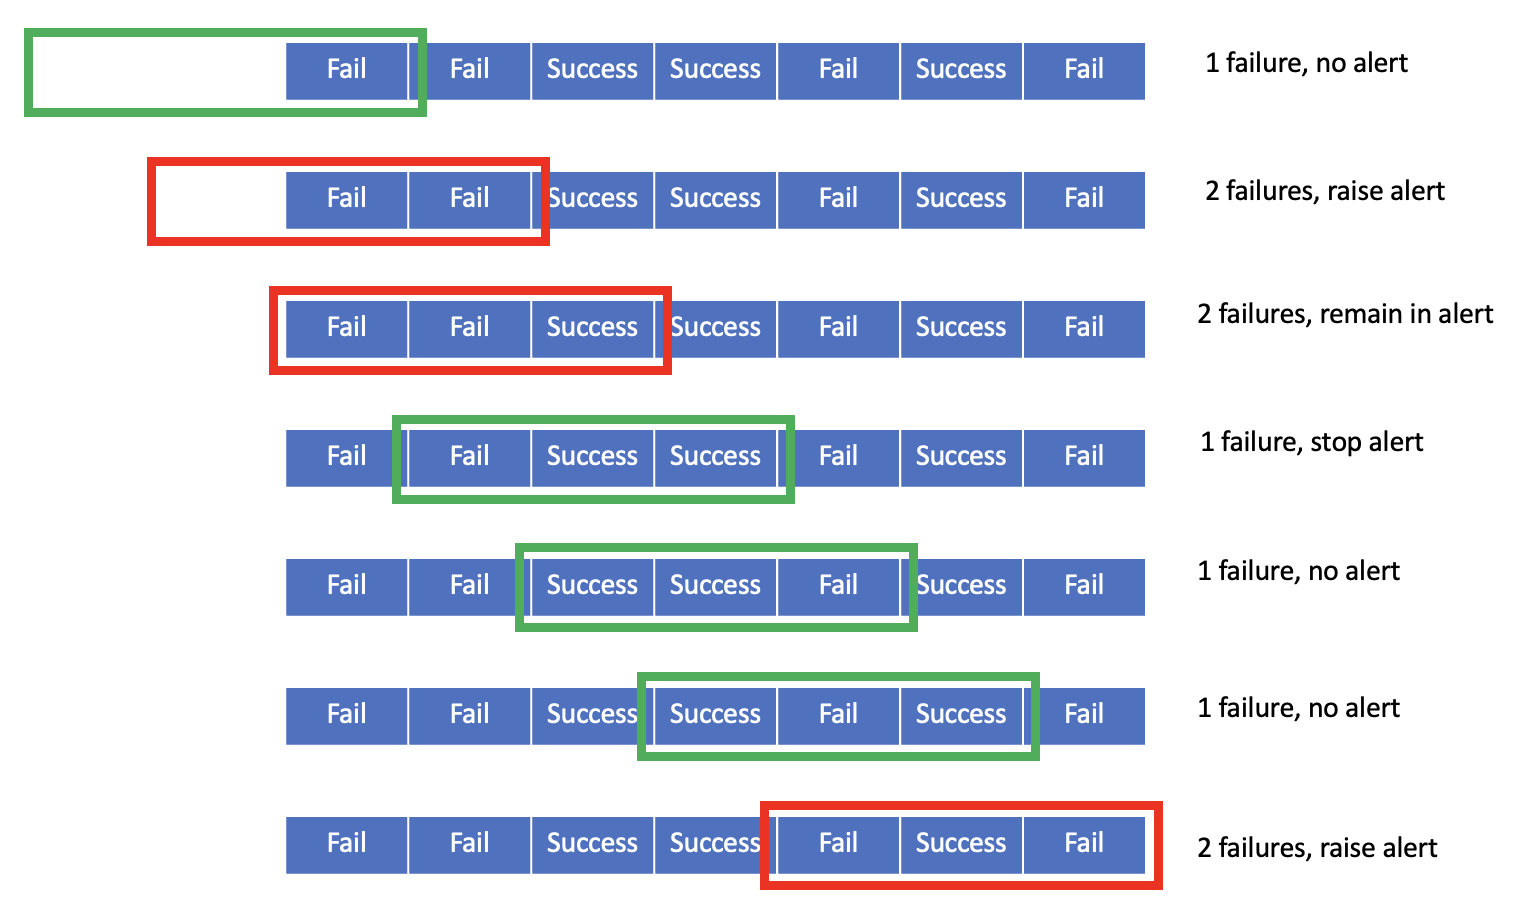
The following image shows an example scenario of a series of Model Monitor executions in which we set a hypothetical Evaluation period of 3 and a Datapoints to alert value of 2. After every monitoring execution, the number of failures are counted within the Evaluation period of 3. If the number of failures meets or exceeds the Datapoints to alert value 2, the monitor raises an alert and remains in alert status until the number of failures within the Evaluation period becomes less than 2 in subsequent iterations. In the image, the evaluation windows are red when the monitor raises an alert or remains in alert status, and green otherwise.

Note that even if the evaluation window size has not reached the Evaluation period of 3, as shown in the first 2 rows of the image, the monitor still raises an alert if the number of failures meets or exceeds the Datapoints to alert value of 2.

A sequence of seven example monitoring executions. After every monitoring execution, the evaluation window slides forward by another execution.

Within the monitor details page, you can view your alert history, edit existing alert criteria, and view job reports to help you debug alert failures. For instructions about how to view alert history or job reports for failed monitoring executions, see View alert history or job reports. For instructions about how to edit alert criteria, see Edit alert criteria.

View alert history or job reports

To view alert history or job reports of failed executions, complete the following steps:
  1. Open the SageMaker console.

  2. Choose Governance in the left panel.

  3. Choose Model Dashboard.

  4. In the Models section of the Model Dashboard, select the model name of the alert history you want to view.

  5. In the Schedule name column, select the monitor name of the alert history you want to view.

  6. To view alert history, select the Alert history tab.

  7. (optional) To view job reports of monitoring executions, complete the following steps:

    1. In the Alert history tab, choose View executions for the alert you want to investigate.

    2. In the Execution history table, choose View report of the monitoring execution you want to investigate.

      The report displays the following information:
      • Feature: The user-defined ML feature monitored

      • Constraint: The specific check within the monitor

      • Violation details: Information about why the constraint was violated

Edit alert criteria

To edit an alert in the Model Dashboard, complete the following steps:
  1. Open the SageMaker console.

  2. Choose Governance in the left panel.

  3. Choose Model Dashboard.

  4. In the Models section of the Model Dashboard, select the model name of the alert you want to modify.

  5. Choose the radio box next to the monitor schedule of the alert you want to modify.

  6. Choose Edit Alert in the Monitor schedule section.

  7. (optional) Change Datapoints to alert if you want to change the number of failures within the Evaluation period that initiate an alert.

  8. (optional) Change Evaluation period if you want to change the number of most recent monitoring executions to consider when evaluating alert status.