Quickstart: Create a SageMaker AI sandbox domain to launch Amazon EMR clusters in Studio
This section walks you through the quick set up of a complete test environment in Amazon SageMaker Studio. You will be creating a new Studio domain that lets users launch new Amazon EMR clusters directly from Studio. The steps provide an example notebook that you can connect to an Amazon EMR cluster to start running Spark workloads. Using this notebook, you will build a Retrieval Augmented Generation System (RAG) using Amazon EMR Spark distributed processing and OpenSearch vector database.
Note
To get started, sign in to the Amazon Management Console using an Amazon Identity and Access Management (IAM) user account with admin permissions. For information on how to sign up for an Amazon account and create a user with administrative access, see Complete Amazon SageMaker AI prerequisites.
To set up your Studio test environment and start running Spark jobs:
Step 1: Create a SageMaker AI domain for launching Amazon EMR clusters in Studio
In the following steps, you apply a Amazon CloudFormation stack to automatically create a new SageMaker AI
domain. The stack also creates a user profile and configures the needed environment and
permissions. The SageMaker AI domain is configured to let you directly launch Amazon EMR clusters
from Studio. For this example, the Amazon EMR clusters are created in the same Amazon
account as SageMaker AI without authentication. You can find additional Amazon CloudFormation stacks supporting
various authentication methods like Kerberos in the getting_started
Note
SageMaker AI allows 5 Studio domains per Amazon account and Amazon Web Services Region by default. Ensure your account has no more than 4 domains in your region before you create your stack.
Follow these steps to set up a SageMaker AI domain for launching Amazon EMR clusters from Studio.
-
Download the raw file of this Amazon CloudFormation template
from the sagemaker-studio-emrGitHub repository. -
Go to the Amazon CloudFormation console: https://console.amazonaws.cn/cloudformation
-
Choose Create stack and select With new resources (standard) from the drop down menu.
-
In Step 1:
-
In the Prepare template section, select Choose an existing template.
-
In the Specify template section, choose Upload a template file.
-
Upload the downloaded Amazon CloudFormation template and choose Next.
-
-
In Step 2, enter a Stack name and a SageMakerDomainName then choose Next.
-
In Step 3, keep all default values and choose Next.
-
In Step 4, check the box to acknowledge resource creation and choose Create stack. This creates a Studio domain in your account and region.
Step 2: Launch a new Amazon EMR cluster from Studio UI
In the following steps, you create a new Amazon EMR cluster from the Studio UI.
-
Go to the SageMaker AI console at https://console.amazonaws.cn/sagemaker/
and choose Domains in the left menu. -
Click on your domain name GenerativeAIDomain to open the Domain details page.
-
Launch Studio from the user profile
genai-user. -
In the left navigation pane, go to Data then Amazon EMR Clusters.
-
On the Amazon EMR clusters page, choose Create. Select the template SageMaker Studio Domain No Auth EMR created by the Amazon CloudFormation stack and then choose Next.
-
Enter a name for the new Amazon EMR cluster. Optionally update other parameters such as the instance type of core and master nodes, idle timeout, or number of core nodes.
-
Choose Create resource to launch the new Amazon EMR cluster.
After creating the Amazon EMR cluster, follow the status on the EMR Clusters page. When the status changes to
Running/Waiting, your Amazon EMR cluster is ready to use in Studio.
Step 3: Connect a JupyterLab notebook to the Amazon EMR cluster
In the following steps, you connect a notebook in JupyterLab to your running Amazon EMR cluster. For this example, you import a notebook allowing you to build a Retrieval Augmented Generation (RAG) system using Amazon EMR Spark distributed processing and OpenSearch vector database.
-
Launch JupyterLab
From Studio, launch the JupyterLab application.
-
Create a private space
If you have not created a space for your JupyterLab application, choose Create a JupyterLab space. Enter a name for the space, and keep the space as Private. Leave all other settings at their default values, and then choose Create space.
Otherwise, run your JupyterLab space to launch a JupyterLab application.
-
Deploy your LLM and embedding models for inference
-
From the top menu, choose File, New, and then Terminal.
-
In the terminal, run the following command.
wget --no-check-certificate https://raw.githubusercontent.com/aws-samples/sagemaker-studio-foundation-models/main/lab-00-setup/Lab_0_Warm_Up_Deploy_EmbeddingModel_Llama2_on_Nvidia.ipynb
mkdir AWSGuides
cd AWSGuides
wget --no-check-certificate https://raw.githubusercontent.com/aws-samples/sagemaker-studio-foundation-models/main/lab-03-rag/AWSGuides/AmazonSageMakerDeveloperGuide.pdf
wget --no-check-certificate https://raw.githubusercontent.com/aws-samples/sagemaker-studio-foundation-models/main/lab-03-rag/AWSGuides/EC2DeveloperGuide.pdf
wget --no-check-certificate https://raw.githubusercontent.com/aws-samples/sagemaker-studio-foundation-models/main/lab-03-rag/AWSGuides/S3DeveloperGuide.pdf
This retrieves the the
Lab_0_Warm_Up_Deploy_EmbeddingModel_Llama2_on_Nvidia.ipynbnotebook to your local directory and downloads three PDF files into a localAWSGuidesfolder. -
Open
lab-00-setup/Lab_0_Warm_Up_Deploy_EmbeddingModel_Llama2_on_Nvidia.ipynb, keep thePython 3 (ipykernel)kernel, and run each cell.Warning
In the Llama 2 License Agreement section, ensure to accept the Llama2 EULA before you continue.
The notebook deploys two models,
Llama 2andall-MiniLM-L6-v2 Models, onml.g5.2xlargefor inference.The deployment of the models and the creation of the endpoints may take some time.
-
-
Open your main notebook
In JupyterLab, open your terminal and run the following command.
cd ..
wget --no-check-certificate https://raw.githubusercontent.com/aws-samples/sagemaker-studio-foundation-models/main/lab-03-rag/Lab_3_RAG_on_SageMaker_Studio_using_EMR.ipynb
You should see the additional
Lab_3_RAG_on_SageMaker_Studio_using_EMR.ipynbnotebook in the left panel of JupyterLab. -
Choose a
PySparkkernelOpen your
Lab_3_RAG_on_SageMaker_Studio_using_EMR.ipynbnotebook and ensure that you are using theSparkMagic PySparkkernel. You can switch kernel at the top right of your notebook. Choose the current kernel name to open up a kernel selection modal, and then chooseSparkMagic PySpark. -
Connect your notebook to the cluster
-
At the top right of your notebook, choose Cluster. This action opens a modal window that lists all of the running clusters that you have permission to access.
-
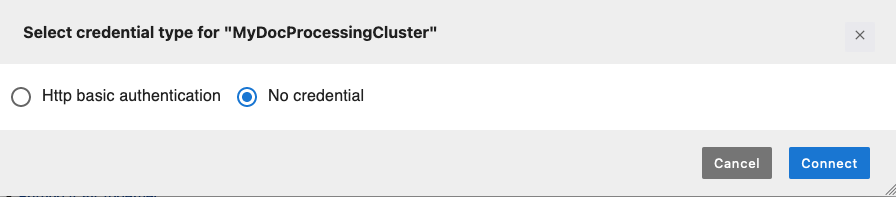
Select your cluster then choose Connect. A new credential type selection modal window opens up.
-
Choose No credential and then Connect.
-
A notebook cell automatically populates and runs. The notebook cell loads the
sagemaker_studio_analytics_extension.magicsextension, which provides functionality to connect to the Amazon EMR cluster. It then uses the%sm_analyticsmagic command to initiate the connection to your Amazon EMR cluster and the Spark application.Note
Ensure that the connection string to your Amazon EMR cluster has an authentication type set to
None. This is illustrated by the value--auth-type Nonein the following example. You can modify the field if necessary.%load_ext sagemaker_studio_analytics_extension.magics %sm_analytics emr connect --verify-certificate False --cluster-idyour-cluster-id--auth-typeNone--language python -
Once you successfully establish the connection, your connection cell output message should display your
SparkSessiondetails including your cluster ID,YARNapplication ID, and a link to the Spark UI to monitor your Spark jobs.
-
You are ready to use the Lab_3_RAG_on_SageMaker_Studio_using_EMR.ipynb
notebook. This example notebook runs distributed PySpark workloads for building a RAG
system using LangChain and OpenSearch.
Step 4: Clean up your Amazon CloudFormation stack
After you are finished, make sure to terminate your two endpoints and delete your Amazon CloudFormation stack to prevent continued charges. Deleting the stack cleans up all the resources that were provisioned by the stack.
To delete your Amazon CloudFormation stack when you are done with it
-
Go to the Amazon CloudFormation console: https://console.amazonaws.cn/cloudformation
-
Select the stack you want to delete. You can search for it by name or find it in the list of stacks.
-
Click the Delete button to finalize deleting the stack and then Delete again to acknowledge that this will delete all resources created by the stack.
Wait for the stack deletion to complete. This can take a few minutes. Amazon CloudFormation automatically cleans up all resources defined in the stack template.
-
Verify that all resources created by the stack have been deleted. For example, check for any leftover Amazon EMR cluster.
To remove the API endpoints for a model
-
Go to the SageMaker AI console: https://console.amazonaws.cn/sagemaker/
. -
In the left navigation pane, choose Inference and then Endpoints.
-
Select the endpoint
hf-allminil6v2-embedding-epand then choose Delete in the Actions drop down list. Repeat the step for the endpointmeta-llama2-7b-chat-tg-ep.