The Amazon SDK for JavaScript V3 API
Reference Guide
Building an Amazon Lex chatbot
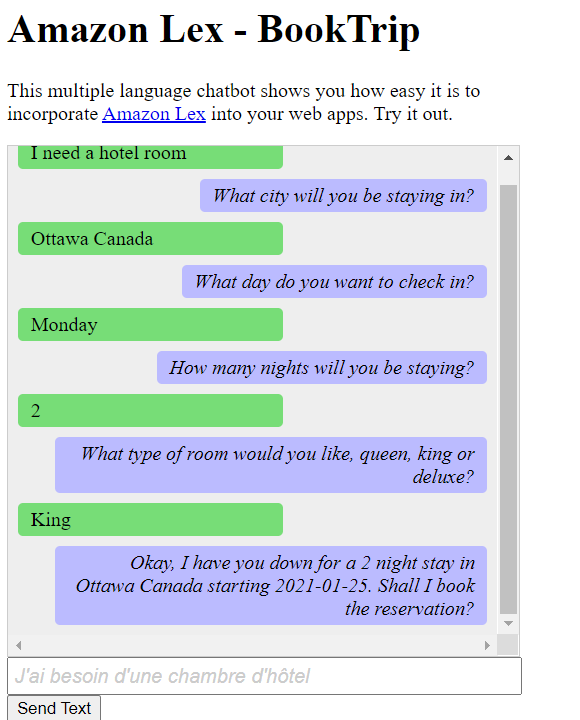
You can create an Amazon Lex chatbot within a web application to engage your web site visitors. An Amazon Lex chatbot is functionality that performs on-line chat conversation with users without providing direct contact with a person. For example, the following illustration shows an Amazon Lex chatbot that engages a user about booking a hotel room.

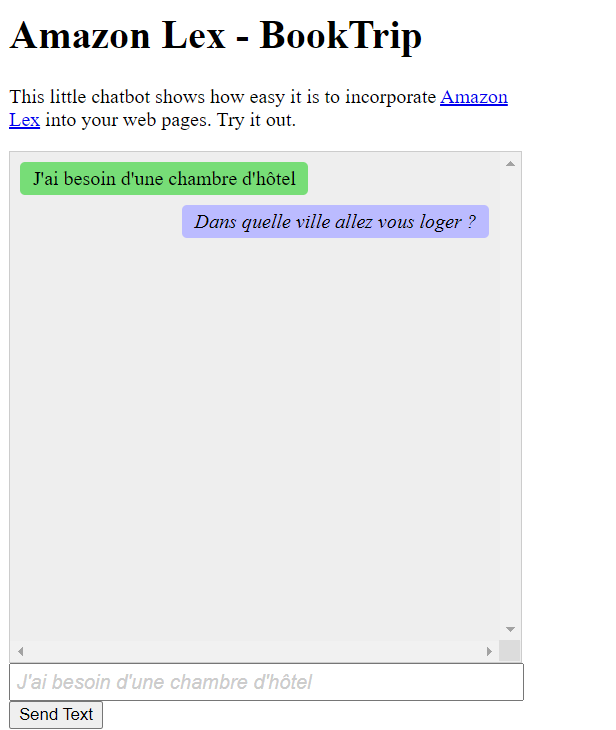
The Amazon Lex chatbot created in this Amazon tutorial is able to handle multiple languages. For example, a user who speaks French can enter French text and get back a response in French.

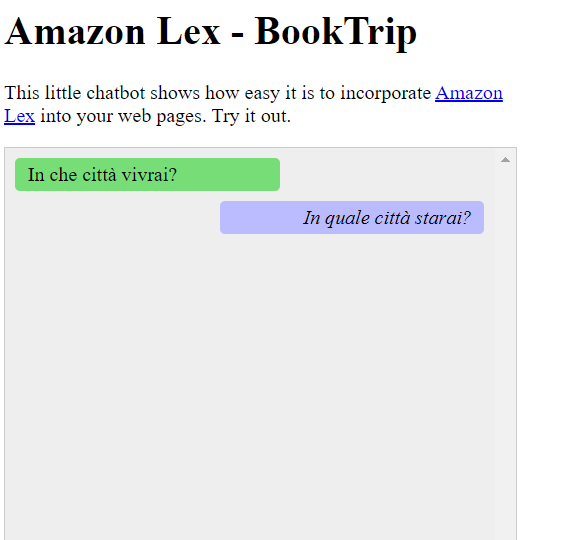
Likewise, a user can communicate with the Amazon Lex chatbot in Italian.

This Amazon tutorial guides you through creating an Amazon Lex chatbot and integrating it into a Node.js web application. The Amazon SDK for JavaScript (v3) is used to invoke these Amazon services:
-
Amazon Lex
-
Amazon Comprehend
-
Amazon Translate
Cost to complete:
The Amazon services included in this document are included in the Amazon Free Tier
Note: Be sure to terminate all of the resources you create while going through this tutorial to ensure that you’re not charged.
To build the app:
Prerequisites
To set up and run this example, you must first complete these tasks:
-
Set up the project environment to run these Node TypeScript examples, and install the required Amazon SDK for JavaScript and third-party modules. Follow the instructions on GitHub
. -
Create a shared configurations file with your user credentials. For more information about providing a shared credentials file, see Shared config and credentials files in the Amazon SDKs and Tools Reference Guide.
Important
This example uses ECMAScript6 (ES6). This requires Node.js version 13.x or higher. To download and install the latest version of
Node.js, see Node.js downloads.
However, if you prefer to use CommonJS syntax, please refer to JavaScript ES6/CommonJS syntax.
Create the Amazon resources
This tutorial requires the following resources.
-
An unauthenticated IAM role with attached permissions to:
Amazon Comprehend
Amazon Translate
Amazon Lex
You can create this resources manually, but we recommend provisioning these resources using Amazon CloudFormation as described in this tutorial.
Create the Amazon resources using Amazon CloudFormation
Amazon CloudFormation enables you to create and provision Amazon infrastructure deployments predictably and repeatedly. For more information about Amazon CloudFormation, see the Amazon CloudFormation User Guide.
To create the Amazon CloudFormation stack using the Amazon CLI:
Install and configure the Amazon CLI following the instructions in the Amazon CLI User Guide
. Create a file named
setup.yamlin the root directory of your project folder, and copy the content here on GitHubinto it. Note
The Amazon CloudFormation template was generated using the Amazon CDK available here on GitHub
. For more information about the Amazon CDK, see the Amazon Cloud Development Kit (Amazon CDK) Developer Guide. Run the following command from the command line, replacing
STACK_NAMEwith a unique name for the stack.Important
The stack name must be unique within an Amazon Region and Amazon account. You can specify up to 128 characters, and numbers and hyphens are allowed.
aws cloudformation create-stack --stack-name STACK_NAME --template-body file://setup.yaml --capabilities CAPABILITY_IAMFor more information on the
create-stackcommand parameters, see the Amazon CLI Command Reference guide, and the Amazon CloudFormation User Guide . To view the resources created, open the Amazon Lex console, choose the stack, and select the Resources tab.
Create an Amazon Lex bot
Important
Use V1 of the the Amazon Lex console to create the bot. This exmaple does not work with bots created using V2.
The first step is to create an Amazon Lex chatbot by using the Amazon Web Services Management Console.
In this example, the Amazon Lex BookTrip example is
used. For more information, see Book
Trip
-
Sign in to the Amazon Web Services Management Console and open the Amazon Lex console at Amazon Web Services Console
. -
On the Bots page, choose Create.
-
Choose BookTrip blueprint (leave the default bot name BookTrip).

-
Fill in the default settings and choose Create (the console shows the BookTrip bot). On the Editor tab, review the details of the preconfigured intents.
-
Test the bot in the test window. Start the test by typing I want to book a hotel room.

-
Choose Publish and specify an alias name (you will need this value when using the Amazon SDK for JavaScript).
Note
You need to reference the bot name and the bot alias in your JavaScript code.
Create the HTML
Create a file named index.html. Copy and paste the code below in to index.html. This HTML references main.js.
This is a bundled version of index.js, which includes the required Amazon SDK for JavaScript modules. You'll create this file in Create the HTML.
index.html also references style.css, which adds the styles.
<!doctype html>
<head>
  <title>Amazon Lex - Sample Application (BookTrip)</title>
  <link type="text/css" rel="stylesheet" href="style.css" />
</head>

<body>
  <h1 id="title">Amazon Lex - BookTrip</h1>
  <p id="intro">
    This multiple language chatbot shows you how easy it is to incorporate
    <a
      href="https://aws.amazon.com/lex/"
      title="Amazon Lex (product)"
      target="_new"
      >Amazon Lex</a
    >
    into your web apps. Try it out.
  </p>
  <div id="conversation"></div>
  <input
    type="text"
    id="wisdom"
    size="80"
    value=""
    placeholder="J'ai besoin d'une chambre d'hôtel"
  />
  <br />
  <button onclick="createResponse()">Send Text</button>
  <script type="text/javascript" src="./main.js"></script>
</body>
This code is also available here on GitHub
Create the browser script
Create a file named index.js. Copy and paste the code below into index.js. Import the required Amazon SDK for JavaScript modules and commands.
Create clients for Amazon Lex, Amazon Comprehend, and Amazon Translate. Replace REGION with Amazon Region, and IDENTITY_POOL_ID with the ID of the
identity pool you created in the Create the Amazon resources . To retrieve this identity pool ID, open the identity pool in the
Amazon Cognito console, choose Edit identity pool, and choose Sample code in the side menu. The identity pool ID is shown in red text in the console.
First, create a libs directory create the required service client objects by creating three files, comprehendClient.js, lexClient.js,
and translateClient.js. Paste the appropriate code below into each, and replace REGION and
IDENTITY_POOL_ID in each file.
Note
Use the ID of the Amazon Cognito identity pool you created in Create the Amazon resources using Amazon CloudFormation.
import { CognitoIdentityClient } from "@aws-sdk/client-cognito-identity";
import { fromCognitoIdentityPool } from "@aws-sdk/credential-provider-cognito-identity";
import { ComprehendClient } from "@aws-sdk/client-comprehend";

const REGION = "REGION";
const IDENTITY_POOL_ID = "IDENTITY_POOL_ID"; // An Amazon Cognito Identity Pool ID.

// Create an Amazon Comprehend service client object.
const comprehendClient = new ComprehendClient({
  region: REGION,
  credentials: fromCognitoIdentityPool({
    client: new CognitoIdentityClient({ region: REGION }),
    identityPoolId: IDENTITY_POOL_ID,
  }),
});

export { comprehendClient };
import { CognitoIdentityClient } from "@aws-sdk/client-cognito-identity";
import { fromCognitoIdentityPool } from "@aws-sdk/credential-provider-cognito-identity";
import { LexRuntimeServiceClient } from "@aws-sdk/client-lex-runtime-service";

const REGION = "REGION";
const IDENTITY_POOL_ID = "IDENTITY_POOL_ID"; // An Amazon Cognito Identity Pool ID.

// Create an Amazon Lex service client object.
const lexClient = new LexRuntimeServiceClient({
  region: REGION,
  credentials: fromCognitoIdentityPool({
    client: new CognitoIdentityClient({ region: REGION }),
    identityPoolId: IDENTITY_POOL_ID,
  }),
});

export { lexClient };
import { CognitoIdentityClient } from "@aws-sdk/client-cognito-identity";
import { fromCognitoIdentityPool } from "@aws-sdk/credential-provider-cognito-identity";
import { TranslateClient } from "@aws-sdk/client-translate";

const REGION = "REGION";
const IDENTITY_POOL_ID = "IDENTITY_POOL_ID"; // An Amazon Cognito Identity Pool ID.

// Create an Amazon Translate service client object.
const translateClient = new TranslateClient({
  region: REGION,
  credentials: fromCognitoIdentityPool({
    client: new CognitoIdentityClient({ region: REGION }),
    identityPoolId: IDENTITY_POOL_ID,
  }),
});

export { translateClient };
This code is available here on GitHub.
Next, create an index.js file, and paste the code below into it.
Replace BOT_ALIAS and BOT_NAME with the alias and name of your Amazon Lex bot respectively, and
USER_ID with a user id. The createResponse asynchronous function does the following:
Takes the text inputted by the user into the browser and uses Amazon Comprehend to determine its language code.
Takes the language code and uses Amazon Translate to translate the text into English.
Takes the translated text and uses Amazon Lex to generate a response.
Posts the response to the browser page.
import { DetectDominantLanguageCommand } from "@aws-sdk/client-comprehend";
import { TranslateTextCommand } from "@aws-sdk/client-translate";
import { PostTextCommand } from "@aws-sdk/client-lex-runtime-service";
import { lexClient } from "./libs/lexClient.js";
import { translateClient } from "./libs/translateClient.js";
import { comprehendClient } from "./libs/comprehendClient.js";

let g_text = "";
// Set the focus to the input box.
document.getElementById("wisdom").focus();

function showRequest() {
  const conversationDiv = document.getElementById("conversation");
  const requestPara = document.createElement("P");
  requestPara.className = "userRequest";
  requestPara.appendChild(document.createTextNode(g_text));
  conversationDiv.appendChild(requestPara);
  conversationDiv.scrollTop = conversationDiv.scrollHeight;
}

function showResponse(lexResponse) {
  const conversationDiv = document.getElementById("conversation");
  const responsePara = document.createElement("P");
  responsePara.className = "lexResponse";

  const lexTextResponse = lexResponse;

  responsePara.appendChild(document.createTextNode(lexTextResponse));
  responsePara.appendChild(document.createElement("br"));
  conversationDiv.appendChild(responsePara);
  conversationDiv.scrollTop = conversationDiv.scrollHeight;
}

function handletext(text) {
  g_text = text;
  const xhr = new XMLHttpRequest();
  xhr.addEventListener("load", loadNewItems, false);
  xhr.open("POST", "../text", true); // A Spring MVC controller
  xhr.setRequestHeader("Content-type", "application/x-www-form-urlencoded"); //necessary
  xhr.send(`text=${text}`);
}

function loadNewItems() {
  showRequest();

  // Re-enable input.
  const wisdomText = document.getElementById("wisdom");
  wisdomText.value = "";
  wisdomText.locked = false;
}

// Respond to user's input.
const createResponse = async () => {
  // Confirm there is text to submit.
  const wisdomText = document.getElementById("wisdom");
  if (wisdomText?.value && wisdomText.value.trim().length > 0) {
    // Disable input to show it is being sent.
    const wisdom = wisdomText.value.trim();
    wisdomText.value = "...";
    wisdomText.locked = true;
    handletext(wisdom);

    const comprehendParams = {
      Text: wisdom,
    };
    try {
      const data = await comprehendClient.send(
        new DetectDominantLanguageCommand(comprehendParams),
      );
      console.log(
        "Success. The language code is: ",
        data.Languages[0].LanguageCode,
      );
      const translateParams = {
        SourceLanguageCode: data.Languages[0].LanguageCode,
        TargetLanguageCode: "en", // For example, "en" for English.
        Text: wisdom,
      };
      try {
        const data = await translateClient.send(
          new TranslateTextCommand(translateParams),
        );
        console.log("Success. Translated text: ", data.TranslatedText);
        const lexParams = {
          botName: "BookTrip",
          botAlias: "mynewalias",
          inputText: data.TranslatedText,
          userId: "chatbot", // For example, 'chatbot-demo'.
        };
        try {
          const data = await lexClient.send(new PostTextCommand(lexParams));
          console.log("Success. Response is: ", data.message);
          const msg = data.message;
          showResponse(msg);
        } catch (err) {
          console.log("Error responding to message. ", err);
        }
      } catch (err) {
        console.log("Error translating text. ", err);
      }
    } catch (err) {
      console.log("Error identifying language. ", err);
    }
  }
};
// Make the function available to the browser.
window.createResponse = createResponse;
This code is available here on GitHub.
Now use webpack to bundle the index.js and Amazon SDK for JavaScript modules into a single file, main.js.
If you haven't already, follow the Prerequisites for this example to install webpack.
Note
For information aboutwebpack, see Bundle applications with webpack.
Run the the following in the command line to bundle the JavaScript for this example into a file called
main.js:webpack index.js --mode development --target web --devtool false -o main.js
Next steps
Congratulations! You have created a Node.js application that uses Amazon Lex to create an interactive user experience. As stated at the beginning of this tutorial, be sure to terminate all of the resources you create while going through this tutorial to ensure that you’re not charged. You can do this by deleting the Amazon CloudFormation stack you created in the Create the Amazon resources topic of this tutorial, as follows:
-
Open the Amazon CloudFormation console
. On the Stacks page, select the stack.
Choose Delete.
For more Amazon cross-service examples, see Amazon SDK for JavaScript cross-service examples