Using certificates with IAM Roles Anywhere
SAP system can be authenticated on Amazon by using certificated-based authentication with
Amazon Identity and Access Management Roles Anywhere. You must setup the certificate in STRUST, and configure
the SDK profile in /AWS1/IMG.
Prerequisites
The following prerequisites must be met before commencing setup for certification.
-
The X.509 certificate issued by your certificate authority (CA) must meet the following requirements.
-
The signing certificate must be a v3 certificate.
-
The chain must not exceed 5 certificates.
-
The certificate must support RSA or ECDSA algorithms.
-
-
Register your CA with IAM Roles Anywhere as a trust anchor, and create a profile to specify the roles/policies for IAM Roles Anywhere. For more information, see Creating a trust anchor and profile in Amazon Identity and Access Management Roles Anywhere.
-
IAM roles for SAP users must be created by the IAM administrator. The roles must have permissions to call the required Amazon Web Services services. For more information, see Best practices for IAM Security.
-
Create authorization to run
/AWS1/IMGtransaction. For more information, see Authorizations for configuration.
Procedure
Follow along these instructions to setup certificate-based authentication.
Steps
Step 1 – Define an SSF application by using SAP's Secure Store and Forward (SSF)
-
Run transaction code
SE16to define an SSF application. -
Enter
SSFAPPLICtable name, and select New Entries. -
Enter a name for the SSF application in the
APPLICfiled, a description in theDESCRIPTfiled, and selectSelected (X)option for the remaining fields.
Step 2 – Set SSF parameters
-
Run the
/n/AWS1/IMGto launch Amazon SDK for SAP ABAP Implementation Guide (IMG). -
Select Amazon SDK for SAP ABAP Settings > Technical Prerequisites > Additional Settings for On-Premises Systems.
-
Run the Set SSF Parameters IMG activity.
-
Select New Entries, and choose the SSF application created in the previous step. Select Save.
-
Modify the hash algorithm to SHA256, and the encryption algorithm to AES256-CBC. Retain the other settings as default, and select Save.
Step 3 – Create the PSE and certificate request
-
Run the
/n/AWS1/IMGtransaction, and select Amazon SDK for SAP ABAP Settings > Technical Prerequisites > Additional Settings for On-Premises systems. -
Run the
Create PSE for SSF ApplicationIMG activity. -
Select Edit for the
STRUSTtransaction. -
Right-select the SSF application created in Step 1 – Define an SSF application by using SAP's Secure Store and Forward (SSF), and choose Create. Retain all other default settings, and select Continue.
-
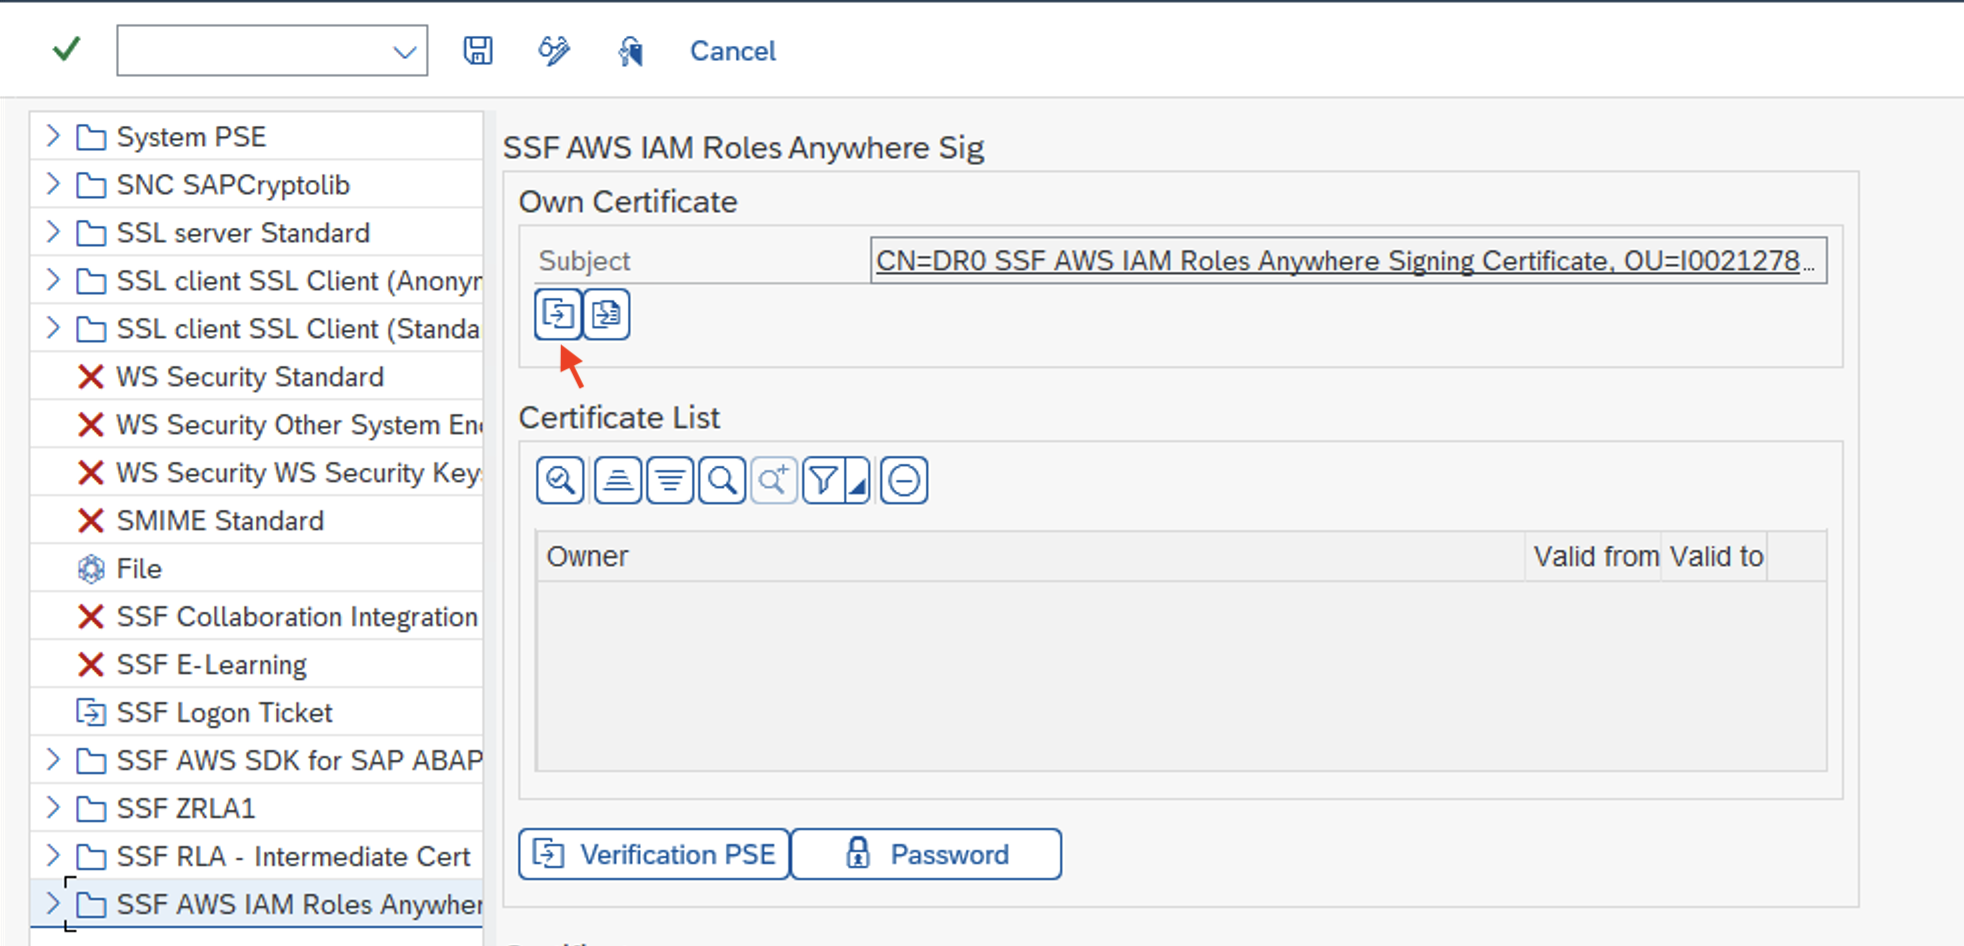
Select Create Certificate Request. See the following image. Retain the default options, and select Continue. Copy or export the generated certificate request, and provide it to your CA. Your CA verifies the request, and responds with a signed public-key certificate.

The signing process varies based on your CA, and the technology used by them. See Issuing private end-entity certificates with Amazon Private Certificate Authority for an example.
Step 4 – Import certificate response into the relevant PSE
-
Run the
/n/AWS1/IMGtransaction, and select Amazon SDK for SAP ABAP Settings > Technical Prerequisites > Additional Settings for On-Premises systems. -
Run the
Create PSE for SSF ApplicationIMG activity. -
Select Edit for the
STRUSTtransaction. -
Choose the SSF application, and then select Import Certificate Response located in the PSE section below the subject. Either copy and paste the certificate response into text box or import the file from the file system. Select Continue > Save.
-
The certificate details can be viewed by selecting the subject twice. The information is displayed in the certificate section.
Step 5 – Configuring SDK profile to use IAM Roles Anywhere
-
Run the
/n/AWS1/IMGtransaction, and select Amazon SDK for SAP ABAP Settings > Application Configurations. -
Create a new SDK profile, and name it.
-
Choose IAM Roles Anywhere as the authentication method.
-
In the left pane, select Authentication and Settings.
-
Create a new entry, and enter the information for your SAP system, and Amazon Web Services Region.
-
Select IAM Roles Anywhere for the authentication method, and select Save.
-
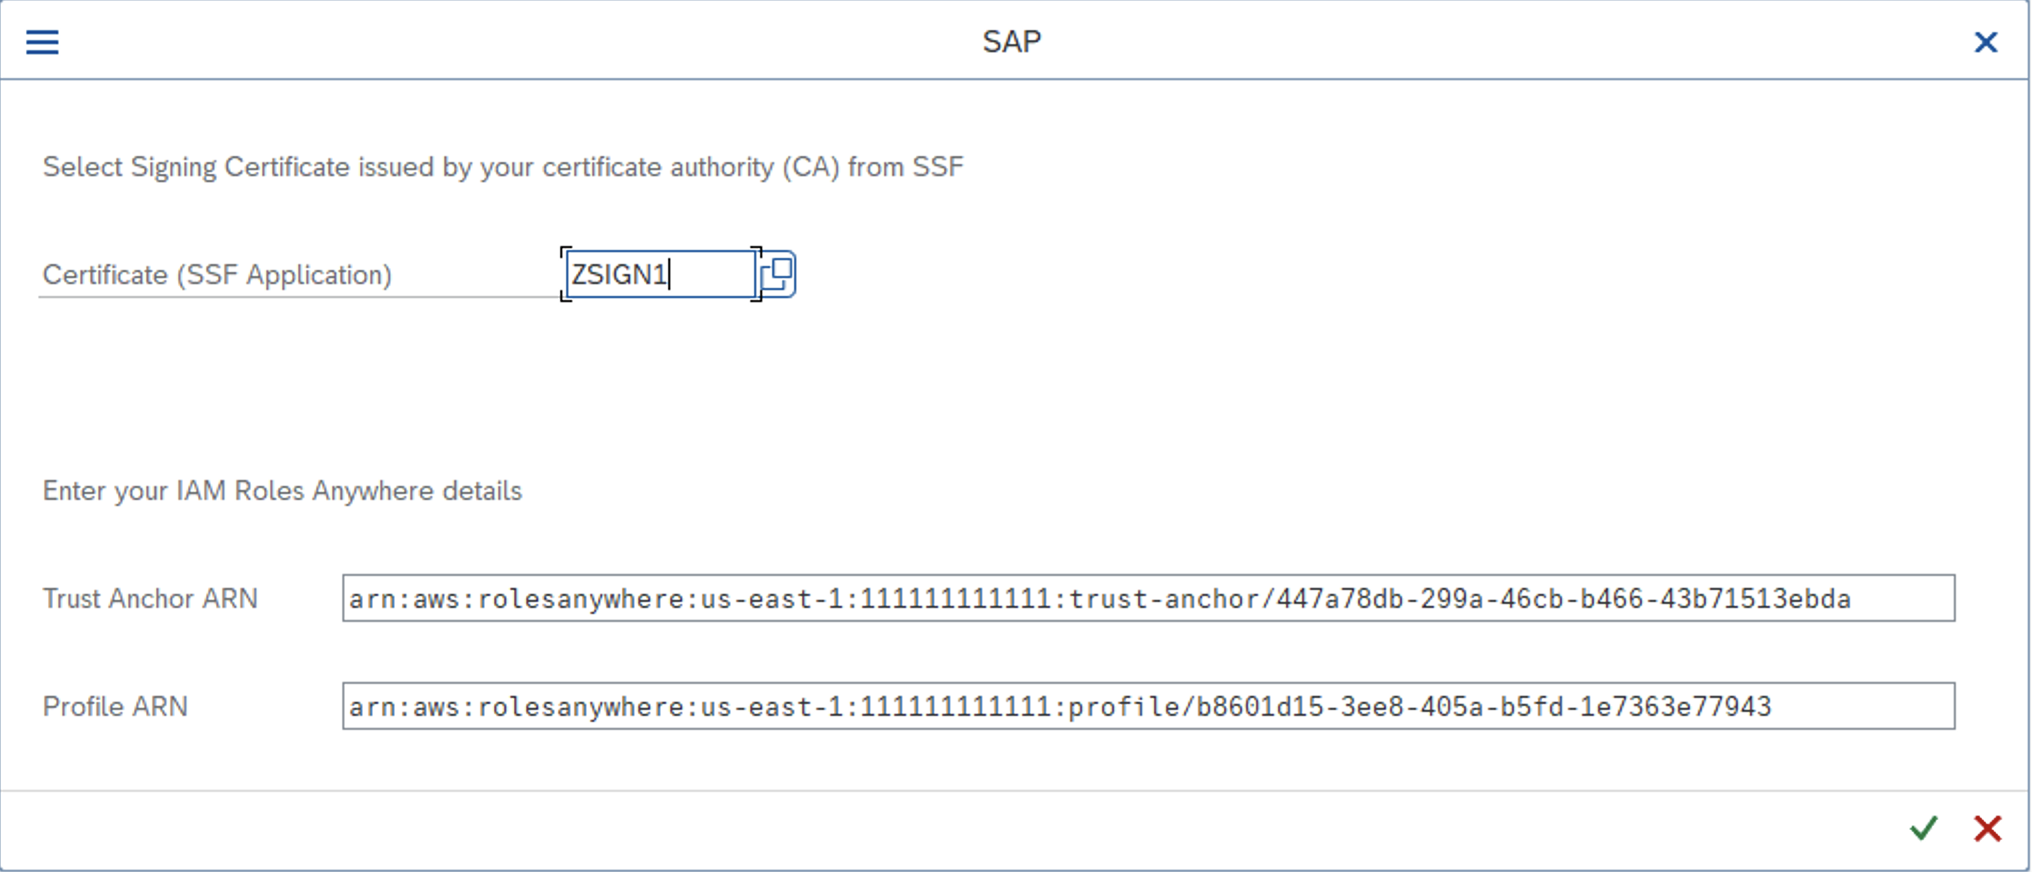
Select Enter Details, and in the pop-up window, choose the SSF application created in Step 1 – Define an SSF application by using SAP's Secure Store and Forward (SSF). Enter the Trust Anchor ARN, and Profile ARN that were created in Prerequisites. See the following image. Select Continue.

-
-
In the left pane, select IAM Role Mapping. Enter a name, and provide the IAM role's ARN provided by your IAM administrator.
For more information, see Application configuration.