本文属于机器翻译版本。若本译文内容与英语原文存在差异,则一律以英文原文为准。
正在创建订购 Snowball Edge 设备的任务
要订购 Snowball Edge 设备,您需要在中创建一个订购 Snowball Edge 设备的任务。 Amazon Snow 系列管理控制台工作是一个术语, Amazon 用于描述客户使用 Snowball Edge 设备的生命周期。任务从您订购设备时开始,在 Amazon 准备设备并将其运送给您然后您使用时继续,然后在您退回设备后 Amazon 接收和处理设备后完成。作业按类型分类:导出、导入以及本地计算和存储。有关更多信息,请参阅了解 Amazon Snowball Edge 作业。
创建订购设备的任务后,您可以使用查看任务状态并监控您订购的设备在 Amazon 准备发货给您以及设备退回后的进度。 Amazon Snow 系列管理控制台 有关更多信息,请参阅作业状态。设备返回并由处理后 Amazon,您可以访问任务完成报告并通过进行日志 Amazon Snow 系列管理控制台。有关更多信息,请参阅在控制台上获取作业完成报告和日志。
您也可以使用作业管理 API 创建和管理作业。有关更多信息,请参阅 Amazon Snowball Edge API 参考。
选择作业类型
创建作业的第一步是确定所需的作业类型,然后使用 Amazon Snow 系列管理控制台开始对其进行规划。
要选择您的作业类型,请执行以下操作
-
登录 Amazon Web Services 管理控制台,然后打开Amazon Snow 系列管理控制台
。如果这是你第一次在此创建作业 Amazon Web Services 区域,你将看到 S Amazon nowball Edge 页面。否则,您将看到现有作业的列表。 -
如果这是您第一次订购设备,请选择订购 S Amazon nowball Edge 设备。如果您期望多个作业迁移超过 500 TB 的数据,请选择创建大于 500 TB 的大型数据迁移计划。否则,请在左侧导航栏中选择创建作业。选择下一步,打开规划您的作业页面。
-
在作业名称部分,在作业名称框中为您的作业提供一个名称。
-
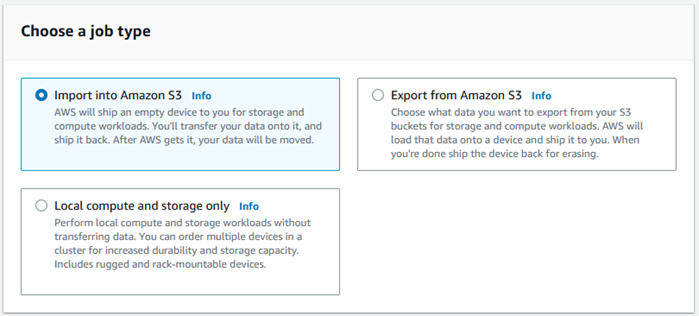
根据您的需求,选择以下作业类型之一:
-
导入到亚马逊 S3 — 选择此选项可为您 Amazon 配送一台空的 Snowball Edge 设备。将设备连接到本地网络并运行 Snowball Edge 客户端。您可以使用 NFS 共享或 S3 适配器将数据复制到设备上,然后将其运回设备 Amazon,然后将数据上传到 Amazon。
-
从 Amazon S3 导出:选择此选项可将数据从 Amazon S3 存储桶导出到您的设备。 Amazon 会在设备上加载您的数据并将其运输给您。将设备连接到本地网络并运行 Snowball Edge 客户端。您可以将数据从设备复制到服务器。完成后,将设备运送到设备上 Amazon,您的数据就会从设备中删除。
-
仅限本地计算和存储:无需传输数据即可在设备上执行计算和存储工作负载。
-
-
选择下一步以继续。
选择计算和存储选项
选择您的 Snowball Edge 设备的硬件规格、要在其中包含哪些 EC2与 Amazon 兼容的实例、数据的存储方式以及定价。
选择设备的计算和存储选项
-
在 S now 设备部分,选择要订购的 Snowball Edge 设备。
注意
某些 Snowball Edge 可能不可用,具体取决于 Amazon Web Services 区域 您订购的商品和所选的工作类型。
-
在选择您的定价选项部分,从选择您的定价选项菜单中,选择适用于此作业的定价类型。如果您选择 1 年或 3 年承诺预先定价,请在自动续订中选择打开从而在当前期间结束时自动续订定价,或者选择关闭从而在当前期间结束时不自动续订定价。有关 Snowball Edge 设备长期定价选项的更多信息,请参阅本指南中的 Snowball Edge 设备的长期定价。有关您的设备定价 Amazon Web Services 区域,请参阅Amazon Snowball Edge 定价
。 -
在选择存储类型部分,根据需要进行选择:
S3 适配器:使用 S3 适配器使用 Amazon S3 REST API 操作以编程方式在 Snowball Edge 之间传输数据。
与 Amazon S3 兼容的存储:使用与 Amazon S3 兼容的存储,在单个 Snowball Edge 设备或多设备集群中部署与 S3 兼容且持久、可扩展的对象存储。
基于 NFS 的数据传输:使用基于网络文件系统 (NFS) 的数据传输将文件从您的计算机拖放到 Snowball Edge 上的 Amazon S3 存储桶中。
警告
基于 NFS 的数据传输不支持 S3 Adapter。如果继续进行基于 NFS 的数据传输,则必须挂载 NFS 共享才能传输对象。使用传输对象将失败。 Amazon CLI
有关更多信息,请参阅《 Amazon Snowball Edge 边缘开发者指南》中的 “使用 NFS 进行离线数据传输”。
注意
可用的存储类型选项取决于您选择的作业类型和 Snow 设备。
-
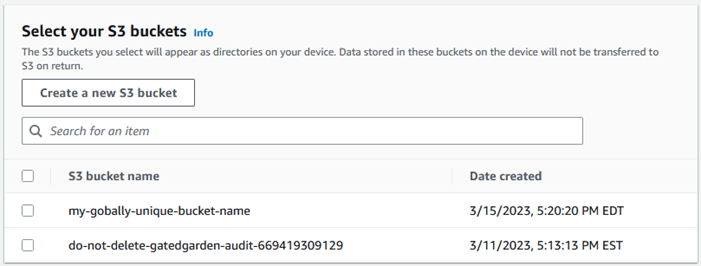
如果您选择 S3 Adapter 作为存储类型,或者选择了支持块存储的设备,请执行以下操作来选择要包含在设备上的一个或多个 S3 存储桶:
在选择您的 S3 存储桶部分,执行以下一项或多项操作来选择一个或多个 S3 存储桶:
在 S3 存储桶名称列表中,选择您想要使用的 S3 存储桶。
在搜索项目字段中,输入全部或部分存储桶名称来筛选条目中的可用存储桶列表,然后选择存储桶。
选择创建新的 S3 存储桶来创建新 S3 存储桶。新的存储桶名称将显示在存储桶名称列表中, 选择该存储桶。
您可包含一个或多个 S3 存储桶。这些存储桶将在您的设备上显示为本地 S3 存储桶。
如果您选择了与 Amazon S3 兼容的存储作为存储类型,请在 S3 存储容量部分执行以下操作:
选择在单台设备或设备集群上使用 Snowball Edge 上与 Amazon S3 兼容的存储。请参阅本指南中的使用 Amazon Snowball Edge 集群。
在 Snowball Edge 上选择要用于 Amazon S3 兼容存储空间的设备存储量。
注意
在 Snowball Edge 上使用与 Amazon S3 兼容的存储空间时,您可以在收到设备后管理和创建 Amazon S3 存储桶,因此在订购时无需选择它们。在本指南中查看 Snowball Edge 上与亚马逊 S3 兼容的存储。

如果您选择基于 NFS 的数据传输作为存储类型,请在选择您的 S3 存储桶部分中,执行以下一项或多项操作来选择一个或多个 S3 存储桶:
在 S3 存储桶名称列表中,选择您想要使用的 S3 存储桶。
在搜索项目字段中,输入全部或部分存储桶名称来筛选条目中的可用存储桶列表,然后选择存储桶。
选择创建新的 S3 存储桶来创建新 S3 存储桶。新的存储桶名称将显示在存储桶名称列表中, 选择该存储桶。
选择要用于 NFS 数据传输的 S3 存储桶后,还要选择一个 S3 存储桶作为其块存储。 AMIs查看选择 S3 存储桶的步骤。
您可包含一个或多个 S3 存储桶。这些存储桶将在您的设备上显示为本地 S3 存储桶。

-
在 “使用 EC2兼容实例进行计算-可选” 部分中, AMIs 从您的账户中选择要包含在设备上的亚马逊 EC2兼容。或者,在搜索字段中输入 AMI 的全部或部分名称以筛选条目中的可用 AMIs列表,然后选择 AMI。
要了解如何为安全外壳 (SSH) 配置 AMI,请参阅为 Snowball Edge 和 SSH 配置 AMI
有关更多信息,请参阅本指南中的在预定设备时添加 AMI。
此特征会产生额外费用。有关更多信息,请参阅Amazon Snowball Edge 定价
。 -
选择下一步按钮。
选择您的特征和选项
选择要包含在 Amazon Snowball Edge 设备任务中的功能和选项,包括 Amazon EKS Anywhere for Snow、 Amazon IoT Greengrass 实例和远程设备管理功能。
要选择您的特征和选项,请执行以下操作
-
在亚马逊 EKS Anywhere on Sno Amazon w 部分中,要在 Sno Amazon w 上包括亚马逊 EKS Anywhere,请选择 “在 Sno w 上包含亚马逊 EKS Anywhere”,然后执行以下操作。
注意
我们建议您使用 Amazon EKS Anywhere 支持的最新可用 Kubernetes 版本创建 Kubernetes 集群。有关更多信息,请参阅 Amazon EKS-Anywhere Versioning
。如果您的应用程序需要特定版本的 Kubernetes,请使用 Amazon EKS 标准支持或扩展支持中提供的任何 Kubernetes 版本。在规划部署生命周期时,请考虑 Kubernetes 版本的发布和支持日期。这有助于避免可能失去对您打算使用的 Kubernetes 版本的支持。有关更多信息,请参阅 Amazon EKS Kubernetes 发布日历。 在 “构建你自己的 AMI” 部分,选择 AMIs 你为 Amazon EKS Anywhere 构建的。请参阅在订购适用于亚马逊 EKS 的 Snowball Edge 设备之前需要完成的操作 Amazon Anywhere on Snow Amazon。
在高可用性部分,要在多台 Snowball Edge 设备上运行 Amazon EKS Anywhere 集群,请选择要包含在订单中的设备数量。
-
在 Sno w 部分中,要包含适用于物联网工作负载的经过验证的 AMI,请选择在我的 Snow 设备上安装 Amazon IoT Greengrass 经过验证的 AMI。Amazon IoT Greengrass
-
要启用通过 Amazon OpsHub 或 Snowball Edge Client 远程管理您的 Snowball Edge 设备,请选择使用或 Snowball Edge Client 远程管理您的 Amazon OpsHub Snowball Edge 设备。
-
选择下一步按钮。
选择安全、运输和通知首选项
选择 Snowball Edge 的安全偏好设置
设置安全性会添加 Amazon Snowball Edge 作业的权限和加密设置,以帮助保护传输过程中的数据。
主题
要为您的作业设置安全性,请执行以下操作
-
在加密部分,选择要使用的 KMS 密钥。
-
如果要使用默认 Amazon Key Management Service (Amazon KMS) 密钥,请选择 Amazon/importexport(默认)。这是在未定义其他密钥时保护您的导入和导出作业的默认密钥。
-
如果您想提供自己的 Amazon KMS 密钥,请选择输入密钥 ARN,在密钥 ARN 框中提供亚马逊资源名称 (ARN),然后选择使用此 K M S 密钥。密钥 ARN 将添加到列表中。
-
-
在选择服务访问类型部分中,执行以下操作之一:
-
选择 Sno w 控制台将创建并使用服务相关角色代表您访问 Amazon 资源。 授予 S Amazon nowball Edge 代表你使用亚马逊 S3 和亚马逊简单通知服务 (Amazon SNS) Simple Notification Service 的权限。该角色向 Snow 服务授予 Amazon 安全令牌服务 (Amazon STS) AssumeRole 信任
-
选择添加要使用的现有服务角色,指定所需的角色 ARN,也可以使用默认角色。
-
-
选择下一步。
选择您接收和退回 Snowball Edge 的配送偏好
接收和退回 Snowball Edge 设备涉及来回运送设备,因此提供准确的配送信息非常重要。
要提供运输详细信息,请执行以下操作
-
在送货地址部分,选择一个现有地址或添加一个新地址。
-
如果您选择使用最近地址,则会显示存档的地址。从列表中仔细选择所需的地址。
-
如果您选择添加新地址,请提供所需的地址信息。 Amazon Snow 系列管理控制台 保存您的新配送信息。
注意
您在地址中提供的国家/地区必须与设备的目的地国家/地区相匹配,并且必须在该国家/地区有效。
-
-
在送货速度部分,为作业选择送货速度。送货速度并不表示自创建作业当天算起,需要多久才能收到设备。相反,它表示设备与您的收货地址 Amazon 之间的运输时间。
在运输设备之前,最长可能需要 4 周时间来为您的作业预置和准备设备。应该在您的项目计划中考虑这个时间段,以确保无缝过渡。
您可以选择的送货速度如下:
-
一日送达(1 个工作日)
-
两日送达(2 个工作日)
-
为有关 Snowball Edge 作业的通知选择首选项
通知会更新你的 S Amazon nowball Edge 任务的最新状态。您可以创建一个 SNS 主题,并在作业状态更改时收到来自 Amazon Simple Notification Service(Amazon SNS)的电子邮件。
要设置通知,请执行以下操作
-
在设置通知部分中,执行以下操作之一:
-
如果您想使用现有 SNS 主题,请选择使用现有 SNS 主题,然后从列表中选择主题 Amazon 资源名称(ARN)。
-
如果您想创建新的 SNS 主题,请选择创建新的 SNS 主题。输入主题的名称并提供电子邮件地址。
注意
在美国西部(北加利福尼亚)和美国西部(俄勒冈州)区域创建的订购 Snow 设备作业都会传递到美国东部(弗吉尼亚州北部)区域。因此,Amazon SNS 之类的服务调用也传递到美国东部(弗吉尼亚州北部)。为了获得更好的体验,我们建议在美国东部(弗吉尼亚州北部)区域创建任何新的 SNS 主题。
-
通知将与以下作业状态之一有关:
-
作业已创建
-
正在准备设备
-
正在准备发运
-
运送给您的途中
-
已交付给您
-
正在运往 Amazon
-
位于分拣机构
-
在 Amazon
-
正在导入
-
已完成
-
已取消
有关任务状态变更通知和加密 SNS 主题的更多信息,请参阅本指南中的 Sn owball Edge 通知。
选择下一步。
查看作业摘要并创建作业
在您为 S Amazon nowball Edge 作业提供所有必要信息后,请查看该作业并创建它。在你创建任务后, Amazon 将开始准备 Snowball Edge 以便发货给你。
作业受特定国家/地区出口管制法的约束,可能需要出口许可证。美国的出口和再出口法律也适用。禁止出现违反该国家/地区以及美国的法律和法规的行为。
-
在作业摘要页面中,创建作业之前先检查所有部分。如果需要进行更改,请选择相应部分的编辑,然后对信息进行编辑。
-
检查和编辑完成后,请选择创建作业。
注意
在您创建了订购 Snowball Edge 设备的任务后,您可以在该设备处于 “任务已创建” 状态时取消该任务,而不会产生任何费用。有关更多信息,请参阅通过 Amazon Snow 系列管理控制台取消作业。
创建作业后,您可以在作业状态部分查看作业的状态。有关作业状态的详细信息,请参阅 Job Statuses。