Tutorial: Create a runbook using the visual design experience
In this tutorial, you will learn the basics of working with the visual design experience provided by Systems Manager Automation. In the visual design experience, you can create a runbook that uses multiple actions. You use the drag and drop feature to arrange actions on the canvas. You also search for, select, and configure these actions. Then, you can view the auto-generated YAML code for your runbook's workflow, exit the visual design experience, run the runbook, and review the execution details.
This tutorial also shows you how to update the runbook and view the new version. At the end of the tutorial, you perform a clean-up step and delete your runbook.
After you complete this tutorial, you'll know how to use the visual design experience to create a runbook. You'll also know how to update, run, and delete your runbook.
Note
Before you start this tutorial, make sure to complete Setting up Automation.
Topics
Step 1: Navigate to the visual design experience
-
Sign in to the Systems Manager Automation console
. -
Choose Create automation runbook.
Step 2: Create a workflow
In the visual design experience, a workflow is a graphical representation of your runbook on the canvas. You can use the visual design experience to define, configure, and examine the individual actions of your runbook.
To create a workflow
-
Next to the Design and Code toggle, select the pencil icon and enter a name for your runbook. For this tutorial, enter
VisualDesignExperienceTutorial.
-
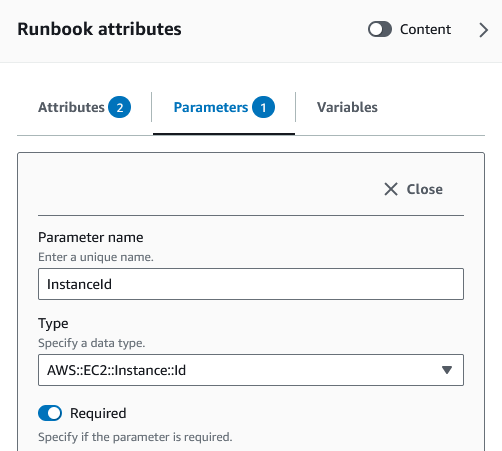
In the Document attributes section of the Form panel, expand the Input parameters dropdown, and select Add a parameter.
-
In the Parameter name field, enter
InstanceId. -
In the Type dropdown, choose AWS::EC2::Instance.
-
Select the Required toggle.
-
-
In the Amazon APIs browser, enter
DescribeInstancesin the search bar. -
Drag an Amazon EC2 – DescribeInstances action to the empty canvas.
-
For Step name, enter a value. For this tutorial, you can use the name
GetInstanceState.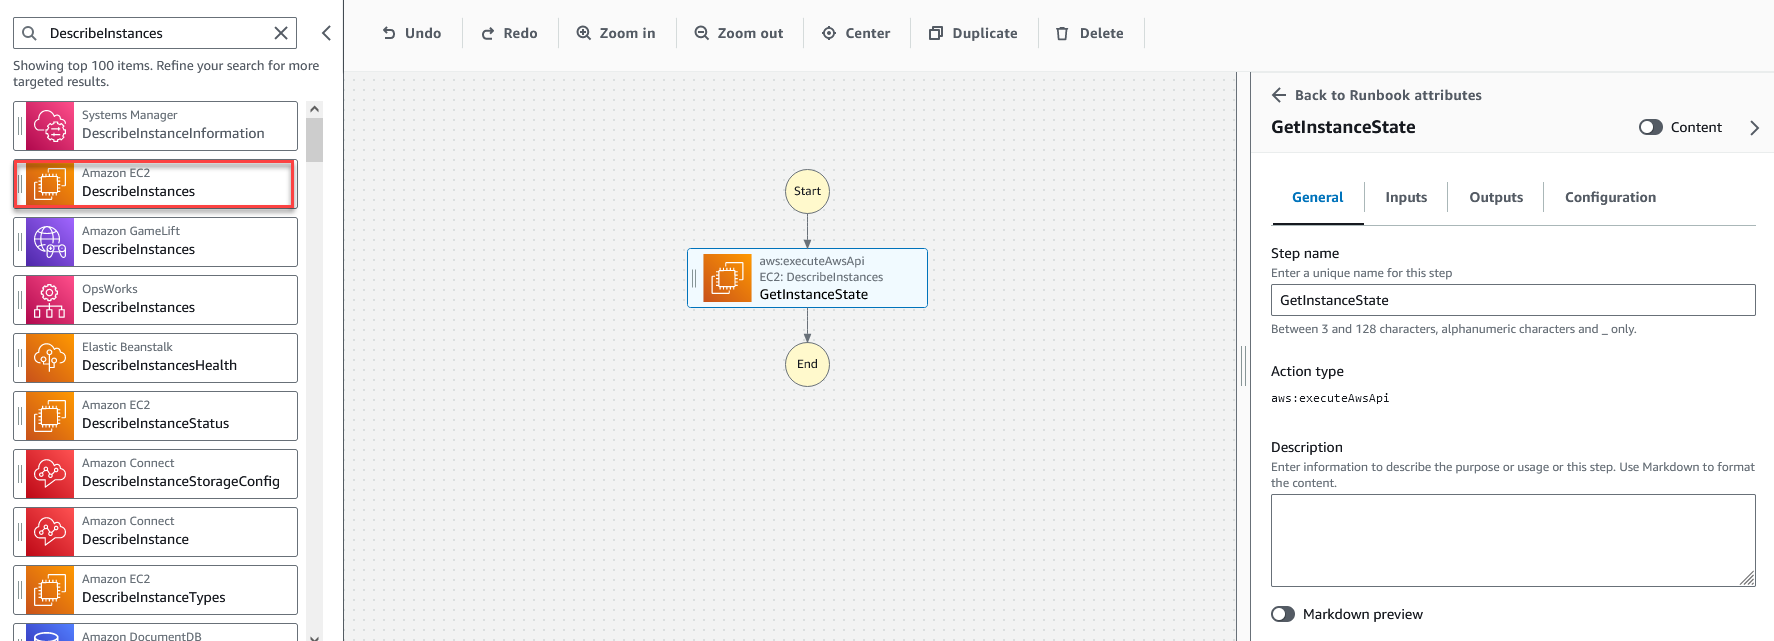
-
Expand the Additional inputs dropdown, and in the Input name field, enter
InstanceIds. -
Choose the Inputs tab.
-
In the Input value field, choose the
InstanceIddocument input. This references the value of the input parameter that you created at the beginning of the procedure. Since the InstanceIds input for theDescribeInstancesaction acceptsStringListvalues, you must wrap the InstanceId input in square brackets. The YAML for the Input value should match the following:['{{ InstanceId }}']. -
In the Outputs tab, select Add an output and enter
InstanceStatein the Name field. -
In the Selector field, enter
$.Reservations[0].Instances[0].State.Name. -
In the Type dropdown, choose String.
-
-
Drag a Branch action from the Actions browser, and drop it below the
GetInstanceStatestep. -
For Step name, enter a value. For this tutorial, use the name
BranchOnInstanceStateTo define the branching logic, do the following:
-
Choose the
Branchstate on the canvas. Then, under Inputs and Choices, select the pencil icon to edit Rule #1. -
Choose Add conditions.
-
In the Conditions for rule #1 dialog box, choose the
GetInstanceState.InstanceStatestep output from the Variable dropdown. -
For Operator, choose is equal to.
-
For Value, choose String from the dropdown list. Enter
stopped.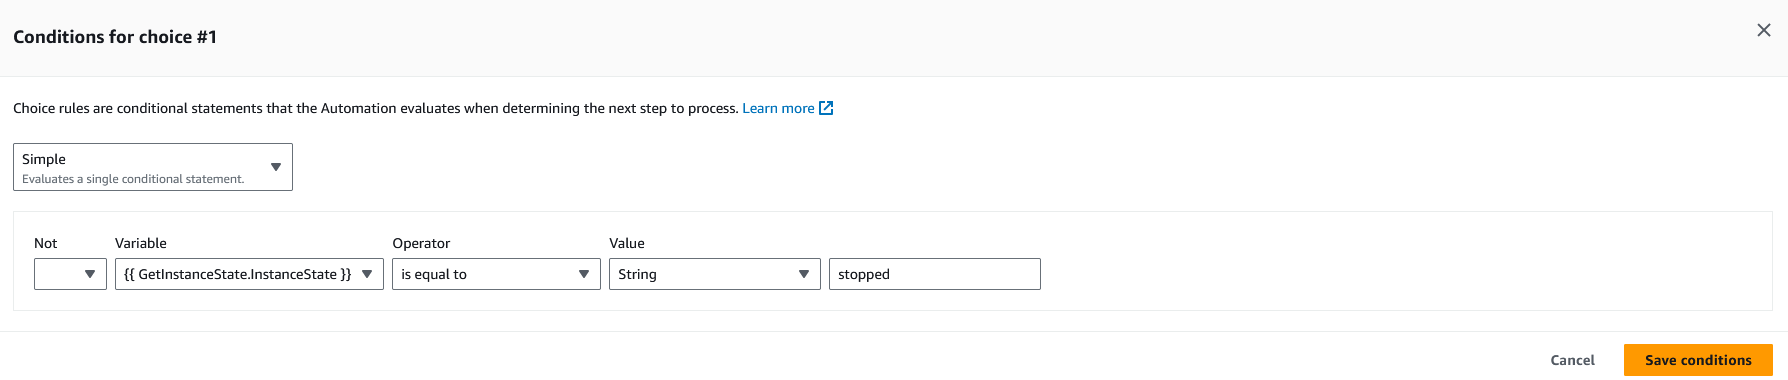
-
Select Save conditions.
-
Choose Add new choice rule.
-
Choose Add conditions for Rule #2.
-
In the Conditions for rule #2 dialog box, choose the
GetInstanceState.InstanceStatestep output from the Variable dropdown. -
For Operator, choose is equal to.
-
For Value, choose String from the dropdown list. Enter
stopping. -
Select Save conditions.
-
Choose Add new choice rule.
-
For Rule #3, choose Add conditions.
-
In the Conditions for rule #3 dialog box, choose the
GetInstanceState.InstanceStatestep output from the Variable dropdown. -
For Operator, choose is equal to.
-
For Value, choose String from the dropdown list. Enter
running. -
Select Save conditions.
-
In the Default rule, choose Go to end for the Default step.
-
-
Drag a Change an instance state action to the empty Drag action here box under the {{ GetInstanceState.InstanceState }} == "stopped" condition.
-
For the Step name, enter
StartInstance. -
In the Inputs tab, under Instance IDs, choose the InstanceId document input value from the dropdown.
-
For the Desired state, specify
running.
-
-
Drag a Wait on Amazon resource action to the empty Drag action here box under the {{ GetInstanceState.InstanceState }} == "stopping" condition.
-
For Step name, enter a value. For this tutorial, use the name
WaitForInstanceStop-
For the Service field, choose Amazon EC2.
-
For the API field, choose DescribeInstances.
-
For the Property selector field, enter
$.Reservations[0].Instances[0].State.Name. -
For the Desired values parameter, enter
["stopped"] -
In the Configuration tab of the WaitForInstanceStop action, choose StartInstance from the Next step dropdown.
-
-
Drag a Run command on instances action to the empty Drag action here box under the {{ GetInstanceState.InstanceState }} == "running" condition.
-
For the Step name, enter
SayHello.-
In the Inputs tab, enter
AWS-RunShellScriptfor the Document name parameter. -
For InstanceIds, choose the InstanceId document input value from the dropdown.
-
Expand the Additional inputs dropdown, and in the Input name dropdown, choose Parameters.
-
In the Input value field, enter
{"commands": "echo 'Hello World'"}
-
-
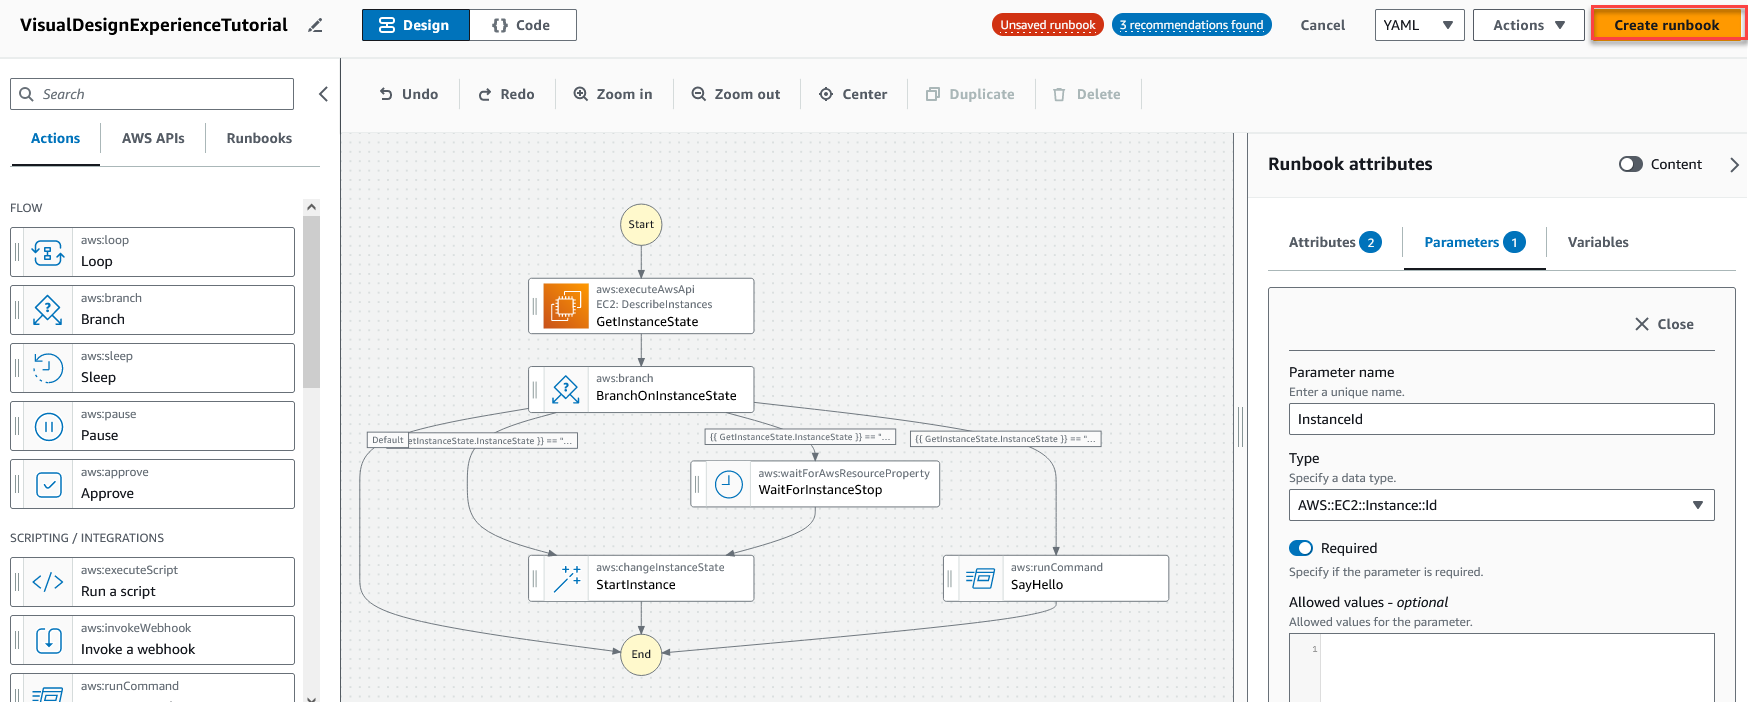
Review the completed runbook in the canvas and select Create runbook to save the tutorial runbook.
Step 3: Review the auto-generated code
As you drag and drop actions from the Actions browser onto the canvas, the visual design experience automatically composes the YAML or JSON content of your runbook in real-time. You can view and edit this code. To view the auto-generated code, select Code for the Design and Code toggle.
Step 4: Run your new runbook
After creating your runbook, you can run the automation.
To run your new automation runbook
Open the Amazon Systems Manager console at https://console.amazonaws.cn/systems-manager/
. -
In the navigation pane, choose Automation, and then choose Execute automation.
-
In the Automation document list, choose a runbook. Choose one or more options in the Document categories pane to filter SSM documents according to their purpose. To view a runbook that you own, choose the Owned by me tab. To view a runbook that is shared with your account, choose the Shared with me tab. To view all runbooks, choose the All documents tab.
Note
You can view information about a runbook by choosing the runbook name.
-
In the Document details section, verify that Document version is set to the version that you want to run. The system includes the following version options:
-
Default version at runtime – Choose this option if the Automation runbook is updated periodically and a new default version is assigned.
-
Latest version at runtime – Choose this option if the Automation runbook is updated periodically, and you want to run the version that was most recently updated.
-
1 (Default) – Choose this option to run the first version of the document, which is the default.
-
-
Choose Next.
-
In the Execute automation runbook section, choose Simple execution.
In the Input parameters section, specify the required inputs. Optionally, you can choose an IAM service role from the AutomationAssumeRole list.
-
(Optional) Choose an Amazon CloudWatch alarm to apply to your automation for monitoring. To attach a CloudWatch alarm to your automation, the IAM principal that starts the automation must have permission for the
iam:createServiceLinkedRoleaction. For more information about CloudWatch alarms, see Using Amazon CloudWatch alarms. If your alarm activates, the automation is stopped. If you use Amazon CloudTrail, you will see the API call in your trail. -
Choose Execute.
Step 5: Clean up
To delete your runbook
Open the Amazon Systems Manager console at https://console.amazonaws.cn/systems-manager/
. In the navigation pane, choose Documents.
-
Select the Owned by me tab.
-
Locate the VisualDesignExperienceTutorial runbook.
-
Select the button on the document card page, and then choose Delete document from the Actions dropdown.