Job queueing
Using job queueing, you can submit more transcription job requests than can be concurrently processed. Without job queueing, once you reach the quota of allowed concurrent requests, you must wait until one or more requests are completed before submitting a new request.
Job queueing is optional for both transcription job and post-call analytics job requests.
If you enable job queueing, Amazon Transcribe creates a queue that contains all requests that exceed your limit. As soon as a request is completed, a new request is pulled from your queue and processed. Queued requests are processed in a FIFO (first in, first out) order.
You can add up to 10,000 jobs to your queue. If you exceed this limit, you get a
LimitExceededConcurrentJobException error. To maintain optimal
performance, Amazon Transcribe only uses up to 90 percent of your quota (a bandwidth
ratio of 0.9) to process queued jobs. Note that these are default values that can be
increased upon request.
Tip
You can find a list of default limits and quotas for Amazon Transcribe resources in the Amazon General Reference. Some of these defaults can be increased upon request.
If you enable job queueing but don't exceed the quota for concurrent requests, all requests are processed concurrently.
Enabling job queueing
You can enable job queueing using the Amazon Web Services Management Console, Amazon CLI, or Amazon SDKs; see the following for examples; see the following for examples:
-
Sign in to the Amazon Web Services Management Console
. -
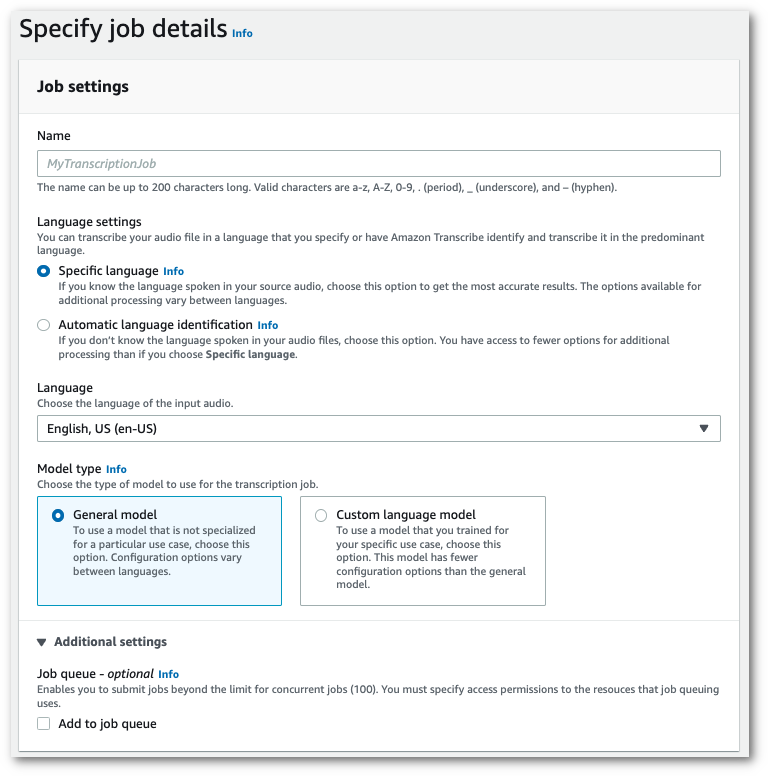
In the navigation pane, choose Transcription jobs, then select Create job (top right). This opens the Specify job details page.
-
In the Job Settings box, there is an Additional settings panel. If you expand this panel, you can select the Add to job queue box to enable job queueing.

-
Fill in any other fields you want to include on the Specify job details page, then select Next. This takes you to the Configure job - optional page.
-
Select Create job to run your transcription job.
This example uses the start-transcription-jobjob-execution-settings parameter with the AllowDeferredExecution
sub-parameter. Note that when you include AllowDeferredExecution in your request, you must
also include DataAccessRoleArn.
For more information, see StartTranscriptionJob and
JobExecutionSettings.
aws transcribe start-transcription-job \ --regionus-west-2\ --transcription-job-namemy-first-transcription-job\ --media MediaFileUri=s3://amzn-s3-demo-bucket/my-input-files/my-media-file.flac\ --output-bucket-nameamzn-s3-demo-bucket\ --output-keymy-output-files/ \ --language-codeen-US\ --job-execution-settings AllowDeferredExecution=true,DataAccessRoleArn=arn:aws:iam::111122223333:role/ExampleRole
Here's another example using the
start-transcription-job
aws transcribe start-transcription-job \ --regionus-west-2\ --cli-input-json file://my-first-queueing-request.json
The file my-first-queueing-request.json contains the following request body.
{
  "TranscriptionJobName": "my-first-transcription-job",
  "Media": {
        "MediaFileUri": "s3://amzn-s3-demo-bucket/my-input-files/my-media-file.flac"
  },
  "OutputBucketName": "amzn-s3-demo-bucket",
  "OutputKey": "my-output-files/",
  "LanguageCode": "en-US",
  "JobExecutionSettings": {
        "AllowDeferredExecution": true,
        "DataAccessRoleArn": "arn:aws:iam::111122223333:role/ExampleRole"
  }
}
This example uses the Amazon SDK for Python (Boto3) to enable job queueing using the
AllowDeferredExecution argument for the
start_transcription_jobAllowDeferredExecution in your
request, you must also include DataAccessRoleArn. For more information,
see StartTranscriptionJob
and JobExecutionSettings.
For additional examples using the Amazon SDKs, including feature-specific, scenario, and cross-service examples, refer to the Code examples for Amazon Transcribe using Amazon SDKs chapter.
from __future__ import print_function
import time
import boto3
transcribe = boto3.client('transcribe', 'us-west-2')
job_name = "my-first-queueing-request"
job_uri = "s3://amzn-s3-demo-bucket/my-input-files/my-media-file.flac"
transcribe.start_transcription_job(
    TranscriptionJobName = job_name,
    Media = {
        'MediaFileUri': job_uri
    },
    OutputBucketName = 'amzn-s3-demo-bucket',
    OutputKey = 'my-output-files/',
    LanguageCode = 'en-US',
    JobExecutionSettings = {
        'AllowDeferredExecution': True,
        'DataAccessRoleArn': 'arn:aws:iam::111122223333:role/ExampleRole'
   }
)

while True:
    status = transcribe.get_transcription_job(TranscriptionJobName = job_name)
    if status['TranscriptionJob']['TranscriptionJobStatus'] in ['COMPLETED', 'FAILED']:
        break
    print("Not ready yet...")
    time.sleep(5)
print(status)
You can view the progress of a queued job via the Amazon Web Services Management Console or by
submitting a GetTranscriptionJob
request. When a job is queued, the Status is QUEUED. The
status changes to IN_PROGRESS once your job starts processing, then
changes to COMPLETED or FAILED when processing
is finished.