# Tagging resources
A tag is a custom metadata label that you can add to a resource to make it easier to identify, organize, and find in a search. Tags are comprised of two individual parts: A tag key and a tag value. This is referred to as a key:value pair.
A tag key typically represents a larger category, while a tag value represents a subset of that category. For example you could have *tag key=Color* and *tag value=Blue*, which would produce the key:value pair `Color:Blue`. Note that you can set the value of a tag to an empty string, but you can't set the value of a tag to null. Omitting the tag value is the same as using an empty string.
**Tip**
Amazon Billing and Cost Management can use tags to separate your bills into dynamic categories. For example, if you add tags to represent different departments within your company, such as `Department:Sales` or `Department:Legal`, Amazon can provide you with your cost distribution per department.
In Amazon Transcribe, you can tag the following resources:
+ Transcription jobs
+ Medical transcription jobs
+ Call analytics post call transcription jobs
+ Custom vocabularies
+ Custom medical vocabularies
+ Custom vocabulary filters
+ Call analytics categories
+ Custom language models
Tag keys can be up to 128 characters in length and tag values can be up to 256 characters in length; both are case sensitive. Amazon Transcribe supports up to 50 tags per resource. For a given resource, each tag key must be unique with only one value. Note that your tags cannot begin with `aws:` because Amazon reserves this prefix for system-generated tags. You cannot add, modify, or delete `aws:*` tags, and they don't count against your tags-per-resource limit.
**API operations specific to resource tagging**
[https://docs.amazonaws.cn/transcribe/latest/APIReference/API_ListTagsForResource.html](https://docs.amazonaws.cn/transcribe/latest/APIReference/API_ListTagsForResource.html), [https://docs.amazonaws.cn/transcribe/latest/APIReference/API_TagResource.html](https://docs.amazonaws.cn/transcribe/latest/APIReference/API_TagResource.html), [https://docs.amazonaws.cn/transcribe/latest/APIReference/API_UntagResource.html](https://docs.amazonaws.cn/transcribe/latest/APIReference/API_UntagResource.html)
To use the tagging APIs, you must include an Amazon Resource Name (ARN) with your request. ARNs have the format `arn:partition:service:region:account-id:resource-type/resource-id`. For example, the ARN associated with a transcription job may look like: `arn:{{aws}}:transcribe:{{us-west-2}}:{{111122223333}}:transcription-job/{{my-transcription-job-name}}`.
To learn more about tagging, including best practices, see [Tagging Amazon resources](https://docs.amazonaws.cn/general/latest/gr/aws_tagging.html).
## Tag-based access control
You can use tags to control access within your Amazon Web Services accounts. For tag-based access control, you provide tag information in the condition element of an IAM policy. You can then use tags and their associated tag condition key to control access to:
+ **Resources:** Control access to your Amazon Transcribe resources based on the tags you've assigned to those resources.
+ Use the `aws:ResourceTag/{{key-name}}` condition key to specify which tag key:value pair must be attached to the resource.
+ **Requests:** Control which tags can be passed in a request.
+ Use the `aws:RequestTag/{{key-name}}` condition key to specify which tags can be added, modified, or removed from an IAM user or role.
+ **Authorization processes:** Control tag-based access for any part of your authorization process.
+ Use the `aws:TagKeys/` condition key to control whether specific tag keys can be used on a resource, in a request, or by a principal. In this case, the key value doesn't matter.
For an example tag-based access control policy, see [Viewing transcription jobs based on tags](security_iam_id-based-policy-examples.md#tagging-transcription-policy).
For more detailed information on tag-based access control, see [Controlling access to Amazon resources using tags](https://docs.amazonaws.cn/IAM/latest/UserGuide/access_tags.html).
## Adding tags to your Amazon Transcribe resources
You can add tags before or after you run your Amazon Transcribe job. Using the existing **Create\*** and **Start\*** APIs, you can add add tags with your transcription request.
You can add, modify or delete tags using the **Amazon Web Services Management Console**, **Amazon CLI**, or **Amazon SDKs**; see the following for examples:
### Amazon Web Services Management Console
1. Sign in to the [Amazon Web Services Management Console](https://console.amazonaws.cn/transcribe/).
1. In the navigation pane, choose **Transcription jobs**, then select **Create job** (top right). This opens the **Specify job details** page.
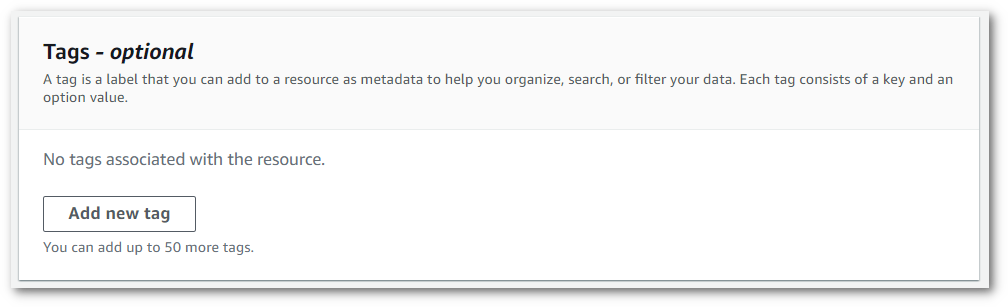
1. Scroll to the bottom of the **Specify job details** page to find the **Tags - *optional*** box and select **Add new tag**.
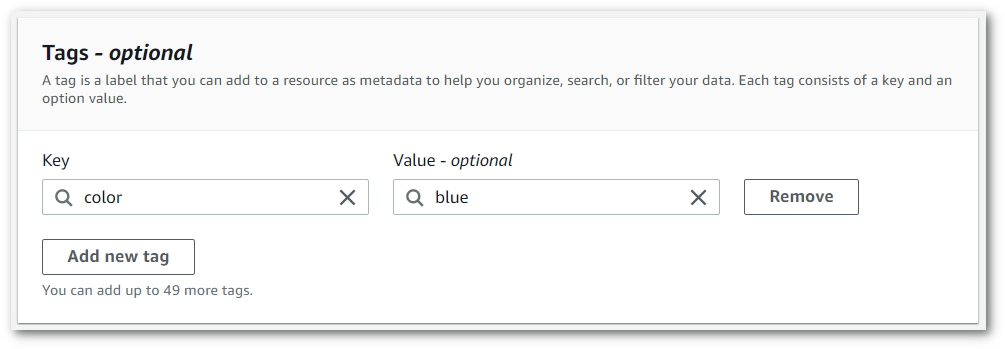
1. Enter information for the **Key** field and, optionally, the **Value** field.
1. Fill in any other fields you want to include on the **Specify job details** page, then select **Next**. This takes you to the **Configure job - *optional* page.**
Select **Create job** to run your transcription job.
1. You can view the tags associated with a transcription job by navigating to the **Transcription jobs** page, selecting a transcription job, and scrolling to the bottom of that job's information page. If you want to edit your tags, you can do so by selecting **Manage tags**.

### Amazon CLI
This example uses the [start-transcription-job](https://awscli.amazonaws.com/v2/documentation/api/latest/reference/transcribe/start-transcription-job.html) command and `Tags` parameter. For more information, see [https://docs.amazonaws.cn/transcribe/latest/APIReference/API_StartTranscriptionJob.html](https://docs.amazonaws.cn/transcribe/latest/APIReference/API_StartTranscriptionJob.html) and [https://docs.amazonaws.cn/transcribe/latest/APIReference/API_Tag.html](https://docs.amazonaws.cn/transcribe/latest/APIReference/API_Tag.html).
```
aws transcribe start-transcription-job \
--region {{us-west-2}} \
--transcription-job-name {{my-first-transcription-job}} \
--media MediaFileUri=s3://{{amzn-s3-demo-bucket}}/{{my-input-files}}/{{my-media-file}}.{{flac}} \
--output-bucket-name {{amzn-s3-demo-bucket}} \
--output-key {{my-output-files}}/ \
--language-code {{en-US}} \
--tags Key={{color}},Value={{blue}} Key={{shape}},Value={{square}}
```
Here's another example using the [start-transcription-job](https://awscli.amazonaws.com/v2/documentation/api/latest/reference/transcribe/start-transcription-job.html) command, and a request body that adds tags to that job.
```
aws transcribe start-transcription-job \
--region {{us-west-2}} \
--cli-input-json file://{{filepath}}/{{my-first-tagging-job.json}}
```
The file *my-first-tagging-job.json* contains the following request body.
```
{
"TranscriptionJobName": "{{my-first-transcription-job}}",
"Media": {
"MediaFileUri": "s3://{{amzn-s3-demo-bucket}}/{{my-input-files}}/{{my-media-file}}.{{flac}}"
},
"OutputBucketName": "{{amzn-s3-demo-bucket}}",
"OutputKey": "{{my-output-files}}/",
"LanguageCode": "{{en-US}}",
"Tags": [
{
"Key": "{{color}}",
"Value": "{{blue}}"
},
{
"Key": "{{shape}}",
"Value": "{{square}}"
}
]
}
```
### Amazon SDK for Python (Boto3)
The following example uses the Amazon SDK for Python (Boto3) to add a tag by using the `Tags` argument for the [start\_transcription\_job](https://boto3.amazonaws.com/v1/documentation/api/latest/reference/services/transcribe.html#TranscribeService.Client.start_transcription_job) method. For more information, see [https://docs.amazonaws.cn/transcribe/latest/APIReference/API_StartTranscriptionJob.html](https://docs.amazonaws.cn/transcribe/latest/APIReference/API_StartTranscriptionJob.html) and [https://docs.amazonaws.cn/transcribe/latest/APIReference/API_Tag.html](https://docs.amazonaws.cn/transcribe/latest/APIReference/API_Tag.html).
For additional examples using the Amazon SDKs, including feature-specific, scenario, and cross-service examples, refer to the [Code examples for Amazon Transcribe using Amazon SDKs](service_code_examples.md) chapter.
```
from __future__ import print_function
import time
import boto3
transcribe = boto3.client('transcribe', '{{us-west-2}}')
job_name = "{{my-first-transcription-job}}"
job_uri = "s3://{{amzn-s3-demo-bucket}}/{{my-input-files}}/{{my-media-file}}.{{flac}}"
transcribe.start_transcription_job(
TranscriptionJobName = job_name,
Media = {
'MediaFileUri': job_uri
},
OutputBucketName = '{{amzn-s3-demo-bucket}}',
OutputKey = '{{my-output-files}}/',
LanguageCode = '{{en-US}}',
Tags = [
{
'Key':'{{color}}',
'Value':'{{blue}}'
}
]
)
while True:
status = transcribe.get_transcription_job(TranscriptionJobName = job_name)
if status['TranscriptionJob']['TranscriptionJobStatus'] in ['COMPLETED', 'FAILED']:
break
print("Not ready yet...")
time.sleep(5)
print(status)
```