# Setting up an Amazon API Gateway method as a custom identity provider
This tutorial illustrates how to set up an Amazon API Gateway method and use it as a custom identity provider to upload files to an Amazon Transfer Family server. This tutorial uses the [Basic stack template](https://s3.amazonaws.com/aws-transfer-resources/custom-idp-templates/aws-transfer-custom-idp-basic-apig.template.yml), and other basic functionality as an example only.
**Topics**
+ [Prerequisites](#prereq-api-gateway-tutorial)
+ [Step 1: Create a CloudFormation stack](#create-cf-stack)
+ [Step 2: Check the API Gateway method configuration for your server](#deploy-api-gateway)
+ [Step 3: View the Transfer Family server details](#create-transfer-server)
+ [Step 4: Test that your user can connect to the server](#test-user-server-connect)
+ [Step 5: Test the SFTP connection and file transfer](#test-sftp-connection)
+ [Step 6: Limit access to the bucket](#example-bucket)
+ [Update Lambda if using Amazon EFS](#lambda-posix)
## Prerequisites
Before you create the Transfer Family resources in Amazon CloudFormation, create your storage and your user role.
**To specify storage and create a user role**
1. Depending on which storage you are using, see the following documentation:
+ To create an Amazon S3 bucket, see [How do I create an S3 bucket?](https://docs.amazonaws.cn/AmazonS3/latest/user-guide/create-bucket-overview.html) in the *Amazon Simple Storage Service User Guide*.
+ To create an Amazon EFS file system, see [Configure an Amazon EFS file system](configure-storage.md#requirements-efs).
1. To create a user role, see [Create an IAM role and policy](requirements-roles.md)
You enter the details for your storage and your user role when you create your Amazon CloudFormation stack in the next section.
## Step 1: Create a CloudFormation stack
**To create an Amazon CloudFormation stack from the provided template**
1. Open the Amazon CloudFormation console at [https://console.amazonaws.cn/cloudformation](https://console.amazonaws.cn/cloudformation/).
1. Select **Create stack**, and choose **With new resources (standard)**.
1. In the **Prerequisite - Prepare template** pane, choose **Choose an existing template**.
1. Copy this link, [Basic stack template](https://s3.amazonaws.com/aws-transfer-resources/custom-idp-templates/aws-transfer-custom-idp-basic-apig.template.yml), and paste it into the **Amazon S3 URL** field.
1. Click **Next**.
1. Specify parameters, including a name for your stack. Be sure to do the following:
+ Replace the default values for **UserName** and **UserPassword**.
+ For **UserHomeDirectory**, enter the details for the storage (either an Amazon S3 bucket or an Amazon EFS filesystem) that you created earlier.
+ Replace the default **UserRoleArn** with the user role that you created earlier. The Amazon Identity and Access Management (IAM) role must have the appropriate permissions. For an example IAM role and bucket policy, see [Step 6: Limit access to the bucket](#example-bucket).
+ If you want to authenticate using a public key instead of a password, enter your public key in the **UserPublicKey1** field. The first time that you connect to the server using SFTP, you then provide the private key instead of a password.
1. Choose **Next**, and then choose **Next** again on the **Configure stack options** page.
1. Review the details for the stack that you are creating, and then choose **Create stack**.
**Note**
At the bottom of the page, under **Capabilities**, you must acknowledge that Amazon CloudFormation might create IAM resources.
## Step 2: Check the API Gateway method configuration for your server
**Note**
To improve security, you can configure a web application firewall. Amazon WAF is a web application firewall that lets you monitor the HTTP and HTTPS requests that are forwarded to an Amazon API Gateway. For details, see [Add a web application firewall](web-application-firewall.md).
**Do not enable API Gateway caching**
Do not enable caching for your API Gateway method when using it as a custom identity provider for Transfer Family. Caching is inappropriate and invalid for authentication requests because:
Each authentication request is unique and requires a live response, not a cached response
Caching provides no benefits since Transfer Family never sends duplicate or repeated requests to the API Gateway
Enabling caching will cause the API Gateway to respond with mismatched data, resulting in invalid responses to authentication requests
**To check the API Gateway method configuration for your server and deploy it**
1.
Open the API Gateway console at [https://console.amazonaws.cn/apigateway/](https://console.amazonaws.cn/apigateway/).
1. Choose the **Transfer Custom Identity Provider basic template API** that the Amazon CloudFormation template generated.
1. In the **Resources** pane, choose **GET**, and then choose **Method Request**.
1. For **Actions**, choose **Deploy API**. For **Deployment stage**, choose **prod**, and then choose **Deploy**.
After the API Gateway method is successfully deployed, view its performance in the **Stage Editor** section.
**Note**
Copy the **Invoke URL** address that appears at the top of the page. You will need it for the next step.
## Step 3: View the Transfer Family server details
When you use the template to create an Amazon CloudFormation stack, a Transfer Family server is automatically created.
**To view your Transfer Family server details**
1. Open the Amazon CloudFormation console at [https://console.amazonaws.cn/cloudformation](https://console.amazonaws.cn/cloudformation/).
1. Choose the stack that you created.
1. Choose the **Resources** tab.
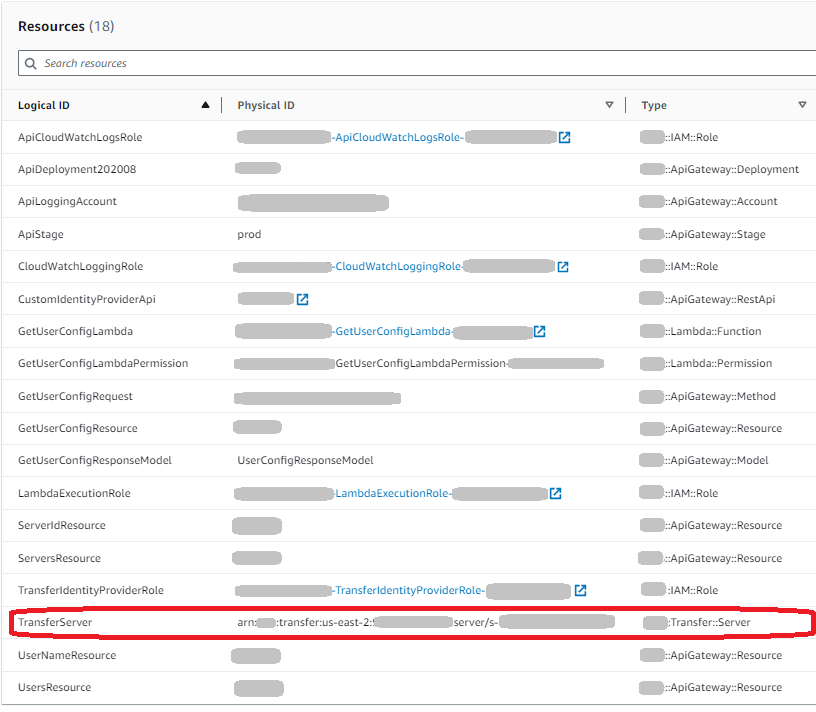
The server ARN is shown in the **Physical ID** column for the **TransferServer** row. The server ID is contained in the ARN, for example **s-11112222333344445**.
1. Open the Amazon Transfer Family console at [https://console.amazonaws.cn/transfer/](https://console.amazonaws.cn/transfer/), and on the **Servers** page, choose the new server.
The server ID matches the ID displayed for the **TransferServer** resource in Amazon CloudFormation.
## Step 4: Test that your user can connect to the server
**To test that your user can connect to the server, using the Transfer Family console**
1. Open the Amazon Transfer Family console at [https://console.amazonaws.cn/transfer/](https://console.amazonaws.cn/transfer/).
1. On the **Servers** page, choose your new server, choose **Actions**, and then choose **Test**.
1. Enter the text for your sign-in credentials into the **Username** field, and into the **Password** field. These are the values that you set when you deployed the Amazon CloudFormation stack.
1. For **Server Protocol**, select **SFTP**, and for **Source IP**, enter **127.0.0.1**.
1. Choose **Test**.
If user authentication succeeds, the test returns a `StatusCode: 200` HTML response and a JSON object containing the details of the user's roles and permissions. For example:
```
{
"Response": "{\"Role\": \"arn:aws-cn:iam::{{123456789012}}:role/{{my-user-role}}\",\"HomeDirectory\": \"/${transfer:HomeBucket}/\"}",
"StatusCode": 200,
"Message": "",
"Url": "https://{{1a2b3c4d5e}}.execute-api.{{us-east-2}}.amazonaws.com/prod/servers/s-{{1234abcd5678efgh0}}/users/{{myuser}}/config"
}
```
If the test fails, add one of the API Gateway Amazon managed policies to the role that you are using for your API.
## Step 5: Test the SFTP connection and file transfer
**To test the SFTP connection**
1. On a Linux or macOS device, open a command terminal.
1. Enter one of the following commands, depending on whether you are using a password or a key pair for authentication.
+ If you are using a password, enter this command:
` sftp -o PubkeyAuthentication=no {{myuser}}@{{server-ID}}.server.transfer.{{region-code}}.amazonaws.com `
When prompted, enter your password.
+ If you are using a key pair, enter this command:
` sftp -i {{private-key-file}} {{myuser}}@{{server-ID}}.server.transfer.{{region-code}}.amazonaws.com `
**Note**
For these `sftp` commands, insert the code for the Amazon Web Services Region where your Transfer Family server is located. For example, if your server is in US East (Ohio), enter **us-east-2**.
1. At the `sftp>` prompt, make sure that you can upload (`put`), download (`get`), and view directories and files (`pwd` and `ls`).
## Step 6: Limit access to the bucket
You can limit who can access a specific Amazon S3 bucket. The following example shows the settings to use in your CloudFormation stack and in the policy that you select for your user.
In this example, we set the following parameters for the Amazon CloudFormation stack:
+ **CreateServer**: `true`
+ **UserHomeDirectory**: `/amzn-s3-demo-bucket1`
+ **UserName**: `myuser`
+ **UserPassword**: `MySuperSecretPassword`
**Important**
This is an example password. When you configure your API Gateway method, make sure that you enter a strong password.
+ **UserPublicKey1**: `{{your-public-key}}`
+ **UserRoleArn**: `arn:aws-cn:iam::{{role-id}}:role/myuser-api-gateway-role`
``The **UserPublicKey1** is a public key that you have generated as part of a public/private key pair.
The `{{role-id}}` is unique to the user role that you create. The policy attached to the `myuser-api-gateway-role` is the following:
****
```
{
"Version":"2012-10-17",
"Statement": [
{
"Sid": "VisualEditor0",
"Effect": "Allow",
"Action": "s3:ListBucket",
"Resource": "arn:aws-cn:s3:::amzn-s3-demo-bucket1"
},
{
"Sid": "VisualEditor1",
"Effect": "Allow",
"Action": [
"s3:PutObject",
"s3:GetObjectAcl",
"s3:GetObject",
"s3:DeleteObjectVersion",
"s3:DeleteObject",
"s3:PutObjectAcl",
"s3:GetObjectVersion"
],
"Resource": "arn:aws-cn:s3:::amzn-s3-demo-bucket1/*"
}
]
}
```
To connect to the server using SFTP, enter one of the following commands at the prompt.
+ If you are using a password to authenticate, run the following command:
` sftp -o PubkeyAuthentication=no {{myuser}}@{{transfer-server-ID}}.server.transfer.{{region-id}}.amazonaws.com`
When prompted, enter your password.
+ If you are using a key pair to authenticate, run the following command:
` sftp -i {{private-key-file}} myuser@{{transfer-server-ID}}.server.transfer.{{region-id}}.amazonaws.com `
**Note**
For these `sftp` commands, use the ID for the Amazon Web Services Region where your Transfer Family server is located. For example, if your server is in US East (Ohio), use `us-east-2`.
At the `sftp` prompt, you are directed to your home directory, which you can view by running the `pwd` command. For example:
```
sftp> pwd
Remote working directory: /amzn-s3-demo-bucket1
```
The user cannot view any directories above the home directory. For example:
```
sftp> pwd
Remote working directory: /amzn-s3-demo-bucket1
sftp> cd ..
sftp> ls
Couldn't read directory: Permission denied
```
## Update Lambda if using Amazon EFS
If you selected Amazon EFS as the storage option for your Transfer Family server, you need to edit the lambda function for your stack.
**To add a Posix profile to your Lambda function**
1. Open the Lambda console at [https://console.amazonaws.cn/lambda/](https://console.amazonaws.cn/lambda/).
1. Select the Lambda function that you created earlier. The Lambda function has the format of **{{stack-name}}-GetUserConfigLambda-{{lambda-identifier}}**, where {{stack-name}} is the CloudFormation stack name and {{lambda-identifier}} is the identifier for the function.
1. In the **Code** tab, select **index.js** to display the code for the function.
1. In the `response`, add the following line between `Policy` and `HomeDirectory`:
` PosixProfile: {"Uid": {{uid-value}}, "Gid": {{gid-value}}}, `
Where the {{uid-value}} and {{gid-value}} are integers, 0 or greater, that represent the User ID and Group ID respectively.
For example, after you add the Posix profile, the response field might look like the following:
```
response = {
Role: 'arn:aws-cn:iam::123456789012:role/api-gateway-transfer-efs-role', // The user will be authenticated if and only if the Role field is not blank
Policy: '', // Optional JSON blob to further restrict this user's permissions
PosixProfile: {"Gid": 65534, "Uid": 65534},
HomeDirectory: '/fs-fab2c234' // Not required, defaults to '/'
};
```