Create an IAM role and policy
This topic describes the types of policies and roles that can be used with Amazon Transfer Family, and walks through the process of creating a user role. It also describes how session policies work and provides an example user role.
Amazon Transfer Family uses the following types of roles:
-
User role – Allows service-managed users to access the necessary Transfer Family resources. Amazon Transfer Family assumes this role in the context of a Transfer Family user ARN.
-
Access role – Provides access to only the Amazon S3 files that are being transferred. For inbound AS2 transfers, the access role uses the Amazon Resource Name (ARN) for the agreement. For outbound AS2 transfers, the access role uses the ARN for the connector.
-
Invocation role – For use with Amazon API Gateway as the server's custom identity provider. Transfer Family assumes this role in the context of a Transfer Family server ARN.
-
Logging role – Used to log entries into Amazon CloudWatch. Transfer Family uses this role to log success and failure details along with information about file transfers. Transfer Family assumes this role in the context of a Transfer Family server ARN. For outbound AS2 transfers, the logging role uses the connector ARN.
-
Execution role – Allows a Transfer Family user to call and launch workflows. Transfer Family assumes this role in the context of a Transfer Family workflow ARN.
In addition to these roles, you can also use session policies. A session policy is used to limit access when necessary. Note that these policies are stand-alone: that is, you don't add these polices to a role. Rather, you add a session policy directly to a Transfer Family user.
Note
When you are creating a service-managed Transfer Family user, you can select Auto-generate policy based on home folder. This is a useful shortcut if you want to limit user access to their own folders. Also, you can view details about session policies and an example in How session policies work. You can also find more information about session policies in Session policies in the IAM User Guide.
Create a user role
When you create a user, you make a number of decisions about user access. These
decisions include which Amazon S3 buckets or Amazon EFS file systems that the user can access,
what portions of each Amazon S3 bucket and which files in the file system are accessible,
and what permissions the user has (for example, PUT or
GET).
To set access, you create an identity-based Amazon Identity and Access Management (IAM) policy and role that provide that access information. As part of this process, you provide access for your user to the Amazon S3 bucket or Amazon EFS file system that is the target or source for file operations. To do this, take the following high-level steps, described in detail later:
Create a user role
-
Create an IAM policy for Amazon Transfer Family. This is described in To create an IAM policy for Amazon Transfer Family.
-
Create an IAM role and attach the new IAM policy. For an example, see Example read/write access policy.
-
Establish a trust relationship between Amazon Transfer Family and the IAM role. This is described in To establish a trust relationship.
The following procedures describe how to create an IAM policy and role.
To create an IAM policy for Amazon Transfer Family
-
Open the IAM console at https://console.amazonaws.cn/iam/
. -
In the navigation pane, choose Policies, and then choose Create policy.
-
On the Create Policy page, choose the JSON tab.
-
In the editor that appears, replace the contents of the editor with the IAM policy that you want attach to the IAM role.
You can grant read/write access or restrict users to their home directory. For more information, see Example read/write access policy.
-
Choose Review policy and provide a name and description for your policy, and then choose Create policy.
Next, you create an IAM role and attach the new IAM policy to it.
To create an IAM role for Amazon Transfer Family
-
In the navigation pane, choose Roles, and then choose Create role.
On the Create role page, make sure that Amazon service is chosen.
-
Choose Transfer from the service list, and then choose Next: Permissions. This establishes a trust relationship between Amazon Transfer Family and Amazon.
-
In the Attach permissions policies section, locate and choose the policy that you just created, and choose Next: Tags.
-
(Optional) Enter a key and value for a tag, and choose Next: Review.
-
On the Review page, enter a name and description for your new role, and then choose Create role.
Next, you establish a trust relationship between Amazon Transfer Family and Amazon.
To establish a trust relationship
Note
In our examples, we use both ArnLike and ArnEquals.
They are functionally identical, and therefore you may use either when you construct your policies.
Transfer Family documentation uses ArnLike when the condition contains a wildcard character, and
ArnEquals to indicate an exact match condition.
-
In the IAM console, choose the role that you just created.
-
On the Summary page, choose Trust relationships, and then choose Edit trust relationship.
-
In the Edit Trust Relationship editor, make sure service is
"transfer.amazonaws.com". The access policy is shown following.-
{
  "Version":"2012-10-17",
  "Statement": [
    {
      "Effect": "Allow",
      "Principal": {
        "Service": "transfer.amazonaws.com"
      },
      "Action": "sts:AssumeRole"
    }
  ]
}
We recommend that you use the
aws:SourceAccountandaws:SourceArncondition keys to protect yourself against the confused deputy problem. The source account is the owner of the server and the source ARN is the ARN of the user. For example:"Condition": { "StringEquals": { "aws:SourceAccount": "account_id" }, "ArnLike": { "aws:SourceArn": "arn:aws-cn:transfer:region:account_id:user/*" } }You can also use the
ArnLikecondition if you are looking to restrict to a particular server instead of any server in the user account. For example:"Condition": { "ArnLike": { "aws:SourceArn": "arn:aws-cn:transfer:region:account-id:user/server-id/*" } }Note
In the examples above, replace each
user input
                                placeholder
with your own information.For details on the confused deputy problem and more examples, see Cross-service confused deputy prevention.
-
Choose Update Trust Policy to update the access policy.
You have now created an IAM role that allows Amazon Transfer Family to call Amazon services on your behalf. You attached to the role the IAM policy that you created to give access to your user. In the Getting started with Amazon Transfer Family server endpoints section, this role and policy are assigned to your user or users.
See also
-
For more general information about IAM roles, see Creating a role to delegate permissions to an Amazon service in the IAM User Guide.
-
To learn more about identity-based policies for Amazon S3 resources, see Identity and access management in Amazon S3 in the Amazon Simple Storage Service User Guide.
-
To learn more about identity-based policies for Amazon EFS resources, see Using IAM to control file system data access in the Amazon Elastic File System User Guide.
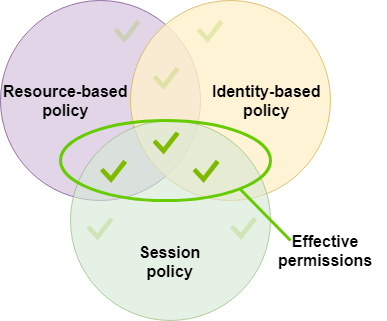
How session policies work
When an administrator creates a role, the role often includes broad permissions to cover multiple use cases or team members. If an administrator configures a console URL, they can reduce permissions for the resulting session by using a session policy. For example, if you create a role with read/write access, you can set up a URL that limits users’ access to only their home directories.
Session policies are advanced policies that you pass as a parameter when you programmatically create a temporary session for a role or user. Session policies are useful for locking down users so that they have access only to portions of your bucket where object prefixes contain their username. The following diagram shows that the session policy's permissions are the intersection of the session policies and the resource-based policies plus the intersection of the session policies and identity-based policies.
For more details, see Session policies in the IAM User Guide.
In Amazon Transfer Family, a session policy is supported only when you are transferring to or
from Amazon S3. The following example policy is a session policy that limits users'
access to their home directories only. Note the following:
-
The
GetObjectACLandPutObjectACLstatements are only required if you need to enable Cross Account Access. That is, your Transfer Family server needs to access a bucket in a different account. -
The maximum length of a session policy is 2048 characters. For more details, see the Policy request parameter for the
CreateUseraction in the API reference. -
If your Amazon S3 bucket is encrypted using Amazon Key Management Service (Amazon KMS), you must specify additional permissions in your policy. For details, see Data protection and encryption.
-
To use session policies to create access permissions based on user attributes without creating separate IAM roles for each user, see Dynamic permission management approaches.
-
{
    "Version":"2012-10-17",
    "Statement": [
        {
            "Sid": "AllowListingOfUserFolder",
            "Action": [
                "s3:ListBucket"
            ],
            "Effect": "Allow",
            "Resource": [
                "arn:aws-cn:s3:::${transfer:HomeBucket}"
            ],
            "Condition": {
                "StringLike": {
                    "s3:prefix": [
                        "${transfer:HomeFolder}/*",
                        "${transfer:HomeFolder}"
                    ]
                }
            }
        },
        {
            "Sid": "HomeDirObjectAccess",
            "Effect": "Allow",
            "Action": [
                "s3:PutObject",
                "s3:GetObject",
                "s3:DeleteObject",
                "s3:DeleteObjectVersion",
                "s3:GetObjectVersion",
                "s3:GetObjectACL",
                "s3:PutObjectACL"
            ],
            "Resource": "arn:aws-cn:s3:::${transfer:HomeDirectory}/*"
        }
    ]
}
Note
The preceding policy example assumes that users have their home directories set to include a trailing slash, to signify that it is a directory.
If, on the other hand, you set a user's HomeDirectory without the trailing slash, then you should include it as part of your policy.
In the previous example policy, note the use of the
transfer:HomeFolder, transfer:HomeBucket, and
transfer:HomeDirectory policy parameters. These parameters are set
for the HomeDirectory that is configured for the user, as described in
HomeDirectory and
Implementing your API Gateway method.
These parameters have the following definitions:
The
transfer:HomeBucketparameter is replaced with the first component ofHomeDirectory.The
transfer:HomeFolderparameter is replaced with the remaining portions of theHomeDirectoryparameter.The
transfer:HomeDirectoryparameter has the leading forward slash (/) removed so that it can be used as part of an S3 Amazon Resource Name (ARN) in aResourcestatement.
Note
If you are using logical directories—that is, the user's homeDirectoryType is LOGICAL—these policy parameters (HomeBucket,
HomeDirectory, and HomeFolder) are not supported.
For example, assume that the HomeDirectory parameter that is
configured for the Transfer Family user is /home/bob/amazon/stuff/.
transfer:HomeBucketis set to/home.transfer:HomeFolderis set to/bob/amazon/stuff/.transfer:HomeDirectorybecomeshome/bob/amazon/stuff/.
The first "Sid" allows the user to list all directories starting from
/home/bob/amazon/stuff/.
The second "Sid" limits the user'put and
get access to that same path,
/home/bob/amazon/stuff/.
Example read/write access policy
Grant read/write access to Amazon S3 bucket
The following example policy for Amazon Transfer Family grants read/write access to objects in your Amazon S3 bucket.
Note the following:
-
Replace
amzn-s3-demo-bucketwith the name of your Amazon S3 bucket. -
The
GetObjectACLandPutObjectACLstatements are only required if you need to enable Cross Account Access. That is, your Transfer Family server needs to access a bucket in a different account. -
The
GetObjectVersionandDeleteObjectVersionstatements are only required if versioning is enabled on the Amazon S3 bucket that is being accessed.Note
If you have ever enabled versioning for your bucket, then you need these permissions, as you can only suspend versioning in Amazon S3, and not turn it off completely. For details, see Unversioned, versioning-enabled, and versioning-suspended buckets.
-
{
    "Version":"2012-10-17",
    "Statement": [
        {
            "Sid": "AllowListingOfUserFolder",
            "Action": [
                "s3:ListBucket",
                "s3:GetBucketLocation"
            ],
            "Effect": "Allow",
            "Resource": [
                "arn:aws-cn:s3:::amzn-s3-demo-bucket"
            ]
        },
        {
            "Sid": "HomeDirObjectAccess",
            "Effect": "Allow",
            "Action": [
                "s3:PutObject",
                "s3:GetObject",
                "s3:GetObjectTagging",
                "s3:DeleteObject",
                "s3:DeleteObjectVersion",
                "s3:GetObjectVersion",
                "s3:GetObjectVersionTagging",
                "s3:GetObjectACL",
                "s3:PutObjectACL"
            ],
            "Resource": "arn:aws-cn:s3:::amzn-s3-demo-bucket/*"
        }
    ]
}
Grant file system access to files in Amazon EFS file system
Note
In addition to the policy, you must also make sure your POSIX file permissions are granting the appropriate access. For more information, see Working with users, groups, and permissions at the Network File System (NFS) Level in the Amazon Elastic File System User Guide.
The following example policy grants root file system access to files in your Amazon EFS file system.
Note
In the following examples, replace region with your
region, account-id with the account the file is in,
and file-system-id with the ID of your Amazon Elastic File System
(Amazon EFS).
-
{
    "Version":"2012-10-17",
    "Statement": [
        {
            "Sid": "RootFileSystemAccess",
            "Effect": "Allow",
            "Action": [
                "elasticfilesystem:ClientRootAccess",
                "elasticfilesystem:ClientMount",
                "elasticfilesystem:ClientWrite"
            ],
            "Resource": "arn:aws-cn:elasticfilesystem:us-east-1:123456789012:file-system/file-system-id"
        }
    ]
}
The following example policy grants user file system access to files in your Amazon EFS file system.
-
{
    "Version":"2012-10-17",
    "Statement": [
        {
            "Sid": "UserFileSystemAccess",
            "Effect": "Allow",
            "Action": [
                "elasticfilesystem:ClientMount",
                "elasticfilesystem:ClientWrite"
            ],
            "Resource": "arn:aws-cn:elasticfilesystem:us-east-1:123456789012:file-system/file-system-id"
        }
    ]
}