Sending and receiving AS2 messages
This section describes the processes for sending and receiving AS2 messages. It also provide details on filenames and locations associated with AS2 messages.
The following table lists the available encryption algorithms for AS2 messages, and when you can use them.
| Encryption algorithm | HTTP | HTTPS | Notes |
|---|---|---|---|
| AES128_CBC | Yes | Yes | |
| AES192_CBC | Yes | Yes | |
| AES256_CBC | Yes | Yes | |
| DES_EDE3_CBC | Yes | Yes | Only use this algorithm if you must support a legacy client that requires it, as it is a weak encryption algorithm. |
| NONE | No | Yes | If you are sending messages to a Transfer Family server, you can only select
NONE if you are using an Application Load Balancer
(ALB). |
Topics
Receive AS2 message process
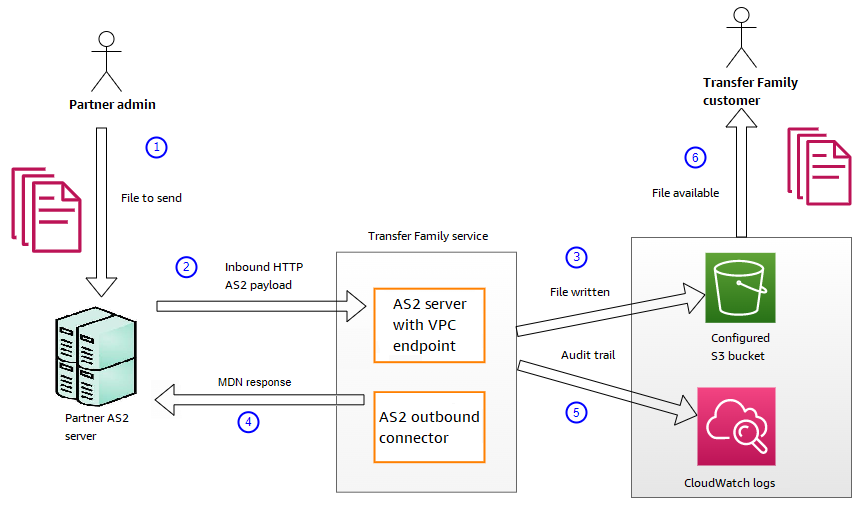
The inbound process is defined as a message or file that's being transferred to your Amazon Transfer Family server. The sequence for inbound messages is as follows:
-
An admin or automated process starts an AS2 file transfer on the partner's remote AS2 server.
-
The partner's remote AS2 server signs and encrypts the file contents, then sends an HTTP POST request to an AS2 inbound endpoint hosted on Transfer Family.
-
Using the configured values for the server, partners, certificates, and agreement, Transfer Family decrypts and verifies the AS2 payload. The file contents are stored in the configured Amazon S3 file store.
-
The signed MDN response is returned either inline with the HTTP response, or asynchronously through a separate HTTP POST request back to the originating server.
-
An audit trail is written to Amazon CloudWatch with details about the exchange.
-
The decrypted file is available in a folder named
inbox/processed.
Sending and receiving AS2 messages over HTTPS
This section describes how to configure a Transfer Family server that uses the AS2 protocol to send and receive messages over HTTPS.
Send AS2 messages over HTTPS
To send AS2 messages using HTTPS, create a connector with the following information:
-
For the URL, specify an HTTPS URL
-
For the encryption algorithm, select any of the available algorithms.
Note
To send messages to a Transfer Family server while not using encryption (that is, you select
NONEfor the encryption algorithm), you must use an Application Load Balancer (ALB). -
Provide the remaining values for the connector as described in Configure AS2 connectors.
Receive AS2 messages over HTTPS
Amazon Transfer Family AS2 servers currently only provide HTTP transport over port 5080. However, you can terminate TLS on a network or application load balancer in front of your Transfer Family server VPC endpoint by using a port and certificate of your choosing. With this approach, you can have incoming AS2 messages use HTTPS.
Prerequisites
-
The VPC must be in the same Amazon Web Services Region as your Transfer Family server.
-
The subnets of your VPC must be within the Availability Zones that you want to use your server in.
Note
Each Transfer Family server can support up to three Availability Zones.
-
Allocate up to three Elastic IP addresses in the same Region as your server. Or, you can choose to bring your own IP address range (BYOIP).
Note
The number of Elastic IP addresses must match the number of Availability Zones that you use with your server endpoints.
You can configure either a Network Load Balance (NLB) or an Application Load Balancer (ALB). The following table lists the pros and cons for each approach.
The table below provides the differences in capabilities when you use an NLB versus an ALB to terminate TLS.
| Feature | Network Load Balancer (NLB) | Application Load Balancer (ALB) |
|---|---|---|
| Latency | Lower latency as it operates at the network layer. | Higher latency as it operates at the application layer. |
| Static IP support | Can attach Elastic IP addresses that can be static. | Cannot attach Elastic IP addresses: provides a domain whose underlying IP addresses can change. |
| Advanced routing | Doesn't support advanced routing. | Supports advanced routing. Can inject
This header is described in X-Forwarded-Proto |
| TLS/SSL termination | Supports TLS/SSL termination | Supports TLS/SSL termination |
| Mutual TLS (mTLS) | Transfer Family doesn't currently support using an NLB for mTLS | Support for mTLS |
After you set up the load balancer, clients communicate with the load balancer over the custom port listener. Then, the load balancer communicates with the server over port 5080.
To create a target group
-
After you choose Create target group in the previous procedure, you are taken to the Specify group details page for a new target group.
-
In the Basic configuration section, enter the following information.
-
For Choose a target type, choose IP addresses.
-
For Target group name, enter a name for the target group.
-
For Protocol, your selection is dependent upon whether you are using an ALB or an NLB.
-
For a Network Load Balancer (NLB), choose TCP
-
For an Application Load Balancer (ALB), choose HTTP
-
-
For Port, enter
5080. -
For IP address type, choose IPv4.
-
For VPC, choose the VPC that you created for your Transfer Family AS2 server.
-
-
In the Health checks section, choose the Health check protocol.
-
For an ALB, choose HTTP
-
For an NLB, choose TCP
-
-
Choose Next.
-
On the Register targets page, enter the following information:
-
For Network, confirm that the VPC that you created for your Transfer Family AS2 server is specified.
-
For IPv4 address, enter the private IPv4 address of your Transfer Family AS2 server's endpoints.
If you have more than one endpoint for your server, choose Add IPv4 address to add another row for entering another IPv4 address. Repeat this process until you've entered the private IP addresses for all of your server's endpoints.
-
Make sure that Ports is set to
5080. -
Choose Include as pending below to add your entries to the Review targets section.
-
-
In the Review targets section, review your IP targets.
-
Choose Create target group, then go back to the previous procedure for creating your NLB and enter the new target group where indicated.
Test access to the server from an Elastic IP address
Connect to the server over the custom port by using an Elastic IP address or the DNS name of the Network Load Balancer.
Important
Manage access to your server from client IP addresses by using the network access control lists (network ACLs) for the subnets configured on the load balancer. Network ACL permissions are set at the subnet level, so the rules apply to all resources that are using the subnet. You can't control access from client IP addresses by using security groups, because the load balancer's target type is set to IP addresses instead of Instances. Therefore, the load balancer doesn't preserve source IP addresses. If the Network Load Balancer's health checks fail, this means that the load balancer can't connect to the server endpoint. To troubleshoot this issue, check the following:
-
Confirm that the server endpoint's associated security group
allows inbound connections from the subnets that are configured on the load balancer. The load balancer must be able to connect to the server endpoint over port 5080. -
Confirm that the server's State is Online.
Transferring files by using an AS2 connector
AS2 connectors establish a relationship between trading partners for transfers of AS2 messages from a Transfer Family server to an external, partner-owned destination.
You can use Transfer Family to send AS2 messages by referencing the connector ID and the paths
to the files, as illustrated in the following start-file-transfer Amazon Command Line Interface (Amazon CLI) command:
aws transfer start-file-transfer --connector-id c-1234567890abcdef0\ --send-file-paths "/amzn-s3-demo-source-bucket/myfile1.txt" "/amzn-s3-demo-source-bucket/myfile2.txt"
To get the details for your connectors, run the following command:
aws transfer list-connectors
The list-connectors command returns the connector IDs, URLs, and Amazon Resource Names (ARNs)
for your connectors.
To return the properties of a particular connector, run the following command with the ID that you want to use:
aws transfer describe-connector --connector-idyour-connector-id
The describe-connector command returns all of the properties for the connector,
including its URL, roles, profiles, Message Disposition Notices (MDNs), tags, and monitoring metrics.
You can confirm that the partner successfully received the files by viewing the JSON and MDN files. These files are named according to the conventions described in File names and locations. If you configured a logging role when you created the connector, you can also check your CloudWatch logs for the status of AS2 messages.
To view AS2 connector details, see View AS2 connector details. For more information about creating AS2 connectors, see Configure AS2 connectors.
To send an AS2 outbound message
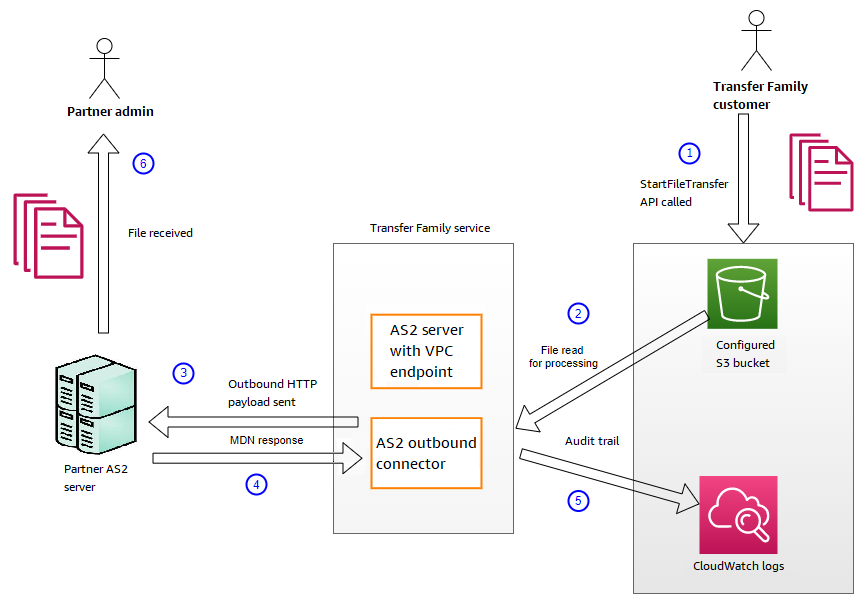
The outbound process is defined as a message or file being sent from Amazon to an external client or service. The sequence for outbound messages is as follows:
-
An admin calls the
start-file-transferAmazon Command Line Interface (Amazon CLI) command or theStartFileTransferAPI operation. This operation references aconnectorconfiguration. -
Transfer Family detects a new file request and locates the file. The file is compressed, signed, and encrypted.
-
A transfer HTTP client performs an HTTP POST request to transmit the payload to the partner's AS2 server.
-
The process returns the signed MDN response, either inline with the HTTP response (synchronous or asynchronous MDN).
-
As the file moves between different stages of transmission, the process delivers the MDN response receipt and processing details to the customer.
-
The remote AS2 server makes the decrypted and verified file available to the partner admin.
AS2 processing supports many of the RFC 4130 protocols, with a focus on common use cases and integration with existing AS2-enabled server implementations. For details of the supported configurations, see AS2 configurations.
File names and locations
This section discusses the file-naming conventions for AS2 transfers.
For inbound file transfers, note the following:
-
You specify the base directory in an agreement. The base directory is the Amazon S3 bucket name combined with a prefix, if any. For example,
/.amzn-s3-demo-bucket/AS2-folder -
If an incoming file is processed successfully, the file (and the corresponding JSON file) is saved to the
/processedfolder. For example,/.amzn-s3-demo-bucket/AS2-folder/processedThe JSON file contains the following fields:
-
agreement-id -
as2-from -
as2-to -
as2-message-id -
transfer-id -
client-ip -
connector-id -
failure-message -
file-path -
message-subject -
mdn-message-id -
mdn-subject -
requester-file-name -
requester-content-type -
server-id -
status-code -
failure-code -
transfer-size
-
-
If an incoming file cannot be processed successfully, the file (and the corresponding JSON file) is saved to the
/failedfolder. For example,/amzn-s3-demo-bucket/AS2-folder/failed. -
The transferred file is stored in the
processedfolder asoriginal_filename.messageId.original_extension -
A JSON file is created and saved as
original_filename.messageId.original_extension.json.jsonis appended to the transferred file's name. -
A Message Disposition Notice (MDN) file is created and saved as
original_filename.messageId.original_extension.mdn.mdnis appended to the transferred file's name. -
If there is an inbound file named
ExampleFileInS3Payload.dat, the following files are created:-
File –
ExampleFileInS3Payload.c4d6b6c7-23ea-4b8c-9ada-0cb811dc8b35@44313c54b0a46a36.dat -
JSON –
ExampleFileInS3Payload.c4d6b6c7-23ea-4b8c-9ada-0cb811dc8b35@44313c54b0a46a36.dat.json -
MDN –
ExampleFileInS3Payload.c4d6b6c7-23ea-4b8c-9ada-0cb811dc8b35@44313c54b0a46a36.dat.mdn
-
For outbound transfers, the naming is similar, with the difference that there is
no incoming message file, and also, the transfer ID for the transferred message is
added to the file name. The transfer ID is returned by the
StartFileTransfer API operation (or when another process or script
calls this operation).
-
The
transfer-idis an identifier that is associated with a file transfer. All requests that are part of aStartFileTransfercall share atransfer-id. -
The base directory is the same as the path that you use for the source file. That is, the base directory is the path that you specify in the
StartFileTransferAPI operation orstart-file-transferAmazon CLI command. For example:aws transfer start-file-transfer --send-file-paths/amzn-s3-demo-bucket/AS2-folder/file-to-send.txtIf you run this command, MDN and JSON files are saved in
/amzn-s3-demo-bucket/AS2-folder/processed(for successful transfers), or/amzn-s3-demo-bucket/AS2-folder/failed(for unsuccessful transfers). -
A JSON file is created and saved as
original_filename.transferId.messageId.original_extension.json -
An MDN file is created and saved as
original_filename.transferId.messageId.original_extension.mdn -
If there is an outbound file named
ExampleFileOutTestOutboundSyncMdn.dat, the following files are created:-
JSON –
ExampleFileOutTestOutboundSyncMdn.dedf4601-4e90-4043-b16b-579af35e0d83.fbe18db8-7361-42ff-8ab6-49ec1e435f34@c9c705f0baaaabaa.dat.json -
MDN –
ExampleFileOutTestOutboundSyncMdn.dedf4601-4e90-4043-b16b-579af35e0d83.fbe18db8-7361-42ff-8ab6-49ec1e435f34@c9c705f0baaaabaa.dat.mdn
-
You can also check the CloudWatch logs to view the details of your transfers, including any that failed.
Status codes
The following table lists all of the status codes that can be logged to CloudWatch logs when you or your partner send an AS2 message. Different message processing steps apply to different message types and are intended for monitoring only. The COMPLETED and FAILED states represent the final step in processing, and are visible in JSON files.
| Code | Description | Processing completed? |
|---|---|---|
| PROCESSING | The message is in the process of being converted to its final format. For example, decompression and decryption steps both have this status. | No |
| MDN_TRANSMIT | Message processing is sending an MDN response. | No |
| MDN_RECEIVE | Message processing is receiving an MDN response. | No |
| COMPLETED | Message processing has completed successfully. This state includes when an MDN is sent for an inbound message or for MDN verification of outbound messages. | Yes |
| FAILED | The message processing has failed. For a list of error codes, see AS2 error codes. | Yes |
Sample JSON files
This section lists sample JSON files for both inbound and outbound transfers, including sample files for successful transfers and transfers that fail.
Sample outbound file that is successfully transferred:
{
  "requester-content-type": "application/octet-stream",
  "message-subject": "File xyzTest from MyCompany_OID to partner YourCompany",
  "requester-file-name": "TestOutboundSyncMdn-9lmCr79hV.dat",
  "as2-from": "MyCompany_OID",
  "connector-id": "c-c21c63ceaaf34d99b",
  "status-code": "COMPLETED",
  "disposition": "automatic-action/MDN-sent-automatically; processed",
  "transfer-size": 3198,
  "mdn-message-id": "OPENAS2-11072022063009+0000-df865189-1450-435b-9b8d-d8bc0cee97fd@PartnerA_OID_MyCompany_OID",
  "mdn-subject": "Message be18db8-7361-42ff-8ab6-49ec1e435f34@c9c705f0baaaabaa has been accepted",
  "as2-to": "PartnerA_OID",
  "transfer-id": "dedf4601-4e90-4043-b16b-579af35e0d83",
  "file-path": "/amzn-s3-demo-bucket/as2testcell0000/openAs2/TestOutboundSyncMdn-9lmCr79hV.dat",
  "as2-message-id": "fbe18db8-7361-42ff-8ab6-49ec1e435f34@c9c705f0baaaabaa",
  "timestamp": "2022-07-11T06:30:10.791274Z"
}
Sample outbound file that is unsuccessfully transferred:
{
  "failure-code": "HTTP_ERROR_RESPONSE_FROM_PARTNER",
  "status-code": "FAILED",
  "requester-content-type": "application/octet-stream",
  "subject": "Test run from Id da86e74d6e57464aae1a55b8596bad0a to partner 9f8474d7714e476e8a46ce8c93a48c6c",
  "transfer-size": 3198,
  "requester-file-name": "openAs2TestOutboundWrongAs2Ids-necco-3VYn5n8wE.dat",
  "as2-message-id": "9a9cc9ab-7893-4cb6-992a-5ed8b90775ff@718de4cec1374598",
  "failure-message": "http://Test123456789.us-east-1.elb.amazonaws.com:10080 returned status 500 for message with ID 9a9cc9ab-7893-4cb6-992a-5ed8b90775ff@718de4cec1374598",
  "transfer-id": "07bd3e07-a652-4cc6-9412-73ffdb97ab92",
  "connector-id": "c-056e15cc851f4b2e9",
  "file-path": "/amzn-s3-demo-bucket-4c1tq6ohjt9y/as2IntegCell0002/openAs2/openAs2TestOutboundWrongAs2Ids-necco-3VYn5n8wE.dat",
  "timestamp": "2022-07-11T21:17:24.802378Z"
}
Sample inbound file that is successfully transferred:
{
  "requester-content-type": "application/EDI-X12",
  "subject": "File openAs2TestInboundAsyncMdn-necco-5Ab6bTfCO.dat sent from MyCompany to PartnerA",
  "client-ip": "10.0.109.105",
  "requester-file-name": "openAs2TestInboundAsyncMdn-necco-5Ab6bTfCO.dat",
  "as2-from": "MyCompany_OID",
  "status-code": "COMPLETED",
  "disposition": "automatic-action/MDN-sent-automatically; processed",
  "transfer-size": 1050,
  "mdn-subject": "Message Disposition Notification",
  "as2-message-id": "OPENAS2-11072022233606+0000-5dab0452-0ca1-4f9b-b622-fba84effff3c@MyCompany_OID_PartnerA_OID",
  "as2-to": "PartnerA_OID",
  "agreement-id": "a-f5c5cbea5f7741988",
  "file-path": "processed/openAs2TestInboundAsyncMdn-necco-5Ab6bTfCO.OPENAS2-11072022233606+0000-5dab0452-0ca1-4f9b-b622-fba84effff3c@MyCompany_OID_PartnerA_OID.dat",
  "server-id": "s-5f7422b04c2447ef9",
  "timestamp": "2022-07-11T23:36:36.105030Z"
}
Sample inbound file that is unsuccessfully transferred:
{
  "failure-code": "INVALID_REQUEST",
  "status-code": "FAILED",
  "subject": "Sending a request from InboundHttpClientTests",
  "client-ip": "10.0.117.27",
  "as2-message-id": "testFailedLogs-TestRunConfig-Default-inbound-direct-integ-0c97ee55-af56-4988-b7b4-a3e0576f8f9c@necco",
  "as2-to": "0beff6af56c548f28b0e78841dce44f9",
  "failure-message": "Unsupported date format: 2022/123/456T",
  "agreement-id": "a-0ceec8ca0a3348d6a",
  "as2-from": "ab91a398aed0422d9dd1362710213880",
  "file-path": "failed/01187f15-523c-43ac-9fd6-51b5ad2b08f3.testFailedLogs-TestRunConfig-Default-inbound-direct-integ-0c97ee55-af56-4988-b7b4-a3e0576f8f9c@necco",
  "server-id": "s-0582af12e44540b9b",
  "timestamp": "2022-07-11T06:30:03.662939Z"
}