Create your first Amazon Verified Permissions policy store
For this tutorial, let's assume you're the developer of a photo sharing application and you are looking for a way to control what actions the users of the application can perform. You want to control who can add, delete, or view photos and photo albums. You also want to control what actions a user can take on their account. Can they manage their account, how about the account of a friend? To control these actions you would create policies that permit or forbid these actions based on the identity of the user. Verified Permissions offers policy stores, or containers, to house these policies.
In this tutorial we'll walk through creating a sample policy store using the Amazon Verified Permissions console. The console offers a few sample policy store options and we’re going to create a PhotoFlash policy store. This policy store allows principals, such as users, to perform actions, such as sharing, on resources, such as photos or albums.
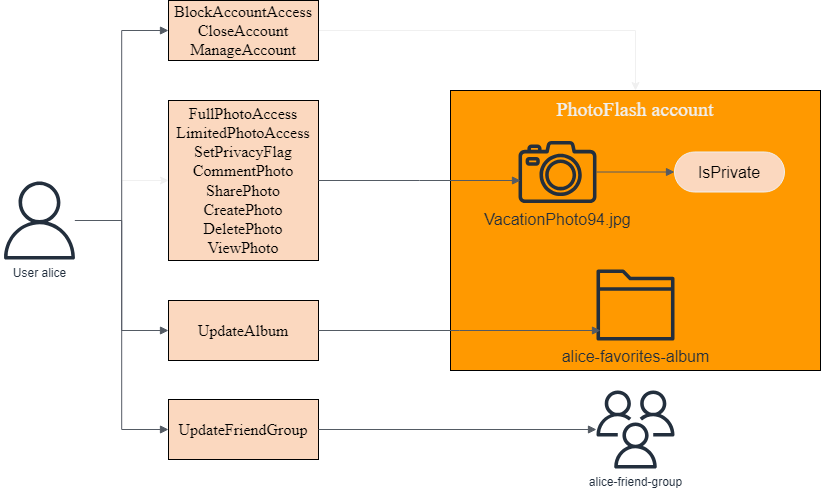
The following diagram illustrates the relationships between a principal,
User::alice, and the actions she can take on various resources, namely her
PhotoFlash account, the VactionPhoto94.jpg file, the photo album
alice-favorites-album, and the user group
alice-friend-group.
Now that you have an understanding of the PhotoFlash policy store, let’s create the policy store and explore it.
Prerequisites
Sign up for an Amazon Web Services account
If you do not have an Amazon Web Services account, use the following procedure to create one.
To sign up for Amazon Web Services
Open http://www.amazonaws.cn/
and choose Sign Up. Follow the on-screen instructions.
Amazon sends you a confirmation email after the sign-up process is
complete. At any time, you can view your current account activity and manage your account by
going to http://www.amazonaws.cn/
Secure IAM users
After you sign up for an Amazon Web Services account, safeguard your administrative user by turning on multi-factor authentication (MFA). For instructions, see Enable a virtual MFA device for an IAM user (console) in the IAM User Guide.
To give other users access to your Amazon Web Services account resources, create IAM users. To secure your IAM users, turn on MFA and only give the IAM users the permissions needed to perform their tasks.
For more information about creating and securing IAM users, see the following topics in the IAM User Guide:
Step 1: Create a PhotoFlash policy store
In the following procedure you'll create a PhotoFlash policy store using the Amazon console.
To create a PhotoFlash policy store
-
In the Verified Permissions console
, choose Create new policy store. -
For Starting options, choose Start from a sample policy store.
-
For Sample project, choose PhotoFlash.
-
Choose Create policy store.
Once you see the message "Created and configured policy store," choose Go to overview to explore your policy store.
Step 2: Create a policy
When you created the policy store, a default policy was created that allows users to
have full control over their own accounts. This is a useful policy, but for our
purposes, let’s create a more restrictive policy to explore the nuances of Verified Permissions. If you
remember the diagram we looked at earlier in the tutorial, we had a principal,
User::alice, who could perform an action, UpdateAlbum, on
a resource, alice-favorites-album. Let's add the policy that will allow
Alice, and only Alice, to manage this album.
To create a policy
-
In the Verified Permissions console
, choose the policy store you created in step 1. -
In the navigation, choose Policies.
-
Choose Create policy and then choose Create static policy.
-
For Policy effect, choose Permit.
-
For Principals scope, choose Specific principal, then for Specify entity type, choose PhotoFlash::User, and for Specify entity identifier, enter
alice. -
For Resources scope, choose Specific resource, then for Specify entity type, choose PhotoFlash::Album, and for Specify entity identifier, enter
alice-favorites-album. -
For Actions scope, choose Specific set of actions, then for Action(s) this policy should apply to, select UpdateAlbum.
-
Choose Next.
-
Under Details, for Policy description - optional enter
Policy allowing alice to update
                        alice-favorites-album.
. -
Choose Create policy
Now that you've created a policy you can test it in the Verified Permissions console.
Step 3: Testing a policy store
After creating your policy store and policy, you can test them by running a simulated authorization request using the Verified Permissions test bench.
To test policy store policies
Open the Verified Permissions console
. Choose your policy store. -
In the navigation pane on the left, choose Test bench.
-
Choose Visual mode.
-
For Principal, do the following:
-
For Principal taking action choose PhotoFlash::User and for Specify entity identifier, enter
alice. -
Under Attributes, for Account: Entity, make sure that the PhotoFlash::Account entity is selected, and for Specify entity identifier, enter
alice-account.
-
-
Under Resource, for Resource that principal is acting on, choose the PhotoFlash::Album resource type and for Specify entity identifier, enter
alice-favorites-album. -
For Action, choose PhotoFlash::Action::"UpdateAlbum" from the list of valid actions.
-
At the top of the page, choose Run authorization request to simulate the authorization request for the Cedar policies in the sample policy store. The test bench should display Decision: Allow indicating our policy is working as expected.
The following table provides additional values for the principal, resource, and action you can test with the Verified Permissions test bench. The table includes the authorization request decision based on the static policies included with the PhotoFlash sample policy store and the policy you created in step 2.
| Principal value | Principal Account: Entity value | Resource value | Resource parent value | Action | Authorization decision |
|---|---|---|---|---|---|
| PhotoFlash::User | bob | PhotoFlash::Account | alice-account | PhotoFlash::Album | alice-favorites-album | N/A | PhotoFlash::Action::"UpdateAlbum" | Deny |
| PhotoFlash::User | alice | PhotoFlash::Account | alice-account | PhotoFlash::Photo | photo.jpeg | PhotoFlash::Account | bob-account | PhotoFlash::Action::"ViewPhoto" | Deny |
| PhotoFlash::User | alice | PhotoFlash::Account | alice-account | PhotoFlash::Photo | photo.jpeg | PhotoFlash::Account | alice-account | PhotoFlash::Action::"ViewPhoto" | Allow |
| PhotoFlash::User | alice | PhotoFlash::Account | alice-account | PhotoFlash::Photo | bob-photo.jpeg | PhotoFlash::Album | Bob-Vacation-Album | PhotoFlash::Action::"DeletePhoto" | Deny |
Step 4: Clean up resources
After you have finished exploring your policy store, delete it.
To delete a policy store
-
In the Verified Permissions console
, choose the policy store you created in step 1. -
In the navigation, choose Settings.
-
Under Delete policy store, choose Delete this policy store.
-
In the Delete this policy store? dialog box, enter delete, and then choose Delete.