Create a VPC with private subnets and NAT gateways using Amazon CLI
This tutorial demonstrates how to create a VPC that you can use for servers in a production environment using the Amazon CLI. To improve resiliency, you'll deploy servers in two Availability Zones, using an Auto Scaling group and an Application Load Balancer. For additional security, you'll deploy the servers in private subnets. The servers will receive requests through the load balancer and can connect to the internet using NAT gateways. To improve resiliency, you'll deploy a NAT gateway in each Availability Zone.
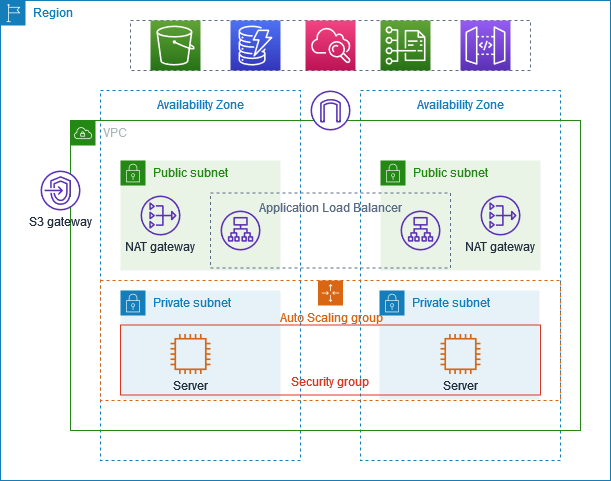
The following diagram provides an overview of the resources included in this tutorial. The VPC has public subnets and private subnets in two Availability Zones. Each public subnet contains a NAT gateway and a load balancer node. The servers run in the private subnets, are launched and terminated by using an Auto Scaling group, and receive traffic from the load balancer. The servers can connect to the internet by using the NAT gateway. The servers can connect to Amazon S3 by using a gateway VPC endpoint.
Prerequisites
Before you begin this tutorial, you need:
-
The Amazon CLI installed and configured with permissions to create VPC resources, EC2 instances, load balancers, and Auto Scaling groups. For information about installing the Amazon CLI, see Installing or updating the latest version of the Amazon CLI.
-
Basic knowledge of VPC concepts, including subnets, route tables, and internet gateways.
-
The
jqcommand-line JSON processor installed. This is used to parse the output of Amazon CLI commands. For information about installing jq, see Download jq. -
Sufficient service quotas for the resources you'll create, including:
-
At least 2 available Elastic IP addresses
-
At least 2 NAT gateways
-
At least 1 VPC
-
At least 4 subnets
-
At least 1 Application Load Balancer
Estimated cost: The resources created in this tutorial will incur charges in your Amazon account: NAT Gateways: ~$0.045 per hour, plus data processing charges Elastic IP addresses: Free when associated with running instances, ~$0.005 per hour when not associated EC2 instances: Varies by instance type (t3.micro used in this tutorial) Application Load Balancer: ~$0.0225 per hour, plus data processing charges
Create the VPC and subnets
First, you'll create a VPC with a CIDR block of 10.0.0.0/16, which provides up to 65,536 private IP addresses.
# Create a VPC with CIDR block 10.0.0.0/16
aws ec2 create-vpc --cidr-block 10.0.0.0/16 --tag-specifications 'ResourceType=vpc,Tags=[{Key=Name,Value=ProductionVPC}]'
The command returns output similar to the following:
{
    "Vpc": {
        "CidrBlock": "10.0.0.0/16",
        "DhcpOptionsId": "dopt-abcd1234",
        "State": "pending",
        "VpcId": "vpc-abcd1234",
        "OwnerId": "123456789012",
        "InstanceTenancy": "default",
        "Ipv6CidrBlockAssociationSet": [],
        "CidrBlockAssociationSet": [
            {
                "AssociationId": "vpc-cidr-assoc-abcd1234",
                "CidrBlock": "10.0.0.0/16",
                "CidrBlockState": {
                    "State": "associated"
                }
            }
        ],
        "IsDefault": false,
        "Tags": [
            {
                "Key": "Name",
                "Value": "ProductionVPC"
            }
        ]
    }
}
Note the VPC ID from the output (for example, vpc-abcd1234). You'll use this ID in subsequent commands.
Next, you'll identify two Availability Zones in your region to create a resilient architecture.
# Get available Availability Zones
aws ec2 describe-availability-zones --query 'AvailabilityZones[0:2].ZoneName' --output text
The command returns output similar to the following:
us-east-1a us-east-1b
Now, create four subnets: two public subnets for the load balancer and NAT gateways, and two private subnets for your application servers. Replace vpc-abcd1234 with your actual VPC ID, and us-east-1a and us-east-1b with your actual Availability Zones.
# Create public subnet in first AZ
aws ec2 create-subnet \
  --vpc-id vpc-abcd1234 \
  --cidr-block 10.0.0.0/24 \
  --availability-zone us-east-1a \
  --tag-specifications 'ResourceType=subnet,Tags=[{Key=Name,Value=PublicSubnet1}]'

# Create private subnet in first AZ
aws ec2 create-subnet \
  --vpc-id vpc-abcd1234 \
  --cidr-block 10.0.1.0/24 \
  --availability-zone us-east-1a \
  --tag-specifications 'ResourceType=subnet,Tags=[{Key=Name,Value=PrivateSubnet1}]'

# Create public subnet in second AZ
aws ec2 create-subnet \
  --vpc-id vpc-abcd1234 \
  --cidr-block 10.0.2.0/24 \
  --availability-zone us-east-1b \
  --tag-specifications 'ResourceType=subnet,Tags=[{Key=Name,Value=PublicSubnet2}]'

# Create private subnet in second AZ
aws ec2 create-subnet \
  --vpc-id vpc-abcd1234 \
  --cidr-block 10.0.3.0/24 \
  --availability-zone us-east-1b \
  --tag-specifications 'ResourceType=subnet,Tags=[{Key=Name,Value=PrivateSubnet2}]'
Each command returns output containing the subnet ID. Note these IDs for use in subsequent commands:
-
Public Subnet 1:
subnet-abcd1234 -
Private Subnet 1:
subnet-abcd5678 -
Public Subnet 2:
subnet-efgh1234 -
Private Subnet 2:
subnet-efgh5678
Create and configure internet connectivity
In this section, you'll create an internet gateway to allow communication between your VPC and the internet, and attach it to your VPC.
# Create an Internet Gateway
aws ec2 create-internet-gateway --tag-specifications 'ResourceType=internet-gateway,Tags=[{Key=Name,Value=ProductionIGW}]'
The command returns output containing the Internet Gateway ID. Note this ID (for example, igw-abcd1234).
Attach the Internet Gateway to your VPC. Replace igw-abcd1234 with your actual Internet Gateway ID and vpc-abcd1234 with your actual VPC ID.
# Attach the Internet Gateway to the VPC
aws ec2 attach-internet-gateway --internet-gateway-id igw-abcd1234 --vpc-id vpc-abcd1234
Next, create route tables for your public and private subnets. Replace vpc-abcd1234 with your actual VPC ID.
# Create a route table for public subnets
aws ec2 create-route-table --vpc-id vpc-abcd1234 --tag-specifications 'ResourceType=route-table,Tags=[{Key=Name,Value=PublicRouteTable}]'

# Create route table for private subnet in first AZ
aws ec2 create-route-table --vpc-id vpc-abcd1234 --tag-specifications 'ResourceType=route-table,Tags=[{Key=Name,Value=PrivateRouteTable1}]'

# Create route table for private subnet in second AZ
aws ec2 create-route-table --vpc-id vpc-abcd1234 --tag-specifications 'ResourceType=route-table,Tags=[{Key=Name,Value=PrivateRouteTable2}]'
Each command returns output containing the route table ID. Note these IDs:
-
Public Route Table:
rtb-abcd1234 -
Private Route Table 1:
rtb-efgh1234 -
Private Route Table 2:
rtb-ijkl1234
Add a route to the Internet Gateway in the public route table to enable internet access. Replace rtb-abcd1234 with your actual public route table ID and igw-abcd1234 with your actual Internet Gateway ID.
# Add a route to the Internet Gateway
aws ec2 create-route --route-table-id rtb-abcd1234 --destination-cidr-block 0.0.0.0/0 --gateway-id igw-abcd1234
Associate the subnets with their respective route tables. Replace the route table IDs and subnet IDs with your actual IDs.
# Associate public subnets with the public route table
aws ec2 associate-route-table --route-table-id rtb-abcd1234 --subnet-id subnet-abcd1234
aws ec2 associate-route-table --route-table-id rtb-abcd1234 --subnet-id subnet-efgh1234

# Associate private subnets with their respective route tables
aws ec2 associate-route-table --route-table-id rtb-efgh1234 --subnet-id subnet-abcd5678
aws ec2 associate-route-table --route-table-id rtb-ijkl1234 --subnet-id subnet-efgh5678
Create NAT gateways
NAT gateways allow instances in private subnets to connect to the internet or other Amazon services, but prevent the internet from initiating connections with those instances. First, allocate Elastic IP addresses for your NAT gateways.
# Allocate Elastic IP for NAT Gateway in first AZ
aws ec2 allocate-address --domain vpc --tag-specifications 'ResourceType=elastic-ip,Tags=[{Key=Name,Value=NAT1-EIP}]'

# Allocate Elastic IP for NAT Gateway in second AZ
aws ec2 allocate-address --domain vpc --tag-specifications 'ResourceType=elastic-ip,Tags=[{Key=Name,Value=NAT2-EIP}]'
Each command returns output containing the allocation ID. Note these IDs:
-
EIP 1 Allocation ID:
eipalloc-abcd1234 -
EIP 2 Allocation ID:
eipalloc-efgh1234
Create NAT Gateways in each public subnet. Replace the subnet IDs and allocation IDs with your actual IDs.
# Create NAT Gateway in public subnet of first AZ
aws ec2 create-nat-gateway \
  --subnet-id subnet-abcd1234 \
  --allocation-id eipalloc-abcd1234 \
  --tag-specifications 'ResourceType=natgateway,Tags=[{Key=Name,Value=NAT-Gateway1}]'

# Create NAT Gateway in public subnet of second AZ
aws ec2 create-nat-gateway \
  --subnet-id subnet-efgh1234 \
  --allocation-id eipalloc-efgh1234 \
  --tag-specifications 'ResourceType=natgateway,Tags=[{Key=Name,Value=NAT-Gateway2}]'
Each command returns output containing the NAT Gateway ID. Note these IDs:
-
NAT Gateway 1:
nat-abcd1234 -
NAT Gateway 2:
nat-efgh1234
NAT Gateways take a few minutes to provision. Wait for them to be available before proceeding. Replace the NAT Gateway IDs with your actual IDs.
# Wait for NAT Gateways to be available
aws ec2 wait nat-gateway-available --nat-gateway-ids nat-abcd1234
aws ec2 wait nat-gateway-available --nat-gateway-ids nat-efgh1234
Add routes to the NAT Gateways in the private route tables to enable internet access for instances in private subnets. Replace the route table IDs and NAT Gateway IDs with your actual IDs.
# Add route to NAT Gateway 1 in private route table 1
aws ec2 create-route \
  --route-table-id rtb-efgh1234 \
  --destination-cidr-block 0.0.0.0/0 \
  --nat-gateway-id nat-abcd1234

# Add route to NAT Gateway 2 in private route table 2
aws ec2 create-route \
  --route-table-id rtb-ijkl1234 \
  --destination-cidr-block 0.0.0.0/0 \
  --nat-gateway-id nat-efgh1234
Create a VPC endpoint for Amazon S3
A VPC endpoint for Amazon S3 allows instances in your private subnets to access S3 without going through the NAT Gateway, which reduces data transfer costs and provides better network performance. Replace vpc-abcd1234 with your actual VPC ID and the route table IDs with your actual IDs.
# Get the prefix list ID for S3 in your region
S3_PREFIX_LIST_ID=$(aws ec2 describe-prefix-lists --filters "Name=prefix-list-name,Values=com.amazonaws.$(aws configure get region).s3" --query 'PrefixLists[0].PrefixListId' --output text)

# Create the VPC endpoint for S3
aws ec2 create-vpc-endpoint \
  --vpc-id vpc-abcd1234 \
  --service-name com.amazonaws.$(aws configure get region).s3 \
  --route-table-ids rtb-efgh1234 rtb-ijkl1234 \
  --tag-specifications 'ResourceType=vpc-endpoint,Tags=[{Key=Name,Value=S3-Endpoint}]'
The command returns output containing the VPC endpoint ID. Note this ID (for example, vpce-abcd1234).
Configure security groups
Security groups act as virtual firewalls for your instances to control inbound and outbound traffic. Create a security group for the load balancer that allows inbound HTTP traffic from anywhere. Replace vpc-abcd1234 with your actual VPC ID.
# Create security group for the load balancer
aws ec2 create-security-group \
  --group-name LoadBalancerSG \
  --description "Security group for the load balancer" \
  --vpc-id vpc-abcd1234 \
  --tag-specifications 'ResourceType=security-group,Tags=[{Key=Name,Value=LoadBalancerSG}]'
The command returns output containing the security group ID. Note this ID (for example, sg-abcd1234).
Allow inbound HTTP traffic to the load balancer. Replace sg-abcd1234 with your actual load balancer security group ID.
# Allow inbound HTTP traffic from anywhere
aws ec2 authorize-security-group-ingress \
  --group-id sg-abcd1234 \
  --protocol tcp \
  --port 80 \
  --cidr 0.0.0.0/0
Create a security group for the application servers that allows inbound traffic only from the load balancer. Replace vpc-abcd1234 with your actual VPC ID.
# Create security group for the application servers
aws ec2 create-security-group \
  --group-name AppServerSG \
  --description "Security group for the application servers" \
  --vpc-id vpc-abcd1234 \
  --tag-specifications 'ResourceType=security-group,Tags=[{Key=Name,Value=AppServerSG}]'
The command returns output containing the security group ID. Note this ID (for example, sg-efgh1234).
Allow inbound HTTP traffic from the load balancer security group to the application servers. Replace sg-efgh1234 with your actual application server security group ID and sg-abcd1234 with your actual load balancer security group ID.
# Allow inbound HTTP traffic from the load balancer security group
aws ec2 authorize-security-group-ingress \
  --group-id sg-efgh1234 \
  --protocol tcp \
  --port 80 \
  --source-group sg-abcd1234
Create a launch template for EC2 instances
A launch template contains the configuration information to launch an instance, such as the AMI ID, instance type, and security groups. First, create a user data script that will be executed when the instance launches.
cat > user-data.sh << 'EOF'
#!/bin/bash
yum update -y
yum install -y httpd
systemctl start httpd
systemctl enable httpd
echo "<h1>Hello from $(hostname -f) in $(curl -s http://169.254.169.254/latest/meta-data/placement/availability-zone)</h1>" > /var/www/html/index.html
EOF
Encode the user data script in base64.
USER_DATA=$(base64 -w 0 user-data.sh)
Get the latest Amazon Linux 2 AMI ID.
# Get the latest Amazon Linux 2 AMI ID
aws ec2 describe-images --owners amazon --filters "Name=name,Values=amzn2-ami-hvm-*-x86_64-gp2" "Name=state,Values=available" --query 'sort_by(Images, &CreationDate)[-1].ImageId' --output text
Create a launch template with the AMI ID, instance type, security group, and user data. Replace sg-efgh1234 with your actual application server security group ID and $AMI_ID and $USER_DATA with the values obtained from the previous commands.
# Create a launch template
aws ec2 create-launch-template \
  --launch-template-name AppServerTemplate \
  --version-description "Initial version" \
  --tag-specifications 'ResourceType=launch-template,Tags=[{Key=Name,Value=AppServerTemplate}]' \
  --launch-template-data '{
    "NetworkInterfaces": [{
      "DeviceIndex": 0,
      "Groups": ["sg-efgh1234"],
      "DeleteOnTermination": true
    }],
    "ImageId": "ami-abcd1234",
    "InstanceType": "t3.micro",
    "UserData": "IyEvYmluL2Jhc2gKeXVtIHVwZGF0ZSAteQp5dW0gaW5zdGFsbCAteSBodHRwZApzeXN0ZW1jdGwgc3RhcnQgaHR0cGQKc3lzdGVtY3RsIGVuYWJsZSBodHRwZAplY2hvICI8aDE+SGVsbG8gZnJvbSAkKGhvc3RuYW1lIC1mKSBpbiAkKGN1cmwgLXMgaHR0cDovLzE2OS4yNTQuMTY5LjI1NC9sYXRlc3QvbWV0YS1kYXRhL3BsYWNlbWVudC9hdmFpbGFiaWxpdHktem9uZSk8L2gxPiIgPiAvdmFyL3d3dy9odG1sL2luZGV4Lmh0bWw=",
    "TagSpecifications": [{
      "ResourceType": "instance",
      "Tags": [{
        "Key": "Name",
        "Value": "AppServer"
      }]
    }]
  }'
Create a load balancer and target group
A target group routes requests to registered targets, such as EC2 instances, using the protocol and port that you specify. Create a target group for your application servers. Replace vpc-abcd1234 with your actual VPC ID.
# Create a target group
aws elbv2 create-target-group \
  --name AppTargetGroup \
  --protocol HTTP \
  --port 80 \
  --vpc-id vpc-abcd1234 \
  --target-type instance \
  --health-check-protocol HTTP \
  --health-check-path / \
  --health-check-port traffic-port
The command returns output containing the target group ARN. Note this ARN (for example, arn:aws:elasticloadbalancing:us-east-1:123456789012:targetgroup/AppTargetGroup/abcd1234).
Create an Application Load Balancer in the public subnets. Replace the subnet IDs and security group ID with your actual IDs.
# Create a load balancer
aws elbv2 create-load-balancer \
  --name AppLoadBalancer \
  --subnets subnet-abcd1234 subnet-efgh1234 \
  --security-groups sg-abcd1234 \
  --tags Key=Name,Value=AppLoadBalancer
The command returns output containing the load balancer ARN. Note this ARN (for example, arn:aws:elasticloadbalancing:us-east-1:123456789012:loadbalancer/app/AppLoadBalancer/abcd1234).
Wait for the load balancer to be active before proceeding. Replace arn:aws:elasticloadbalancing:us-east-1:123456789012:loadbalancer/app/AppLoadBalancer/abcd1234 with your actual load balancer ARN.
# Wait for load balancer to be active
aws elbv2 wait load-balancer-available \
  --load-balancer-arns arn:aws:elasticloadbalancing:us-east-1:123456789012:loadbalancer/app/AppLoadBalancer/abcd1234
Create a listener for the load balancer that forwards HTTP traffic to the target group. Replace the load balancer ARN and target group ARN with your actual ARNs.
# Create a listener
aws elbv2 create-listener \
  --load-balancer-arn arn:aws:elasticloadbalancing:us-east-1:123456789012:loadbalancer/app/AppLoadBalancer/abcd1234 \
  --protocol HTTP \
  --port 80 \
  --default-actions Type=forward,TargetGroupArn=arn:aws:elasticloadbalancing:us-east-1:123456789012:targetgroup/AppTargetGroup/abcd1234
Create an Auto Scaling group
An Auto Scaling group contains a collection of EC2 instances that are treated as a logical grouping for the purposes of automatic scaling and management. Create an Auto Scaling group that uses the launch template and places instances in the private subnets. Replace the subnet IDs and target group ARN with your actual IDs and ARN.
# Create an Auto Scaling group
aws autoscaling create-auto-scaling-group \
  --auto-scaling-group-name AppAutoScalingGroup \
  --launch-template LaunchTemplateName=AppServerTemplate,Version='$Latest' \
  --min-size 2 \
  --max-size 4 \
  --desired-capacity 2 \
  --vpc-zone-identifier "subnet-abcd5678,subnet-efgh5678" \
  --target-group-arns arn:aws:elasticloadbalancing:us-east-1:123456789012:targetgroup/AppTargetGroup/abcd1234 \
  --health-check-type ELB \
  --health-check-grace-period 300 \
  --tags Key=Name,Value=AppServer,PropagateAtLaunch=true
Test your configuration
After the Auto Scaling group launches instances and they pass health checks, you can test your load balancer. Get the DNS name of the load balancer. Replace the load balancer ARN with your actual ARN.
# Get the DNS name of the load balancer
aws elbv2 describe-load-balancers \
  --load-balancer-arns arn:aws-cn:elasticloadbalancing:us-east-1:123456789012:loadbalancer/app/AppLoadBalancer/abcd1234 \
  --query "LoadBalancers[0].DNSName" \
  --output text
Use curl to test the application with the load balancer name.
curl http://LoadBalancerName
If you refresh the page multiple times, you should see responses from different instances in different Availability Zones.
Clean up resources
When you're finished with this tutorial, you should delete all the resources to avoid incurring charges. Replace all IDs with your actual resource IDs.
# Delete the Auto Scaling group
aws autoscaling delete-auto-scaling-group \
  --auto-scaling-group-name AppAutoScalingGroup \
  --force-delete

# Wait for the Auto Scaling group to be deleted
sleep 60

# Delete the load balancer
aws elbv2 delete-load-balancer \
  --load-balancer-arn arn:aws:elasticloadbalancing:us-east-1:123456789012:loadbalancer/app/AppLoadBalancer/abcd1234

# Wait for the load balancer to be deleted
sleep 30

# Delete the target group
aws elbv2 delete-target-group \
  --target-group-arn arn:aws:elasticloadbalancing:us-east-1:123456789012:targetgroup/AppTargetGroup/abcd1234

# Delete the launch template
aws ec2 delete-launch-template \
  --launch-template-name AppServerTemplate

# Delete the NAT Gateways
aws ec2 delete-nat-gateway --nat-gateway-id nat-abcd1234
aws ec2 delete-nat-gateway --nat-gateway-id nat-efgh1234

# Wait for the NAT Gateways to be deleted
sleep 90

# Release the Elastic IPs
aws ec2 release-address --allocation-id eipalloc-abcd1234
aws ec2 release-address --allocation-id eipalloc-efgh1234

# Delete the VPC endpoint
aws ec2 delete-vpc-endpoints --vpc-endpoint-ids vpce-abcd1234

# Wait for security group dependencies to clear
sleep 30

# Delete the security groups
aws ec2 delete-security-group --group-id sg-efgh1234
aws ec2 delete-security-group --group-id sg-abcd1234

# Detach the Internet Gateway
aws ec2 detach-internet-gateway --internet-gateway-id igw-abcd1234 --vpc-id vpc-abcd1234

# Delete the Internet Gateway
aws ec2 delete-internet-gateway --internet-gateway-id igw-abcd1234

# Delete the route tables
aws ec2 delete-route-table --route-table-id rtb-efgh1234
aws ec2 delete-route-table --route-table-id rtb-ijkl1234
aws ec2 delete-route-table --route-table-id rtb-abcd1234

# Delete the subnets
aws ec2 delete-subnet --subnet-id subnet-abcd1234
aws ec2 delete-subnet --subnet-id subnet-efgh1234
aws ec2 delete-subnet --subnet-id subnet-abcd5678
aws ec2 delete-subnet --subnet-id subnet-efgh5678

# Delete the VPC
aws ec2 delete-vpc --vpc-id vpc-abcd1234
Next steps
Now that you've created a VPC with private subnets and NAT gateways, you might want to explore these related topics: