Customize branding in WorkSpaces Personal
Amazon WorkSpaces allows you to create a familiar WorkSpaces experience for your users by using APIs to customize the appearance of your WorkSpace's login page with your own branding logo, IT support information, forgot password link, and login message. Your branding will be displayed to your users in their WorkSpace login page rather than the default WorkSpaces branding.
The following clients are supported:
Windows
Linux
Android
MacOS
iOS
Web Access
Import custom branding
To import your client branding customization, use the action
ImportClientBranding, which includes the following elements. See
ImportClientBranding API reference for more information.
Important
Client branding attributes are public facing. Ensure that you don't include sensitive information.
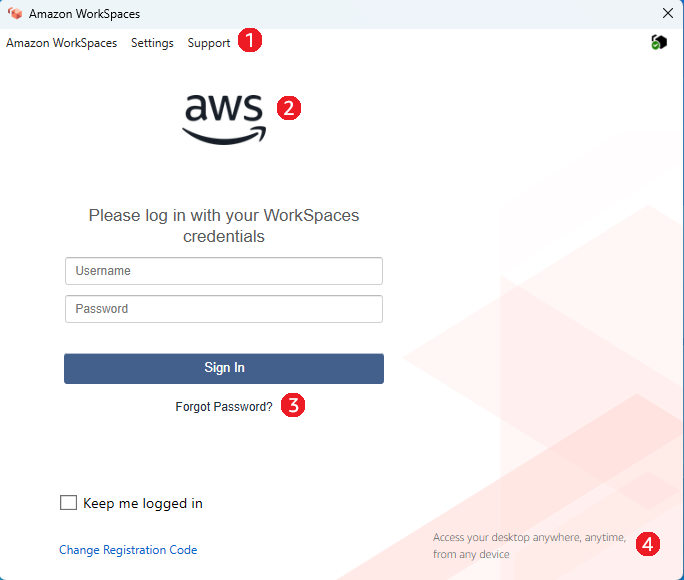
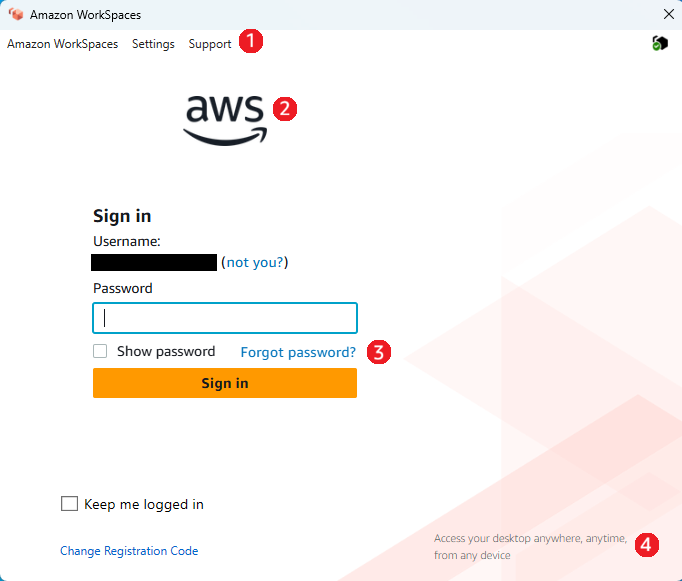
Depending on whether your directories are using the legacy or new user login flow, your users will see your custom client branding attributes as shown in the below screenshots.
|
|
-
Support link
-
Logo
-
Forgot password link
-
Login message
| Branding element | Description | Requirements and recommendations |
|---|---|---|
| Support link | Allows you to specify a support email link for
users to contact for help with their WorkSpaces. You can use the
SupportEmail attribute or provide a link to your support page
using the SupportLink attribute. |
|
| Logo | Allows you to customize your organization's logo using the Logo attribute. |
|
| Forgot password link | Allows you to add a web address using the ForgotPasswordLink attribute that users can go to if they forget their password to their WorkSpace. | Length Constraints: Minimum length of 1. Maximum length of 200. |
| Login message | Allows you to customize a message using the LoginMessage attribute on the sign in screen. |
|
The following are sample code snippets for using ImportClientBranding.
Amazon CLI Version 2
Warning
Importing custom branding overwrites the attributes, within that platform, that you specify with your custom data. It also overwrites the attributes that you don't specify with default custom branding attribute values. You must include the data for any attribute that you don't want to overwrite.
aws workspaces import-client-branding \
--cli-input-json file://~/Downloads/import-input.json \
--region us-west-2
The import JSON file should look like the following sample code:
{
    "ResourceId": "<directory-id>",
    "DeviceTypeOsx": {
        "Logo": "iVBORw0KGgoAAAANSUhEUgAAAAIAAAACCAYAAABytg0kAAAAC0lEQVR42mNgQAcAABIAAeRVjecAAAAASUVORK5CYII=",
        "ForgotPasswordLink": "https://amazon.com/",
        "SupportLink": "https://amazon.com/",
        "LoginMessage": {
            "en_US": "Hello!!"
        }
    }
}
The following sample Java code snippet converts the logo image into a base64-encoded string:
// Read image as BufferImage
BufferedImage bi = ImageIO.read(new File("~/Downloads/logo.png"));

// convert BufferedImage to byte[]
ByteArrayOutputStream baos = new ByteArrayOutputStream();
ImageIO.write(bi, "png", baos);
byte[] bytes = baos.toByteArray();

//convert byte[] to base64 format and print it
String bytesBase64 = Base64.encodeBase64String(bytes);
System.out.println(bytesBase64);
The following sample Python code snippet converts the logo image into a base64-encoded string:
# Read logo into base64-encoded string
with open("~/Downloads/logo.png", "rb") as image_file:
    f = image_file.read()
    base64_string = base64.b64encode(f)
    print(base64_string)
Java
Warning
Importing custom branding overwrites the attributes, within that platform, that you specify with your custom data. It also overwrites the attributes that you don't specify with default custom branding attribute values. You must include the data for any attribute that you don't want to overwrite.
// Create WS Client
WorkSpacesClient client = WorkSpacesClient.builder().build();

// Read image as BufferImage
BufferedImage bi = ImageIO.read(new File("~/Downloads/logo.png"));

// convert BufferedImage to byte[]
ByteArrayOutputStream baos = new ByteArrayOutputStream();
ImageIO.write(bi, "png", baos);
byte[] bytes = baos.toByteArray();

// Create import attributes for the plateform
DefaultImportClientBrandingAttributes attributes =
        DefaultImportClientBrandingAttributes.builder()
                .logo(SdkBytes.fromByteArray(bytes))
                .forgotPasswordLink("https://aws.amazon.com/")
                .supportLink("https://aws.amazon.com/")
                .build();

// Create import request
ImportClientBrandingRequest request =
        ImportClientBrandingRequest.builder()
                .resourceId("<directory-id>")
                .deviceTypeOsx(attributes)
                .build();

// Call ImportClientBranding API
ImportClientBrandingResponse response = client.importClientBranding(request);
Python
Warning
Importing custom branding overwrites the attributes, within that platform, that you specify with your custom data. It also overwrites the attributes that you don't specify with default custom branding attribute values. You must include the data for any attribute that you don't want to overwrite.
import boto3

# Read logo into bytearray
with open("~/Downloads/logo.png", "rb") as image_file:
    f = image_file.read()
    bytes = bytearray(f)

# Create WorkSpaces client
client = boto3.client('workspaces')

# Call import API
response = client.import_client_branding(
    ResourceId='<directory-id>',
    DeviceTypeOsx={
        'Logo': bytes,
        'SupportLink': 'https://aws.amazon.com/',
        'ForgotPasswordLink': 'https://aws.amazon.com/',
        'LoginMessage': {
            'en_US': 'Hello!!'
        }
    }
)
PowerShell
#Requires -Modules @{ ModuleName="AWS.Tools.WorkSpaces"; ModuleVersion="4.1.56"}

# Specify Image Path
$imagePath = "~/Downloads/logo.png"

# Create Byte Array from image file
$imageByte = ([System.IO.File]::ReadAllBytes($imagePath))

# Call import API
Import-WKSClientBranding -ResourceId <directory-id> `
    -DeviceTypeLinux_LoginMessage @{en_US="Hello!!"} `
    -DeviceTypeLinux_Logo $imageByte `
    -DeviceTypeLinux_ForgotPasswordLink "https://aws.amazon.com/" `
    -DeviceTypeLinux_SupportLink "https://aws.amazon.com/"
To preview the login page, launch the WorkSpaces application or web login page.
Note
Changes may take up to 1 minute to appear.
Describe custom branding
To see the details of the client branding customization you currently have, use the action
DescribeCustomBranding. The following is the sample script for using DescribeClientBranding. See
DescribeClientBranding API reference for more information.
aws workspaces describe-client-branding \
--resource-id <directory-id> \
--region us-west-2
Delete custom branding
To delete your client branding customization, use the action
DeleteCustomBranding. The following is the sample script for using DeleteClientBranding. See
DeleteClientBranding API reference for more information.
aws workspaces delete-client-branding \
--resource-id <directory-id> \
--platforms DeviceTypeAndroid DeviceTypeIos \
--region us-west-2
Note
Changes may take up to 1 minute to appear.