本文属于机器翻译版本。若本译文内容与英语原文存在差异,则一律以英文原文为准。
# 将数据提取到 Ama OpenSearch zon 无服务器集合中
这些部分详细介绍了支持将数据提取到 Ama OpenSearch zon Serverless 集合中的采集管道。它们还涵盖了一些可用于与 OpenSearch API 操作交互的客户端。您的客户端应与 OpenSearch 2.x 兼容,才能与 OpenSearch Serverless 集成。
**Topics**
+ [所需的最低权限](#serverless-ingestion-permissions)
+ [OpenSearch 摄入](#serverless-osis-ingestion)
+ [Fluent Bit](#serverless-fluentbit)
+ [Amazon Data Firehose](#serverless-kdf)
+ [Go](#serverless-go)
+ [Java](#serverless-java)
+ [JavaScript](#serverless-javascript)
+ [Logstash](#serverless-logstash)
+ [Python](#serverless-python)
+ [Ruby](#serverless-ruby)
+ [与其他客户端签署 HTTP 请求](#serverless-signing)
## 所需的最低权限
要将数据采集到 OpenSearch Serverless 集合中,写入数据的委托人必须具有在[数据访问](serverless-data-access.md)策略中分配的以下最低权限:
```
[
{
"Rules":[
{
"ResourceType":"index",
"Resource":[
"index/{{target-collection}}/{{logs}}"
],
"Permission":[
"aoss:CreateIndex",
"aoss:WriteDocument",
"aoss:UpdateIndex"
]
}
],
"Principal":[
"arn:aws:iam::{{123456789012}}:user/{{my-user}}"
]
}
]
```
如果您计划写入到其他索引,则权限可以更广。例如,您可以允许访问所有索引(index/ {{target-collection}} /\*)或索引子集(index//),而不是指定单个目标索引。{{target-collection}} {{logs\*}}
有关所有可用的 OpenSearch API 操作及其相关权限的参考,请参阅[Amazon OpenSearch Serverless 中支持的操作和插件](serverless-genref.md)。
## OpenSearch 摄入
您可以使用 Amazon OpenSearch Ingestion,而不是使用第三方客户端将数据直接发送到 OpenSearch 无服务器集合。您可以将数据生成器配置为将数据发送到 OpenSearch Ingestion,它会自动将数据传输到您指定的集合。您还可以将 OpenSearch Ingestion 配置为在交付数据之前对其进行转换。有关更多信息,请参阅 [Amazon OpenSearch Ingestion 概述](ingestion.md)。
OpenSearch 摄取管道需要权限才能写入配置为其 OpenSearch 接收器的无服务器集合。这些权限包括能够描述集合以及向其发送 HTTP 请求。有关使用 OpenSearch Ingestion 向集合添加数据的说明,请参阅。[授予 Amazon OpenSearch Ingestion 管道访问集合的权限](pipeline-collection-access.md)
要开始使用 OpenSearch Ingestion,请参阅。[教程:使用 Amazon Ingestion 将数据提取到集合中 OpenSearch](osis-serverless-get-started.md)
## Fluent Bit
你可以使用 F [Amazon or Fluent Bit 图像](https://github.com/aws/aws-for-fluent-bit#public-images)和[OpenSearch 输出插件](https://docs.fluentbit.io/manual/pipeline/outputs/opensearch)将数据提取到 OpenSearch 无服务器集合中。
**注意**
你必须有 for Fluent Bit 镜像的 2.30.0 或更高版本才能与 Serverless 集成。 Amazon OpenSearch
**示例配置**:
配置文件的输出示例部分显示了如何使用 OpenSearch Serverless 集合作为目标。添加 `AWS_Service_Name` 参数(即 `aoss`)十分重要。`Host` 是集合端点。
```
[OUTPUT]
Name opensearch
Match *
Host {{collection-endpoint}}.{{us-west-2}}.aoss.amazonaws.com
Port 443
Index {{my_index}}
Trace_Error On
Trace_Output On
AWS_Auth On
AWS_Region {{}}
AWS_Service_Name aoss
tls On
Suppress_Type_Name On
```
## Amazon Data Firehose
Firehose 支持将 OpenSearch 无服务器作为送货目的地。有关将数据发送到 OpenSearch 无服务器的说明,请参阅《*亚马逊*数据 Fireh [ose 开发者指南》中的创建 Kinesis Data Firehose 传送](https://docs.amazonaws.cn/firehose/latest/dev/basic-create.html)流[并 OpenSearch 选择无服务器作为目的地](https://docs.amazonaws.cn/firehose/latest/dev/create-destination.html#create-destination-opensearch-serverless)。
您提供给 Firehose 用于传输的 IAM 角色,必须在具有目标集合的 `aoss:WriteDocument` 最低权限的数据访问策略中指定,并且您必须具有预先存在的索引以向其发送数据。有关更多信息,请参阅 [所需的最低权限](#serverless-ingestion-permissions)。
在将数据发送到 OpenSearch Serverless 之前,您可能需要对数据执行转换。要了解有关使用 Lambda 函数执行此任务的更多信息,请参阅此同一指南中的 [Amazon Kinesis Data Firehose 数据转换](https://docs.amazonaws.cn/firehose/latest/dev/data-transformation.html)。
## Go
以下示例代码使用适用于 Go 的 [opensearch-g](https://github.com/opensearch-project/opensearch-go) o 客户端与指定的 OpenSearch Serverless 集合建立安全连接并创建单个索引。必须提供 `region` 和 `host` 的值。
```
package main
import (
"context"
"log"
"strings"
"github.com/aws/aws-sdk-go-v2/aws"
"github.com/aws/aws-sdk-go-v2/config"
opensearch "github.com/opensearch-project/opensearch-go/v2"
opensearchapi "github.com/opensearch-project/opensearch-go/v2/opensearchapi"
requestsigner "github.com/opensearch-project/opensearch-go/v2/signer/awsv2"
)
const endpoint = "" // serverless collection endpoint
func main() {
ctx := context.Background()
awsCfg, err := config.LoadDefaultConfig(ctx,
config.WithRegion(""),
config.WithCredentialsProvider(
getCredentialProvider("", "", ""),
),
)
if err != nil {
log.Fatal(err) // don't log.fatal in a production-ready app
}
// create an AWS request Signer and load AWS configuration using default config folder or env vars.
signer, err := requestsigner.NewSignerWithService(awsCfg, "aoss") // "aoss" for Amazon OpenSearch Serverless
if err != nil {
log.Fatal(err) // don't log.fatal in a production-ready app
}
// create an opensearch client and use the request-signer
client, err := opensearch.NewClient(opensearch.Config{
Addresses: []string{endpoint},
Signer: signer,
})
if err != nil {
log.Fatal("client creation err", err)
}
indexName := "go-test-index"
// define index mapping
mapping := strings.NewReader(`{
"settings": {
"index": {
"number_of_shards": 4
}
}
}`)
// create an index
createIndex := opensearchapi.IndicesCreateRequest{
Index: indexName,
Body: mapping,
}
createIndexResponse, err := createIndex.Do(context.Background(), client)
if err != nil {
log.Println("Error ", err.Error())
log.Println("failed to create index ", err)
log.Fatal("create response body read err", err)
}
log.Println(createIndexResponse)
// delete the index
deleteIndex := opensearchapi.IndicesDeleteRequest{
Index: []string{indexName},
}
deleteIndexResponse, err := deleteIndex.Do(context.Background(), client)
if err != nil {
log.Println("failed to delete index ", err)
log.Fatal("delete index response body read err", err)
}
log.Println("deleting index", deleteIndexResponse)
}
func getCredentialProvider(accessKey, secretAccessKey, token string) aws.CredentialsProviderFunc {
return func(ctx context.Context) (aws.Credentials, error) {
c := &aws.Credentials{
AccessKeyID: accessKey,
SecretAccessKey: secretAccessKey,
SessionToken: token,
}
return *c, nil
}
}
```
## Java
以下示例代码使用适用于 Java 的 [opensearch-j](https://search.maven.org/artifact/org.opensearch.client/opensearch-java) ava 客户端与指定的 OpenSearch Serverless 集合建立安全连接并创建单个索引。必须提供 `region` 和 `host` 的值。
与 OpenSearch 服务*域*相比,重要的区别在于服务名称(`aoss`而不是`es`)。
```
// import OpenSearchClient to establish connection to OpenSearch Serverless collection
import org.opensearch.client.opensearch.OpenSearchClient;
SdkHttpClient httpClient = ApacheHttpClient.builder().build();
// create an opensearch client and use the request-signer
OpenSearchClient client = new OpenSearchClient(
new AwsSdk2Transport(
httpClient,
"...us-west-2.aoss.amazonaws.com", // serverless collection endpoint
"aoss" // signing service name
Region.US_WEST_2, // signing service region
AwsSdk2TransportOptions.builder().build()
)
);
String index = "sample-index";
// create an index
CreateIndexRequest createIndexRequest = new CreateIndexRequest.Builder().index(index).build();
CreateIndexResponse createIndexResponse = client.indices().create(createIndexRequest);
System.out.println("Create index reponse: " + createIndexResponse);
// delete the index
DeleteIndexRequest deleteIndexRequest = new DeleteIndexRequest.Builder().index(index).build();
DeleteIndexResponse deleteIndexResponse = client.indices().delete(deleteIndexRequest);
System.out.println("Delete index reponse: " + deleteIndexResponse);
httpClient.close();
```
以下示例代码会重新建立安全连接,然后搜索索引。
```
import org.opensearch.client.opensearch.OpenSearchClient;
SdkHttpClient httpClient = ApacheHttpClient.builder().build();
OpenSearchClient client = new OpenSearchClient(
new AwsSdk2Transport(
httpClient,
"...us-west-2.aoss.amazonaws.com", // serverless collection endpoint
"aoss" // signing service name
Region.US_WEST_2, // signing service region
AwsSdk2TransportOptions.builder().build()
)
);
Response response = client.generic()
.execute(
Requests.builder()
.endpoint("/" + "users" + "/_search?typed_keys=true")
.method("GET")
.json("{"
+ " \"query\": {"
+ " \"match_all\": {}"
+ " }"
+ "}")
.build());
httpClient.close();
```
## JavaScript
以下示例代码使用的 [opensearch-js](https://www.npmjs.com/package/@opensearch-project/opensearch) 客户端与指定的 S OpenSearch erverless 集合建立安全连接、创建单个索引、添加文档和删除索引。 JavaScript 必须提供 `node` 和 `region` 的值。
与 OpenSearch 服务*域*相比,重要的区别在于服务名称(`aoss`而不是`es`)。
------
#### [ Version 3 ]
此示例使用了 Node.js JavaScript 中开发工具包的[版本 3](https://docs.amazonaws.cn/AWSJavaScriptSDK/v3/latest/)。
```
const { defaultProvider } = require('@aws-sdk/credential-provider-node');
const { Client } = require('@opensearch-project/opensearch');
const { AwsSigv4Signer } = require('@opensearch-project/opensearch/aws');
async function main() {
// create an opensearch client and use the request-signer
const client = new Client({
...AwsSigv4Signer({
region: '{{us-west-2}}',
service: 'aoss',
getCredentials: () => {
const credentialsProvider = defaultProvider();
return credentialsProvider();
},
}),
node: '' # // serverless collection endpoint
});
const index = 'movies';
// create index if it doesn't already exist
if (!(await client.indices.exists({ index })).body) {
console.log((await client.indices.create({ index })).body);
}
// add a document to the index
const document = { foo: 'bar' };
const response = await client.index({
id: '1',
index: index,
body: document,
});
console.log(response.body);
// delete the index
console.log((await client.indices.delete({ index })).body);
}
main();
```
------
#### [ Version 2 ]
此示例使用了 Node.js JavaScript 中开发工具包的[版本 2](https://docs.amazonaws.cn/AWSJavaScriptSDK/latest/)。
```
const AWS = require('aws-sdk');
const { Client } = require('@opensearch-project/opensearch');
const { AwsSigv4Signer } = require('@opensearch-project/opensearch/aws');
async function main() {
// create an opensearch client and use the request-signer
const client = new Client({
...AwsSigv4Signer({
region: '{{us-west-2}}',
service: 'aoss',
getCredentials: () =>
new Promise((resolve, reject) => {
AWS.config.getCredentials((err, credentials) => {
if (err) {
reject(err);
} else {
resolve(credentials);
}
});
}),
}),
node: '' # // serverless collection endpoint
});
const index = 'movies';
// create index if it doesn't already exist
if (!(await client.indices.exists({ index })).body) {
console.log((await client.indices.create({
index
})).body);
}
// add a document to the index
const document = {
foo: 'bar'
};
const response = await client.index({
id: '1',
index: index,
body: document,
});
console.log(response.body);
// delete the index
console.log((await client.indices.delete({ index })).body);
}
main();
```
------
## Logstash
您可以使用 [Logstash OpenSearch 插件](https://github.com/opensearch-project/logstash-output-opensearch)将日志发布到 OpenSearch 无服务器集合。
**使用 Logstash 向无服务器发送数据 OpenSearch**
1. 使用 Docker *或 Linux 安装该[logstash-output-opensearch](https://github.com/opensearch-project/logstash-output-opensearch)插件的 2.0.0 或更高*版本。
------
#### [ Docker ]
[Docker 托管 Logstash OSS 软件,预装了 OpenSearch 输出插件:opensearchproject/-output-plugin。logstash-oss-with-opensearch](https://hub.docker.com/r/opensearchproject/logstash-oss-with-opensearch-output-plugin/tags?page=1&ordering=last_updated&name=8.4.0)您可以像任何其他映像一样拉取该映像:
```
docker pull opensearchproject/logstash-oss-with-opensearch-output-plugin:latest
```
------
#### [ Linux ]
首先,[请安装最新版本的 Logstash](https://www.elastic.co/guide/en/logstash/current/installing-logstash.html)(如果您尚未这样做)。然后,安装版本 2.0.0 的输出插件:
```
cd logstash-8.5.0/
bin/logstash-plugin install --version 2.0.0 logstash-output-opensearch{{ }}
```
如果已安装该插件,请将其更新到最新版本:
```
bin/logstash-plugin update logstash-output-opensearch{{ }}
```
从插件的 2.0.0 版本开始, Amazon SDK 使用版本 3。如果您使用的是 8.4.0 之前的 Logstash 版本,则必须移除所有预安装的 Amazon 插件并安装该插件:`logstash-integration-aws`
```
/usr/share/logstash/bin/logstash-plugin remove logstash-input-s3
/usr/share/logstash/bin/logstash-plugin remove logstash-input-sqs
/usr/share/logstash/bin/logstash-plugin remove logstash-output-s3
/usr/share/logstash/bin/logstash-plugin remove logstash-output-sns
/usr/share/logstash/bin/logstash-plugin remove logstash-output-sqs
/usr/share/logstash/bin/logstash-plugin remove logstash-output-cloudwatch
/usr/share/logstash/bin/logstash-plugin install --version 0.1.0.pre logstash-integration-aws
```
------
1. 为了使 OpenSearch 输出插件与 OpenSearch Serverless 配合使用,您必须对 logstash.conf 的`opensearch`输出部分进行以下修改:
+ 在 `auth_type` 下,将 `aoss` 指定为 `service_name`。
+ 为 `hosts` 指定您的集合端点。
+ 添加参数 `default_server_major_version` 和 `legacy_template`。这些参数是插件与 OpenSearch Serverless 配合使用所必需的。
```
output {
opensearch {
hosts => "{{collection-endpoint}}:443"
auth_type => {
...
service_name => 'aoss'
}
default_server_major_version => 2
legacy_template => false
}
}
```
此示例配置文件从 S3 存储桶中的文件中获取输入并将其发送到 OpenSearch 无服务器集合:
```
input {
s3 {
bucket => "{{my-s3-bucket}}"
region => "{{us-east-1}}"
}
}
output {
opensearch {
ecs_compatibility => disabled
hosts => "https://{{my-collection-endpoint}}.{{us-east-1}}.aoss.amazonaws.com:443"
index => {{my-index}}
auth_type => {
type => 'aws_iam'
aws_access_key_id => '{{your-access-key}}'
aws_secret_access_key => '{{your-secret-key}}'
region => '{{us-east-1}}'
service_name => 'aoss'
}
default_server_major_version => 2
legacy_template => false
}
}
```
1. 然后,使用新配置运行 Logstash,以测试该插件:
```
bin/logstash -f config/{{test-plugin}}.conf
```
## Python
以下示例代码使用适用于 Python 的 [opensearch-py 客户端与指定的 OpenSearch 无服务器集合建立安全连接,创建单个索引并搜索](https://pypi.org/project/opensearch-py/)该索引。必须提供 `region` 和 `host` 的值。
与 OpenSearch 服务*域*相比,重要的区别在于服务名称(`aoss`而不是`es`)。
```
from opensearchpy import OpenSearch, RequestsHttpConnection, AWSV4SignerAuth
import boto3
host = '' # serverless collection endpoint, without https://
region = '' # e.g. us-east-1
service = 'aoss'
credentials = boto3.Session().get_credentials()
auth = AWSV4SignerAuth(credentials, region, service)
# create an opensearch client and use the request-signer
client = OpenSearch(
hosts=[{'host': host, 'port': 443}],
http_auth=auth,
use_ssl=True,
verify_certs=True,
connection_class=RequestsHttpConnection,
pool_maxsize=20,
)
# create an index
index_name = 'books-index'
create_response = client.indices.create(
index_name
)
print('\nCreating index:')
print(create_response)
# index a document
document = {
'title': 'The Green Mile',
'director': 'Stephen King',
'year': '1996'
}
response = client.index(
index = 'books-index',
body = document,
id = '1'
)
# delete the index
delete_response = client.indices.delete(
index_name
)
print('\nDeleting index:')
print(delete_response)
```
## Ruby
`opensearch-aws-sigv4`Gem 开箱即用地提供对 OpenSearch 无服务器和 OpenSearch 服务的访问权限。它具有 [opensearch-ruby](https://rubygems.org/gems/opensearch-ruby) 客户端的所有功能,因为它是这款 Gem 的依赖项。
在实例化 Sigv4 签名程序时,指定 `aoss` 为服务名称:
```
require 'opensearch-aws-sigv4'
require 'aws-sigv4'
signer = Aws::Sigv4::Signer.new(service: 'aoss',
region: 'us-west-2',
access_key_id: 'key_id',
secret_access_key: 'secret')
# create an opensearch client and use the request-signer
client = OpenSearch::Aws::Sigv4Client.new(
{ host: 'https://your.amz-opensearch-serverless.endpoint',
log: true },
signer)
# create an index
index = 'prime'
client.indices.create(index: index)
# insert data
client.index(index: index, id: '1', body: { name: 'Amazon Echo',
msrp: '5999',
year: 2011 })
# query the index
client.search(body: { query: { match: { name: 'Echo' } } })
# delete index entry
client.delete(index: index, id: '1')
# delete the index
client.indices.delete(index: index)
```
## 与其他客户端签署 HTTP 请求
当您与其他客户端构建 HTTP [请求时,对 OpenSearch 无服务器集合的请求进行签名](https://docs.amazonaws.cn/general/latest/gr/signature-version-4.html)时,以下要求适用。
+ 必须将服务名称指定为 `aoss`。
+ 所有 Amazon 签名版本 4 请求都需要 `x-amz-content-sha256` 标头。它将提供请求负载的哈希。如果有请求有效负载,请将该值设置为其安全哈希算法 (SHA) 加密哈希 (SHA256)。如果没有请求负载,请将该值设置为 `e3b0c44298fc1c149afbf4c8996fb92427ae41e4649b934ca495991b7852b855`,它是空字符串的哈希。
**Topics**
+ [使用 cURL 创建索引](#serverless-signing-curl)
+ [使用 Postman 创建索引](#serverless-signing-postman)
### 使用 cURL 创建索引
以下示例请求使用客户端 URL 请求库(cURL)将单个文档发送到集合中名为 `movies-index` 的索引:
```
curl -XPOST \
--user "$AWS_ACCESS_KEY_ID":"$AWS_SECRET_ACCESS_KEY" \
--aws-sigv4 "aws:amz:{{us-east-1}}:aoss" \
--header "x-amz-content-sha256: $REQUEST_PAYLOAD_SHA_HASH" \
--header "x-amz-security-token: $AWS_SESSION_TOKEN" \
"https://{{my-collection-endpoint}}.{{us-east-1}}.aoss.amazonaws.com/{{movies-index}}/_doc" \
-H "Content-Type: application/json" -d '{"title": "Shawshank Redemption"}'
```
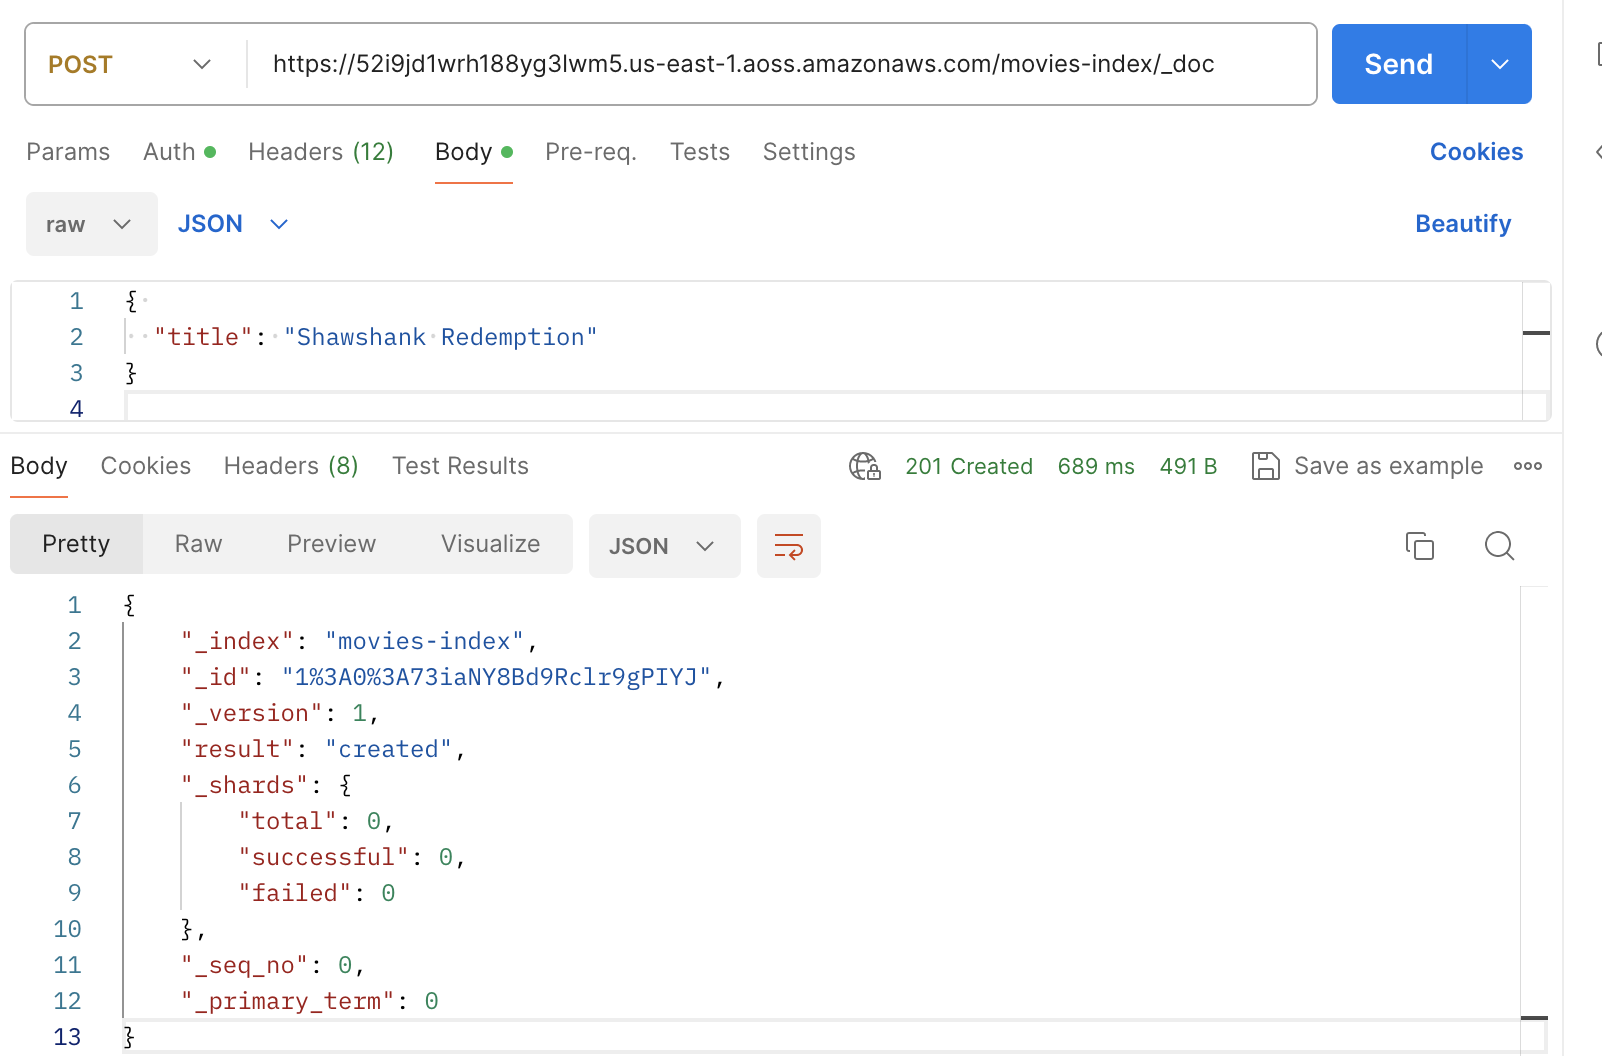
### 使用 Postman 创建索引
下图演示了如何使用 Postman 将请求发送到集合。有关身份验证的说明,请参阅 [Postman 中的使用 Amazon 签名进行身份验证工作流程](https://learning.postman.com/docs/sending-requests/authorization/aws-signature/)。