本文属于机器翻译版本。若本译文内容与英语原文存在差异,则一律以英文原文为准。
教程:使用 OpenSearch 服务和仪表板可视化客户支持电话 OpenSearch
本章是对以下情况的完整演练:企业收到一些客户支持呼叫,想要对其进行分析。每个呼叫的主题是什么? 多少是正面的? 多少是负面的? 经理如何搜索或查看这些呼叫的脚本?
手动工作流可能包括:员工倾听录音、记录每个呼叫的主题并确定每个客户的互动是否积极。
此类流程需要大量人力。假设每次呼叫的平均时间为 10 分钟,则每位员工每天只能接听 48 次呼叫。排除人为偏见,他们生成的数据将高度准确,但数据量 将达到最少:只有调用的主题和一个表示客户是否满意的布尔值。涉及任何内容 (如完整脚本) 都会占用大量时间。
使用 Amazon S3
虽然您可以按原样使用此演练,但其目的是在将它们编入服务中的 OpenSearch 索引之前,激发有关如何丰富您的 JSON 文档的想法。
估计成本
通常,执行本演练中步骤的成本低于 2 美元。本演练使用以下资源:
-
传输和存储数据少于 100 MB 的 S3 存储桶
要了解更多信息,请参阅 Amazon S3 定价
。 -
OpenSearch 具有一个
t2.medium实例和 10 GiB EBS 存储空间的服务域,可存放数小时要了解更多信息,请参阅 Amazon OpenSearch 服务定价
。 -
Amazon Transcribe 的几次呼叫
要了解更多信息,请参阅 Amazon Transcribe 定价
。 -
到 Amazon Comprehend 的几种自然语言处理呼叫
要了解更多信息,请参阅 Amazon Comprehend 定价
。
步骤 1:配置先决条件
继续操作之前,必须具有以下资源。
| 先决条件 | 说明 |
|---|---|
| 亚马逊 S3 存储桶 | 有关更多信息,请参阅 Amazon Simple Storage Service 用户指南中的创建存储桶。 |
| OpenSearch 服务域 | 数据的目的地。有关更多信息,请参阅创建 OpenSearch 服务域。 |
如果还没有这些资源,可以使用以下 Amazon CLI 命令创建这些资源:
aws s3 mb s3://my-transcribe-test --region us-west-2
aws opensearch create-domain --domain-name my-transcribe-test --engine-version OpenSearch_1.0 --cluster-config InstanceType=t2.medium.search,InstanceCount=1 --ebs-options EBSEnabled=true,VolumeType=standard,VolumeSize=10 --access-policies '{"Version": "2012-10-17","Statement":[{"Effect":"Allow","Principal":{"AWS":"arn:aws:iam::123456789012:root"},"Action":"es:*","Resource":"arn:aws:es:us-west-2:123456789012:domain/my-transcribe-test/*"}]}' --region us-west-2
注意
这些命令使用 us-west-2 区域,但您可以使用 Amazon Comprehend 支持的任何区域。要了解更多信息,请参阅 Amazon Web Services 一般参考。
步骤 2:复制示例代码
-
将以下 Python 3 示例代码复制并粘贴到名为
call-center.py的新文件中:import boto3 import datetime import json import requests from requests_aws4auth import AWS4Auth import time import urllib.request # Variables to update audio_file_name = '' # For example, 000001.mp3 bucket_name = '' # For example, my-transcribe-test domain = '' # For example, https://search-my-transcribe-test-12345.us-west-2.es.amazonaws.com index = 'support-calls' type = '_doc' region = 'us-west-2' # Upload audio file to S3. s3_client = boto3.client('s3') audio_file = open(audio_file_name, 'rb') print('Uploading ' + audio_file_name + '...') response = s3_client.put_object( Body=audio_file, Bucket=bucket_name, Key=audio_file_name ) # # Build the URL to the audio file on S3. # # Only for the us-east-1 region. # mp3_uri = 'https://' + bucket_name + '.s3.amazonaws.com/' + audio_file_name # Get the necessary details and build the URL to the audio file on S3. # For all other regions. response = s3_client.get_bucket_location( Bucket=bucket_name ) bucket_region = response['LocationConstraint'] mp3_uri = 'https://' + bucket_name + '.s3-' + bucket_region + '.amazonaws.com/' + audio_file_name # Start transcription job. transcribe_client = boto3.client('transcribe') print('Starting transcription job...') response = transcribe_client.start_transcription_job( TranscriptionJobName=audio_file_name, LanguageCode='en-US', MediaFormat='mp3', Media={ 'MediaFileUri': mp3_uri }, Settings={ 'ShowSpeakerLabels': True, 'MaxSpeakerLabels': 2 # assumes two people on a phone call } ) # Wait for the transcription job to finish. print('Waiting for job to complete...') while True: response = transcribe_client.get_transcription_job(TranscriptionJobName=audio_file_name) if response['TranscriptionJob']['TranscriptionJobStatus'] in ['COMPLETED', 'FAILED']: break else: print('Still waiting...') time.sleep(10) transcript_uri = response['TranscriptionJob']['Transcript']['TranscriptFileUri'] # Open the JSON file, read it, and get the transcript. response = urllib.request.urlopen(transcript_uri) raw_json = response.read() loaded_json = json.loads(raw_json) transcript = loaded_json['results']['transcripts'][0]['transcript'] # Send transcript to Comprehend for key phrases and sentiment. comprehend_client = boto3.client('comprehend') # If necessary, trim the transcript. # If the transcript is more than 5 KB, the Comprehend calls fail. if len(transcript) > 5000: trimmed_transcript = transcript[:5000] else: trimmed_transcript = transcript print('Detecting key phrases...') response = comprehend_client.detect_key_phrases( Text=trimmed_transcript, LanguageCode='en' ) keywords = [] for keyword in response['KeyPhrases']: keywords.append(keyword['Text']) print('Detecting sentiment...') response = comprehend_client.detect_sentiment( Text=trimmed_transcript, LanguageCode='en' ) sentiment = response['Sentiment'] # Build the Amazon OpenSearch Service URL. id = audio_file_name.strip('.mp3') url = domain + '/' + index + '/' + type + '/' + id # Create the JSON document. json_document = {'transcript': transcript, 'keywords': keywords, 'sentiment': sentiment, 'timestamp': datetime.datetime.now().isoformat()} # Provide all details necessary to sign the indexing request. credentials = boto3.Session().get_credentials() awsauth = AWS4Auth(credentials.access_key, credentials.secret_key, region, 'opensearchservice', session_token=credentials.token) # Index the document. print('Indexing document...') response = requests.put(url, auth=awsauth, json=json_document, headers=headers) print(response) print(response.json()) -
更新最初的六个变量。
-
使用以下命令安装所需的程序包:
pip install boto3 pip install requests pip install requests_aws4auth -
将您的 MP3 放在与相同的目录中
call-center.py并运行脚本。示例输出如下:$ python call-center.py Uploading 000001.mp3... Starting transcription job... Waiting for job to complete... Still waiting... Still waiting... Still waiting... Still waiting... Still waiting... Still waiting... Still waiting... Detecting key phrases... Detecting sentiment... Indexing document... <Response [201]> {u'_type': u'call', u'_seq_no': 0, u'_shards': {u'successful': 1, u'failed': 0, u'total': 2}, u'_index': u'support-calls4', u'_version': 1, u'_primary_term': 1, u'result': u'created', u'_id': u'000001'}
call-center.py 可执行许多操作:
-
该脚本会将音频文件(在本例中为,但是 Amazon Tr MP3 anscribe 支持多种格式)上传到您的 S3 存储桶。
-
它将音频文件的 URL 发送给 Amazon Transcribe 并等待转录任务完成。
完成转录任务所需的时间取决于音频文件的长度。假定需要数分钟而非数秒。
提示
要提高转录质量,可为 Amazon Transcribe. 配置自定义词汇表。
-
转录任务完成后,该脚本将提取脚本、将其剪裁为 5,000 个字符,并将其发送到 Amazon Comprehend 进行关键字和情绪分析。
-
最后,该脚本将完整的成绩单、关键字、情绪和当前时间戳添加到 JSON 文档中,并在 S OpenSearch ervice 中对其进行索引。
提示
LibriVox
(可选) 步骤 3:索引示例数据
如果您手头没有大量呼叫记录,可以为 sample-calls.zip 中的示例文档创建索引,其效果与 call-center.py 相当。
-
创建一个名为
bulk-helper.py的文件:import boto3 from opensearchpy import OpenSearch, RequestsHttpConnection import json from requests_aws4auth import AWS4Auth host = '' # For example, my-test-domain.us-west-2.es.amazonaws.com region = '' # For example, us-west-2 service = 'es' bulk_file = open('sample-calls.bulk', 'r').read() credentials = boto3.Session().get_credentials() awsauth = AWS4Auth(credentials.access_key, credentials.secret_key, region, service, session_token=credentials.token) search = OpenSearch( hosts = [{'host': host, 'port': 443}], http_auth = awsauth, use_ssl = True, verify_certs = True, connection_class = RequestsHttpConnection ) response = search.bulk(bulk_file) print(json.dumps(response, indent=2, sort_keys=True)) -
为
host和region更新最初的两个变量。 -
使用以下命令安装所需的程序包:
pip install opensearch-py -
下载并解压缩 sample-calls.zip。
-
将
sample-calls.bulk与bulk-helper.py放在同一目录中并运行帮助程序。示例输出如下:$ python bulk-helper.py { "errors": false, "items": [ { "index": { "_id": "1", "_index": "support-calls", "_primary_term": 1, "_seq_no": 42, "_shards": { "failed": 0, "successful": 1, "total": 2 }, "_type": "_doc", "_version": 9, "result": "updated", "status": 200 } },...], "took": 27 }
步骤 4:分析和可视化您的数据
现在,您已在 S OpenSearch ervice 中拥有一些数据,您可以使用 OpenSearch 仪表板将其可视化。
-
导航到
https://search-。domain.region.es.amazonaws.com/_dashboards -
在使用 OpenSearch 仪表板之前,您需要一个索引模式。控制面板使用索引模式来将分析范围缩小到一个或多个索引。要匹配
call-center.py创建的support-calls索引,转到堆栈管理、索引模式,并定义索引模式support*,然后选择下一步。 -
对于 Time Filter field name (时间筛选字段名称),选择 timestamp (时间戳)。
-
现在,您可以开始创建可视化了。选择 Visualize (可视化),然后添加新的可视化。
-
选择饼图和
support*索引模式。 -
默认可视化是基本的,因此请选择 Split Slices (拆分切片) 来创建更有趣的可视化。
对于 Aggregation,选择 Terms。对于 Field (字段),请选择 sentiment.keyword。然后选择 Apply changes (应用更改) 和 Save (保存)。

-
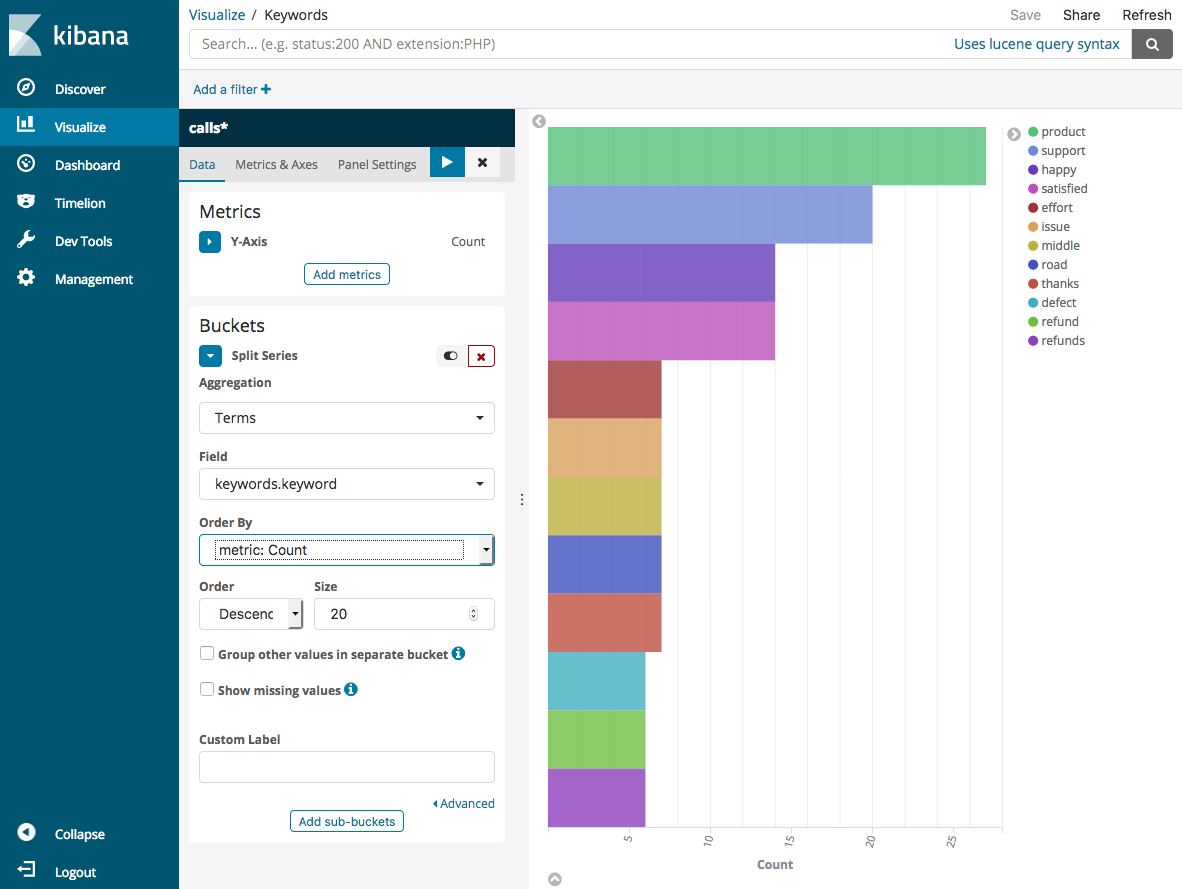
返回到 Visualize (可视化) 页面,然后添加其他可视化。这次请选择水平条形图。
-
选择 Split Series (拆分序列)。
对于 Aggregation,选择 Terms。对于 Field (字段),请选择 keywords.keyword,并将 Size (大小) 更改为 20。然后选择 Apply Changes (应用更改) 和 Save (保存)。
-
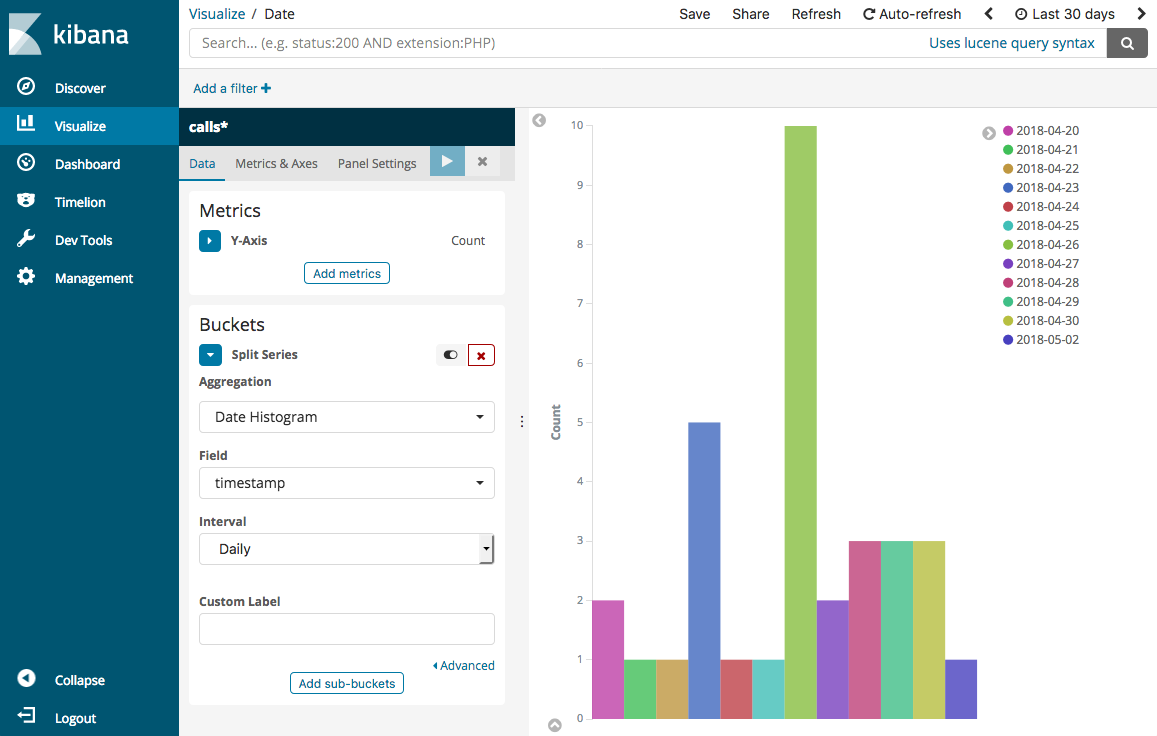
返回到 Visualize (可视化) 页面并添加一个最终的可视化、一个垂直条形图。
-
选择 Split Series (拆分序列)。对于 Aggregation (聚合),请选择 Date Histogram (日期直方图)。对于 Field (字段),请选择 timestamp (时间戳) 并将 Interval (间隔) 更改为 Daily (每日)。
-
选择 Metrics & Axes (指标和轴),并将 Mode (模式) 更改为 normal (正常)。
-
选择 Apply Changes (应用更改) 和 Save (保存)。
-
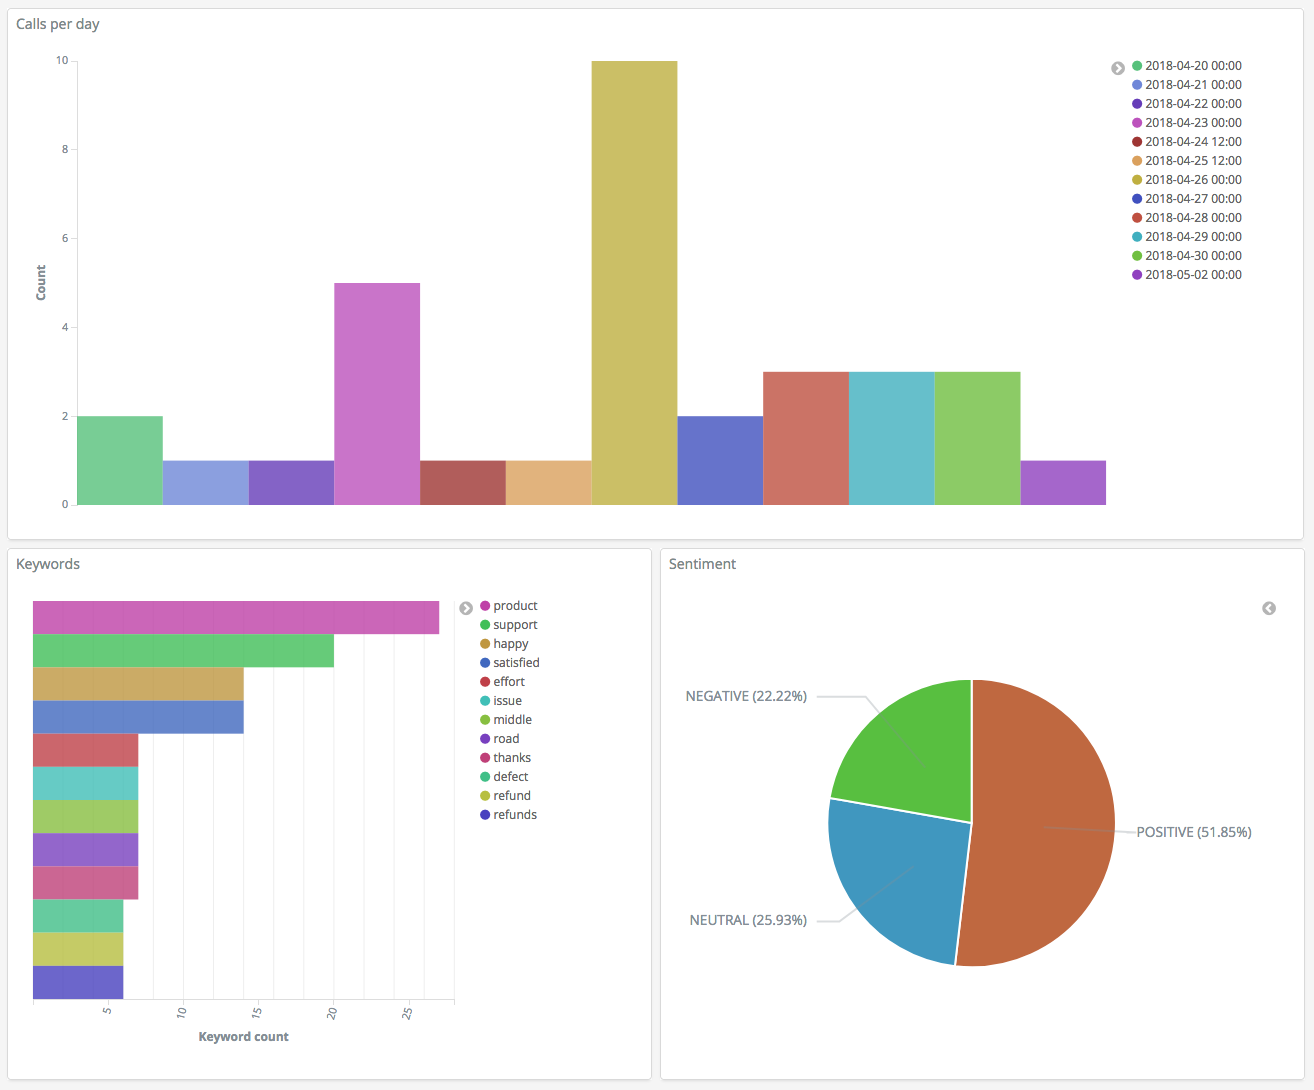
现在,您有三个可视化内容,可以将它们添加到控制面板。选择 Dashboard (控制面板),创建一个控制面板,并添加您的可视化内容。
步骤 5:清除资源和后续步骤
为避免不必要的费用,请删除 S3 存储桶和 OpenSearch 服务域。要了解更多信息,请参阅亚马逊简单存储服务用户指南中的删除存储桶和本指南中的删除 OpenSearch 服务域。
与 MP3 文件相比,转录需要的磁盘空间要少得多。您可以缩短 MP3 保留期限(例如,从三个月的通话录音缩短到一个月),保留多年的笔录,同时还能节省存储成本。
您还可以使用 Amazon Step Functions 和 Lambda 自动执行转录过程,在索引之前添加其他元数据,或者制作更复杂的可视化效果以适合您的确切用例。