使用 Amazon CLI 创建具有私有子网和 NAT 网关的 VPC
本教程将演示如何使用 Amazon CLI 创建可用于生产环境的服务器的 VPC。为了提高故障恢复能力,您需要使用一个自动扩缩组和一个应用程序负载均衡器在两个可用区中部署服务器。为了提高安全性,您需要在私有子网中部署服务器。服务器将通过负载均衡器接收请求,并且可以使用 NAT 网关连接到互联网。为了提高故障恢复能力,您需要在这两个可用区中分别部署 NAT 网关。
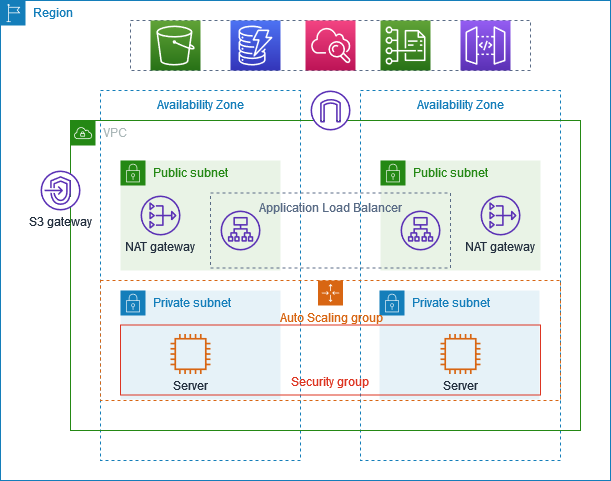
下图概括了本教程中包含的资源。此 VPC 在两个可用区中拥有公有和私有子网。每个公有子网都包含一个 NAT 网关和一个负载均衡器节点。服务器在私有子网中运行,使用自动扩缩组启动和终止,并接收来自负载均衡器的流量。服务器可以使用 NAT 网关连接到互联网。服务器可以使用网关 VPC 端点连接到 Amazon S3。
先决条件
开始本教程之前,您需要:
-
已安装并配置 Amazon CLI,且具有创建 VPC 资源、EC2 实例、负载均衡器和自动扩缩组的权限。有关安装 Amazon CLI 的信息,请参阅安装或更新 Amazon CLI 的最新版本。
-
掌握 VPC 概念的基本知识,包括子网、路由表和互联网网关。
-
已安装
jq命令行 JSON 处理器。这将用于解析 Amazon CLI 命令的输出。有关安装 jq 的信息,请参阅 Download jq。 -
拥有要创建资源所需的足够服务配额,包括:
-
至少 2 个可用的弹性 IP 地址
-
至少 2 个 NAT 网关
-
至少 1 个 VPC
-
至少 4 个子网
-
至少 1 应用程序负载均衡器
估算费用:本教程中创建的资源将让您的 Amazon 账户产生费用:NAT 网关:每小时约 0.045 美元,外加数据处理费用;弹性 IP 地址:与正在运行的实例关联时免费,未与 EC2 实例关联时每小时约 0.005 美元:费用因实例类型而异(本教程使用的是 t3.micro 实例)应用程序负载均衡器:每小时约 0.0225 美元,外加数据处理费用
创建 VPC 和子网
首先,您将创建 CIDR 块为 10.0.0.0/16 的 VPC,该 CIDR 块最多可提供 65536 个 IP 地址。
# Create a VPC with CIDR block 10.0.0.0/16
aws ec2 create-vpc --cidr-block 10.0.0.0/16 --tag-specifications 'ResourceType=vpc,Tags=[{Key=Name,Value=ProductionVPC}]'
该命令返回的输出类似于下方内容:
{
    "Vpc": {
        "CidrBlock": "10.0.0.0/16",
        "DhcpOptionsId": "dopt-abcd1234",
        "State": "pending",
        "VpcId": "vpc-abcd1234",
        "OwnerId": "123456789012",
        "InstanceTenancy": "default",
        "Ipv6CidrBlockAssociationSet": [],
        "CidrBlockAssociationSet": [
            {
                "AssociationId": "vpc-cidr-assoc-abcd1234",
                "CidrBlock": "10.0.0.0/16",
                "CidrBlockState": {
                    "State": "associated"
                }
            }
        ],
        "IsDefault": false,
        "Tags": [
            {
                "Key": "Name",
                "Value": "ProductionVPC"
            }
        ]
    }
}
记下输出中的 VPC ID(例如 vpc-abcd1234)。您将在后续命令中使用此 ID。
接下来,您将在所在区域中确定两个可用区,用以创建弹性架构。
# Get available Availability Zones
aws ec2 describe-availability-zones --query 'AvailabilityZones[0:2].ZoneName' --output text
该命令返回的输出类似于下方内容:
us-east-1a us-east-1b
现在,创建四个子网:两个用于负载均衡器和 NAT 网关的公有子网,以及两个用于应用程序服务器的私有子网。将 vpc-abcd1234 替换为实际的 VPC ID,并将 us-east-1a 和 us-east-1b 替换为实际的可用区。
# Create public subnet in first AZ
aws ec2 create-subnet \
  --vpc-id vpc-abcd1234 \
  --cidr-block 10.0.0.0/24 \
  --availability-zone us-east-1a \
  --tag-specifications 'ResourceType=subnet,Tags=[{Key=Name,Value=PublicSubnet1}]'

# Create private subnet in first AZ
aws ec2 create-subnet \
  --vpc-id vpc-abcd1234 \
  --cidr-block 10.0.1.0/24 \
  --availability-zone us-east-1a \
  --tag-specifications 'ResourceType=subnet,Tags=[{Key=Name,Value=PrivateSubnet1}]'

# Create public subnet in second AZ
aws ec2 create-subnet \
  --vpc-id vpc-abcd1234 \
  --cidr-block 10.0.2.0/24 \
  --availability-zone us-east-1b \
  --tag-specifications 'ResourceType=subnet,Tags=[{Key=Name,Value=PublicSubnet2}]'

# Create private subnet in second AZ
aws ec2 create-subnet \
  --vpc-id vpc-abcd1234 \
  --cidr-block 10.0.3.0/24 \
  --availability-zone us-east-1b \
  --tag-specifications 'ResourceType=subnet,Tags=[{Key=Name,Value=PrivateSubnet2}]'
每个命令返回的输出均包含子网 ID。记下这些 ID,以便在后续命令中使用:
-
公有子网 1:
subnet-abcd1234 -
私有子网 1:
subnet-abcd5678 -
公有子网 2:
subnet-efgh1234 -
私有子网 2:
subnet-efgh5678
创建和配置互联网连接
在本部分中,您将创建互联网网关,以允许 VPC 与互联网之间进行通信,并将其附加到 VPC。
# Create an Internet Gateway
aws ec2 create-internet-gateway --tag-specifications 'ResourceType=internet-gateway,Tags=[{Key=Name,Value=ProductionIGW}]'
该命令返回的输出包含互联网网关 ID。记下此 ID(例如 igw-abcd1234)。
将互联网网关附加到 VPC。将 igw-abcd1234 替换为实际的互联网网关 ID,并将 vpc-abcd1234 替换为实际的 VPC ID。
# Attach the Internet Gateway to the VPC
aws ec2 attach-internet-gateway --internet-gateway-id igw-abcd1234 --vpc-id vpc-abcd1234
接下来,为公有子网与私有子网创建路由表。将 vpc-abcd1234 替换为实际的 VPC ID。
# Create a route table for public subnets
aws ec2 create-route-table --vpc-id vpc-abcd1234 --tag-specifications 'ResourceType=route-table,Tags=[{Key=Name,Value=PublicRouteTable}]'

# Create route table for private subnet in first AZ
aws ec2 create-route-table --vpc-id vpc-abcd1234 --tag-specifications 'ResourceType=route-table,Tags=[{Key=Name,Value=PrivateRouteTable1}]'

# Create route table for private subnet in second AZ
aws ec2 create-route-table --vpc-id vpc-abcd1234 --tag-specifications 'ResourceType=route-table,Tags=[{Key=Name,Value=PrivateRouteTable2}]'
每个命令返回的输出均包含路由表 ID。记下这些 ID:
-
公有路由表:
rtb-abcd1234 -
私有路由表 1:
rtb-efgh1234 -
私有路由表 2:
rtb-ijkl1234
在公有路由表中添加一条指向互联网网关的路由,以启用互联网访问。将 rtb-abcd1234 替换为实际的公有路由表 ID,并将 igw-abcd1234 替换为实际的互联网网关 ID。
# Add a route to the Internet Gateway
aws ec2 create-route --route-table-id rtb-abcd1234 --destination-cidr-block 0.0.0.0/0 --gateway-id igw-abcd1234
将子网与其各自的路由表关联。将路由表 ID 和子网 ID 替换为实际的 ID。
# Associate public subnets with the public route table
aws ec2 associate-route-table --route-table-id rtb-abcd1234 --subnet-id subnet-abcd1234
aws ec2 associate-route-table --route-table-id rtb-abcd1234 --subnet-id subnet-efgh1234

# Associate private subnets with their respective route tables
aws ec2 associate-route-table --route-table-id rtb-efgh1234 --subnet-id subnet-abcd5678
aws ec2 associate-route-table --route-table-id rtb-ijkl1234 --subnet-id subnet-efgh5678
创建 NAT 网关
NAT 网关允许私有子网中的实例连接到互联网或其他 Amazon 服务,但是阻止互联网启动与这些实例的连接。首先,为 NAT 网关分配弹性 IP 地址。
# Allocate Elastic IP for NAT Gateway in first AZ
aws ec2 allocate-address --domain vpc --tag-specifications 'ResourceType=elastic-ip,Tags=[{Key=Name,Value=NAT1-EIP}]'

# Allocate Elastic IP for NAT Gateway in second AZ
aws ec2 allocate-address --domain vpc --tag-specifications 'ResourceType=elastic-ip,Tags=[{Key=Name,Value=NAT2-EIP}]'
每个命令返回的输出均包含分配 ID。记下这些 ID:
-
EIP 1 分配 ID:
eipalloc-abcd1234 -
EIP 2 分配 ID:
eipalloc-efgh1234
在每个公有子网中创建 NAT 网关。将子网 ID 和分配 ID 替换为实际的 ID。
# Create NAT Gateway in public subnet of first AZ
aws ec2 create-nat-gateway \
  --subnet-id subnet-abcd1234 \
  --allocation-id eipalloc-abcd1234 \
  --tag-specifications 'ResourceType=natgateway,Tags=[{Key=Name,Value=NAT-Gateway1}]'

# Create NAT Gateway in public subnet of second AZ
aws ec2 create-nat-gateway \
  --subnet-id subnet-efgh1234 \
  --allocation-id eipalloc-efgh1234 \
  --tag-specifications 'ResourceType=natgateway,Tags=[{Key=Name,Value=NAT-Gateway2}]'
每个命令返回的输出均包含 NAT 网关 ID。记下这些 ID:
-
NAT 网关 1:
nat-abcd1234 -
NAT 网关 2:
nat-efgh1234
NAT 网关需要几分钟时间预置。等待 NAT 网关变为可用后,再继续操作。将 NAT 网关 ID 替换为实际的 ID。
# Wait for NAT Gateways to be available
aws ec2 wait nat-gateway-available --nat-gateway-ids nat-abcd1234
aws ec2 wait nat-gateway-available --nat-gateway-ids nat-efgh1234
在私有路由表中添加指向 NAT 网关的路由,以允许私有子网中的实例访问互联网。将路由表 ID 和 NAT 网关 ID 替换为实际的 ID。
# Add route to NAT Gateway 1 in private route table 1
aws ec2 create-route \
  --route-table-id rtb-efgh1234 \
  --destination-cidr-block 0.0.0.0/0 \
  --nat-gateway-id nat-abcd1234

# Add route to NAT Gateway 2 in private route table 2
aws ec2 create-route \
  --route-table-id rtb-ijkl1234 \
  --destination-cidr-block 0.0.0.0/0 \
  --nat-gateway-id nat-efgh1234
为 Amazon S3 创建 VPC 端点
Amazon S3 的 VPC 端点允许私有子网中的实例无需通过 NAT 网关即可访问 S3,这可以降低数据传输成本并提供更好的网络性能。将 vpc-abcd1234 替换为实际的 VPC ID,并将路由表 ID 替换为实际的 ID。
# Get the prefix list ID for S3 in your region
S3_PREFIX_LIST_ID=$(aws ec2 describe-prefix-lists --filters "Name=prefix-list-name,Values=com.amazonaws.$(aws configure get region).s3" --query 'PrefixLists[0].PrefixListId' --output text)

# Create the VPC endpoint for S3
aws ec2 create-vpc-endpoint \
  --vpc-id vpc-abcd1234 \
  --service-name com.amazonaws.$(aws configure get region).s3 \
  --route-table-ids rtb-efgh1234 rtb-ijkl1234 \
  --tag-specifications 'ResourceType=vpc-endpoint,Tags=[{Key=Name,Value=S3-Endpoint}]'
该命令返回的输出包含 VPC 端点 ID。记下此 ID(例如 vpce-abcd1234)。
配置安全组
安全组充当实例的虚拟防火墙以控制入站和出站流量。为负载均衡器创建安全组,以允许来自任何地方的入站 HTTP 流量。将 vpc-abcd1234 替换为实际的 VPC ID。
# Create security group for the load balancer
aws ec2 create-security-group \
  --group-name LoadBalancerSG \
  --description "Security group for the load balancer" \
  --vpc-id vpc-abcd1234 \
  --tag-specifications 'ResourceType=security-group,Tags=[{Key=Name,Value=LoadBalancerSG}]'
该命令返回的输出包含安全组 ID。记下此 ID(例如 sg-abcd1234)。
允许入站 HTTP 流量流向负载均衡器。将 sg-abcd1234 替换为实际的负载均衡器安全组 ID。
# Allow inbound HTTP traffic from anywhere
aws ec2 authorize-security-group-ingress \
  --group-id sg-abcd1234 \
  --protocol tcp \
  --port 80 \
  --cidr 0.0.0.0/0
为应用程序服务器创建安全组,仅允许来自负载均衡器的入站流量。将 vpc-abcd1234 替换为实际的 VPC ID。
# Create security group for the application servers
aws ec2 create-security-group \
  --group-name AppServerSG \
  --description "Security group for the application servers" \
  --vpc-id vpc-abcd1234 \
  --tag-specifications 'ResourceType=security-group,Tags=[{Key=Name,Value=AppServerSG}]'
该命令返回的输出包含安全组 ID。记下此 ID(例如 sg-efgh1234)。
允许入站 HTTP 流量从负载均衡器安全组流向应用程序服务器。将 sg-efgh1234 替换为实际的应用程序服务器安全组 ID,并将 sg-abcd1234 替换为实际的负载均衡器安全组 ID。
# Allow inbound HTTP traffic from the load balancer security group
aws ec2 authorize-security-group-ingress \
  --group-id sg-efgh1234 \
  --protocol tcp \
  --port 80 \
  --source-group sg-abcd1234
为 EC2 实例创建启动模板
启动模板包含启动实例的配置信息,例如 AMI ID、实例类型和安全组。首先,创建一个将在实例启动时执行的用户数据脚本。
cat > user-data.sh << 'EOF'
#!/bin/bash
yum update -y
yum install -y httpd
systemctl start httpd
systemctl enable httpd
echo "<h1>Hello from $(hostname -f) in $(curl -s http://169.254.169.254/latest/meta-data/placement/availability-zone)</h1>" > /var/www/html/index.html
EOF
以 Base64 格式为用户数据脚本编码。
USER_DATA=$(base64 -w 0 user-data.sh)
查看最新的 Amazon Linux 2 AMI ID。
# Get the latest Amazon Linux 2 AMI ID
aws ec2 describe-images --owners amazon --filters "Name=name,Values=amzn2-ami-hvm-*-x86_64-gp2" "Name=state,Values=available" --query 'sort_by(Images, &CreationDate)[-1].ImageId' --output text
创建启动模板,其中包含 AMI ID、实例类型、安全组和用户数据。将 sg-efgh1234 替换为实际的应用程序服务器安全组 ID,并将 $AMI_ID 和 $USER_DATA 替换为从之前命令获取的值。
# Create a launch template
aws ec2 create-launch-template \
  --launch-template-name AppServerTemplate \
  --version-description "Initial version" \
  --tag-specifications 'ResourceType=launch-template,Tags=[{Key=Name,Value=AppServerTemplate}]' \
  --launch-template-data '{
    "NetworkInterfaces": [{
      "DeviceIndex": 0,
      "Groups": ["sg-efgh1234"],
      "DeleteOnTermination": true
    }],
    "ImageId": "ami-abcd1234",
    "InstanceType": "t3.micro",
    "UserData": "IyEvYmluL2Jhc2gKeXVtIHVwZGF0ZSAteQp5dW0gaW5zdGFsbCAteSBodHRwZApzeXN0ZW1jdGwgc3RhcnQgaHR0cGQKc3lzdGVtY3RsIGVuYWJsZSBodHRwZAplY2hvICI8aDE+SGVsbG8gZnJvbSAkKGhvc3RuYW1lIC1mKSBpbiAkKGN1cmwgLXMgaHR0cDovLzE2OS4yNTQuMTY5LjI1NC9sYXRlc3QvbWV0YS1kYXRhL3BsYWNlbWVudC9hdmFpbGFiaWxpdHktem9uZSk8L2gxPiIgPiAvdmFyL3d3dy9odG1sL2luZGV4Lmh0bWw=",
    "TagSpecifications": [{
      "ResourceType": "instance",
      "Tags": [{
        "Key": "Name",
        "Value": "AppServer"
      }]
    }]
  }'
创建负载均衡器和目标组
目标组使用指定的协议和端口,将请求路由到已注册的目标(例如 EC2 实例)。为应用程序服务器创建目标组。将 vpc-abcd1234 替换为实际的 VPC ID。
# Create a target group
aws elbv2 create-target-group \
  --name AppTargetGroup \
  --protocol HTTP \
  --port 80 \
  --vpc-id vpc-abcd1234 \
  --target-type instance \
  --health-check-protocol HTTP \
  --health-check-path / \
  --health-check-port traffic-port
该命令返回的输出包含目标组 ARN。记下此 ARN(例如 arn:aws:elasticloadbalancing:us-east-1:123456789012:targetgroup/AppTargetGroup/abcd1234)。
在公有子网中创建应用程序负载均衡器。将子网 ID 和安全组 ID 替换为实际的 ID。
# Create a load balancer
aws elbv2 create-load-balancer \
  --name AppLoadBalancer \
  --subnets subnet-abcd1234 subnet-efgh1234 \
  --security-groups sg-abcd1234 \
  --tags Key=Name,Value=AppLoadBalancer
该命令返回的输出包含负载均衡器 ARN。记下此 ARN(例如 arn:aws:elasticloadbalancing:us-east-1:123456789012:loadbalancer/app/AppLoadBalancer/abcd1234)。
等待负载均衡器启用后,再继续操作。将 arn:aws:elasticloadbalancing:us-east-1:123456789012:loadbalancer/app/AppLoadBalancer/abcd1234 替换为实际的负载均衡器 ARN。
# Wait for load balancer to be active
aws elbv2 wait load-balancer-available \
  --load-balancer-arns arn:aws:elasticloadbalancing:us-east-1:123456789012:loadbalancer/app/AppLoadBalancer/abcd1234
为负载均衡器创建侦听器,以将 HTTP 流量转发到目标组。将负载均衡器 ARN 和目标组 ARN 替换为实际的 ARN。
# Create a listener
aws elbv2 create-listener \
  --load-balancer-arn arn:aws:elasticloadbalancing:us-east-1:123456789012:loadbalancer/app/AppLoadBalancer/abcd1234 \
  --protocol HTTP \
  --port 80 \
  --default-actions Type=forward,TargetGroupArn=arn:aws:elasticloadbalancing:us-east-1:123456789012:targetgroup/AppTargetGroup/abcd1234
创建 自动扩缩组
自动扩缩组由一组 Amazon EC2 实例组成,这是实例视为一个逻辑组以实现自动扩缩和管理。创建一个使用启动模板并将实例放置在私有子网中的自动扩缩组。将子网 ID 和目标组 ARN 替换为实际的 ID 和 ARN。
# Create an Auto Scaling group
aws autoscaling create-auto-scaling-group \
  --auto-scaling-group-name AppAutoScalingGroup \
  --launch-template LaunchTemplateName=AppServerTemplate,Version='$Latest' \
  --min-size 2 \
  --max-size 4 \
  --desired-capacity 2 \
  --vpc-zone-identifier "subnet-abcd5678,subnet-efgh5678" \
  --target-group-arns arn:aws:elasticloadbalancing:us-east-1:123456789012:targetgroup/AppTargetGroup/abcd1234 \
  --health-check-type ELB \
  --health-check-grace-period 300 \
  --tags Key=Name,Value=AppServer,PropagateAtLaunch=true
测试配置
自动扩缩组启动实例并通过运行状况检查后,即可测试负载均衡器。获取负载均衡器的 DNS 名称。将负载均衡器 ARN 替换为实际的 ARN。
# Get the DNS name of the load balancer
aws elbv2 describe-load-balancers \
  --load-balancer-arns arn:aws:elasticloadbalancing:us-east-1:123456789012:loadbalancer/app/AppLoadBalancer/abcd1234 \
  --query "LoadBalancers[0].DNSName" \
  --output text
使用 curl 通过负载均衡器名称测试应用程序。
curl http://LoadBalancerName
如果您多次刷新页面,应该会看到来自不同可用区中不同实例的响应。
清理资源
完成本教程后,请删除所有资源以避免产生费用。将所有 ID 替换为实际的资源 ID。
# Delete the Auto Scaling group
aws autoscaling delete-auto-scaling-group \
  --auto-scaling-group-name AppAutoScalingGroup \
  --force-delete

# Wait for the Auto Scaling group to be deleted
sleep 60

# Delete the load balancer
aws elbv2 delete-load-balancer \
  --load-balancer-arn arn:aws:elasticloadbalancing:us-east-1:123456789012:loadbalancer/app/AppLoadBalancer/abcd1234

# Wait for the load balancer to be deleted
sleep 30

# Delete the target group
aws elbv2 delete-target-group \
  --target-group-arn arn:aws:elasticloadbalancing:us-east-1:123456789012:targetgroup/AppTargetGroup/abcd1234

# Delete the launch template
aws ec2 delete-launch-template \
  --launch-template-name AppServerTemplate

# Delete the NAT Gateways
aws ec2 delete-nat-gateway --nat-gateway-id nat-abcd1234
aws ec2 delete-nat-gateway --nat-gateway-id nat-efgh1234

# Wait for the NAT Gateways to be deleted
sleep 90

# Release the Elastic IPs
aws ec2 release-address --allocation-id eipalloc-abcd1234
aws ec2 release-address --allocation-id eipalloc-efgh1234

# Delete the VPC endpoint
aws ec2 delete-vpc-endpoints --vpc-endpoint-ids vpce-abcd1234

# Wait for security group dependencies to clear
sleep 30

# Delete the security groups
aws ec2 delete-security-group --group-id sg-efgh1234
aws ec2 delete-security-group --group-id sg-abcd1234

# Detach the Internet Gateway
aws ec2 detach-internet-gateway --internet-gateway-id igw-abcd1234 --vpc-id vpc-abcd1234

# Delete the Internet Gateway
aws ec2 delete-internet-gateway --internet-gateway-id igw-abcd1234

# Delete the route tables
aws ec2 delete-route-table --route-table-id rtb-efgh1234
aws ec2 delete-route-table --route-table-id rtb-ijkl1234
aws ec2 delete-route-table --route-table-id rtb-abcd1234

# Delete the subnets
aws ec2 delete-subnet --subnet-id subnet-abcd1234
aws ec2 delete-subnet --subnet-id subnet-efgh1234
aws ec2 delete-subnet --subnet-id subnet-abcd5678
aws ec2 delete-subnet --subnet-id subnet-efgh5678

# Delete the VPC
aws ec2 delete-vpc --vpc-id vpc-abcd1234
后续步骤
现在,您已经创建包含私有子网和 NAT 网关的 VPC,可能还想探索以下相关主题: